1. 概述
本教程將探索 <em ChatClient</em>> 的流暢 API,它是 Spring AI 模塊 1.0.0 M1 的一項特性。
<em ChatClient</em>> 接口來自 Spring AI 模塊,它允許與 AI 模型進行通信,使用户能夠發送提示並接收結構化的響應。它遵循構建模式,其 API 類似於 <em WebClient</em>>、<em restClient</em>> 和 <em JdbcClient</em>>。
2. 通過 ChatClient 執行提示
我們可以將客户端作為 Spring Boot 中的自動配置 Bean 使用,也可以通過程序創建實例。
首先,我們需要將 spring-ai-openai-spring-boot-starter 依賴添加到我們的 pom.xml 中:
<dependency>
    <groupId>org.springframework.ai</groupId>
    <artifactId>spring-ai-openai-spring-boot-starter</artifactId>
</dependency>
通過此方法,我們可以將 實例注入到我們的 Spring 管理的組件中:
@RestController
@RequestMapping("api/articles")
class BlogsController {

    private final ChatClient chatClient;

    public BlogsController(ChatClient.Builder chatClientBuilder) {
        this.chatClient = chatClientBuilder.build();
    }

    // ...
}
現在,讓我們創建一個簡單的端點,它接受問題作為查詢參數,並將提示發送到 AI:
@GetMapping("v1")
String askQuestion(@RequestParam(name = "question") String question) {
    return chatClient.prompt()
      .user(question)
      .call()
      .chatResponse()
      .getResult()
      .getOutput()
      .getContent();
}如我們所見,流暢的 ChatClient 允許我們從用户的輸入 String 中輕鬆創建提示請求,調用 API 並以文本形式檢索響應內容.
此外,如果我們僅對響應體感興趣,並且不需要像狀態碼或標頭等元數據,我們可以通過使用 content() 方法來分組最後四步來簡化代碼:
@GetMapping("v1")
String askQuestion(@RequestParam(name = "question") String question) {
return chatClient.prompt()
.user(question)
.call()
.content();
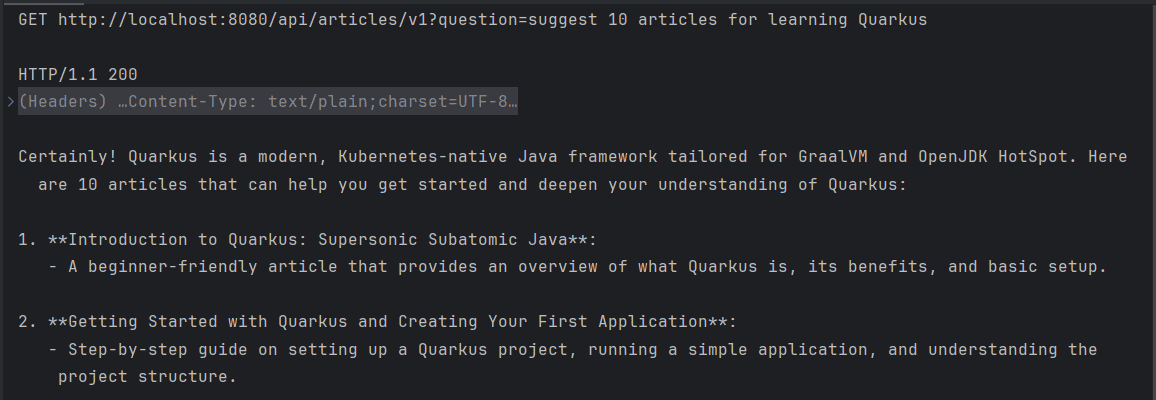
}如果現在發送一個 GET 請求,我們將會收到一個沒有明確結構的響應,類似於通過瀏覽器訪問 ChatGPT 的默認輸出:
3. 將響應映射到特定格式
正如我們所見,<em >ChatClient </em >接口簡化了將用户查詢轉發到聊天模型以及將響應返回的過程。`然而,在大多數情況下,我們希望模型的輸出為結構化格式,以便將其序列化為JSON。
API 暴露了一個 <em >entity() </em >方法,允許我們定義模型輸出的特定數據結構。讓我們修改代碼以確保它返回一個 <em >Article </em >對象的列表,每個對象包含標題和一組標籤:
record Article(String title, Set<String> tags) {
}
@GetMapping("v2")
List<Article> askQuestionAndRetrieveArticles(@RequestParam(name = "question") String question) {
return chatClient.prompt()
.user(question)
.call()
.entity(new ParameterizedTypeReference<List<Article>>() {});
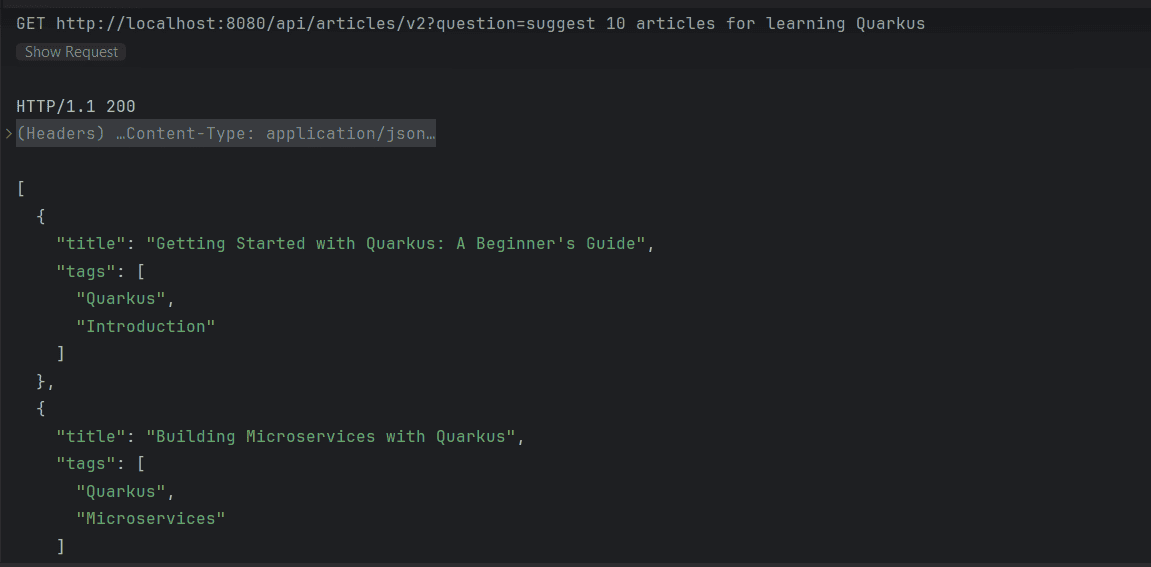
}如果現在執行該請求,我們期望端點返回一個有效的 JSON 列表中的 Article 推薦內容:
4. 提供額外上下文
我們已經學習瞭如何使用 Spring AI 模塊創建提示、將它們發送到 AI 模型以及接收結構化響應。然而,由我們的 REST API 返回的文章推薦可能是虛構的,可能並不存在於現實中或我們的網站上。
為了解決這個問題,<em >ChatClient</em> 利用檢索增強生成 (RAG) 模式,將數據檢索與生成模型相結合,從而提供更準確的響應。我們將使用向量存儲來利用 RAG 模式,並將其加載與我們的用例相關的文檔。
首先,我們將創建一個 <em >VectorStore</em>,並在類初始化期間將其加載與從本地文件加載的增強數據:
@RestController
@RequestMapping("api/articles")
public class BlogsController {

    private final ChatClient chatClient;
    private final VectorStore vectorStore;

    public BlogsController(ChatClient.Builder chatClientBuilder, EmbeddingModel embeddingModel) throws IOException {
        this.chatClient = chatClientBuilder.build();
        this.vectorStore = new SimpleVectorStore(embeddingModel);
        initContext();
    }

    void initContext() throws IOException {
        List<Document> documents = Files.readAllLines(Path.of("src/main/resources/articles.txt"))
          .stream()
          .map(Document::new)
          .toList();

        vectorStore.add(documents);
    }

    // ...
}
如我們所見,我們從 articles.txt 讀取了所有條目,併為該文件中的每一行創建了一個新的 Document。無需贅述,我們如果需要,可以使用任何數據源,而無需依賴文件。
接下來,我們將使用 QuestionAnswerAdvisor 包裹 VectorStore 提供增強後的數據。
@GetMapping("v3")
List<Article> askQuestionWithContext(@RequestParam(name = "question") String question) {
return chatClient.prompt()
.advisors(new QuestionAnswerAdvisor(vectorStore, SearchRequest.defaults()))
.user(question)
.call()
.entity(new ParameterizedTypeReference<List<Article>>() {});
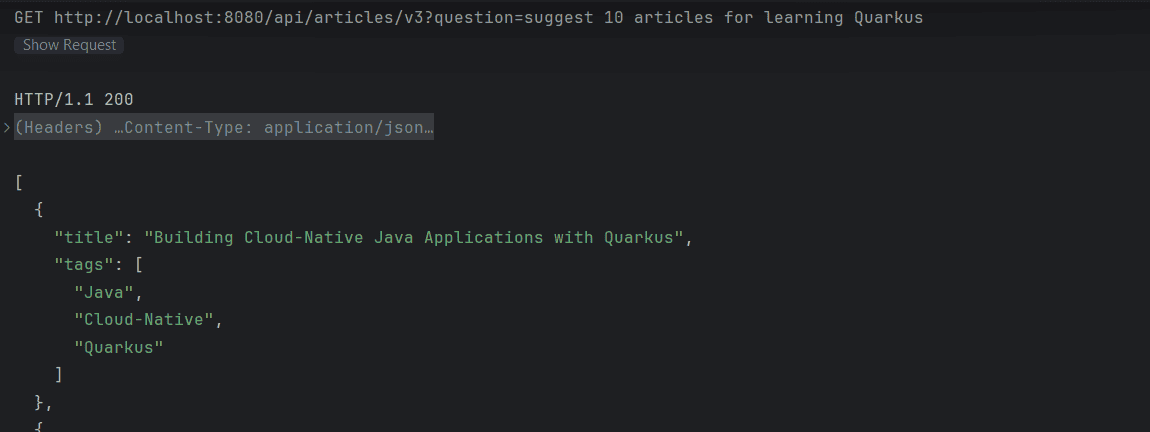
}因此,我們的應用程序現在僅從增強的上下文中返回數據:
5. 結論
本文介紹了 Spring AI 的 ChatClient。我們首先通過向模型發送簡單的用户查詢並讀取其返回的文本響應來開始。隨後,我們通過檢索模型的響應,將其轉換為特定的、結構化的格式,來增強了我們的解決方案。
最後,我們學習瞭如何使用文檔集合加載模型的上下文,從而基於我們的數據提供準確的響應。我們通過使用 VectorStore 和 QuestionAnswerAdvisor 實現了這一點。
