1. 概述
Spring Security 5 為 Spring Webflux 的非阻塞式 WebClient 類提供了 OAuth2 支持。
在本教程中,我們將分析使用該類訪問受保護資源的各種方法。我們還將深入瞭解 Spring 如何處理 OAuth2 授權過程。
2. 場景搭建
按照 OAuth2 規範,除了本教程的主題——我們的客户端之外,我們自然需要一個授權服務器和一個資源服務器。
我們可以使用知名授權提供商,如 Google 或 Github。為了更好地理解 OAuth2 客户端的作用,我們也可以使用自己的服務器,並提供實現參考。由於這與本教程的主題無關,因此我們不會詳細介紹配置,只需知道以下內容:
- 授權服務器將:
- 運行在端口 8081
- 暴露 /oauth/authorize, /oauth/token 和 oauth/check_token 端點,以執行所需的功能
- 配置了示例用户(例如:john/123)和一個 OAuth 客户端(fooClientIdPassword/secret)
- 資源服務器將與身份驗證服務器分離,並且:
- 運行在端口 8082
- 提供一個簡單的 Foo 對象資源,通過 /foos/{id} 端點進行訪問
注意:需要理解的是,許多 Spring 項目提供不同的 OAuth 相關功能和實現。我們可以查看 此 Spring 項目矩陣,瞭解每個庫提供的內容。
WebClient 以及所有相關的 reactive Webflux 功能都屬於 Spring Security 5 項目的一部分。因此,我們將主要在整個教程中使用該框架。
3. Spring Security 5 內部機制
為了充分理解我們即將討論的示例,瞭解 Spring Security 如何內部管理 OAuth2 功能至關重要。
該框架提供以下功能:
- 依賴 OAuth2 提供方賬户,將用户登錄到應用程序
- 配置我們的服務作為 OAuth2 客户端
- 管理授權流程
- 自動刷新令牌
- 如果需要,存儲憑據
以下圖表描述了 Spring Security 的 OAuth2 世界中的一些基本概念:
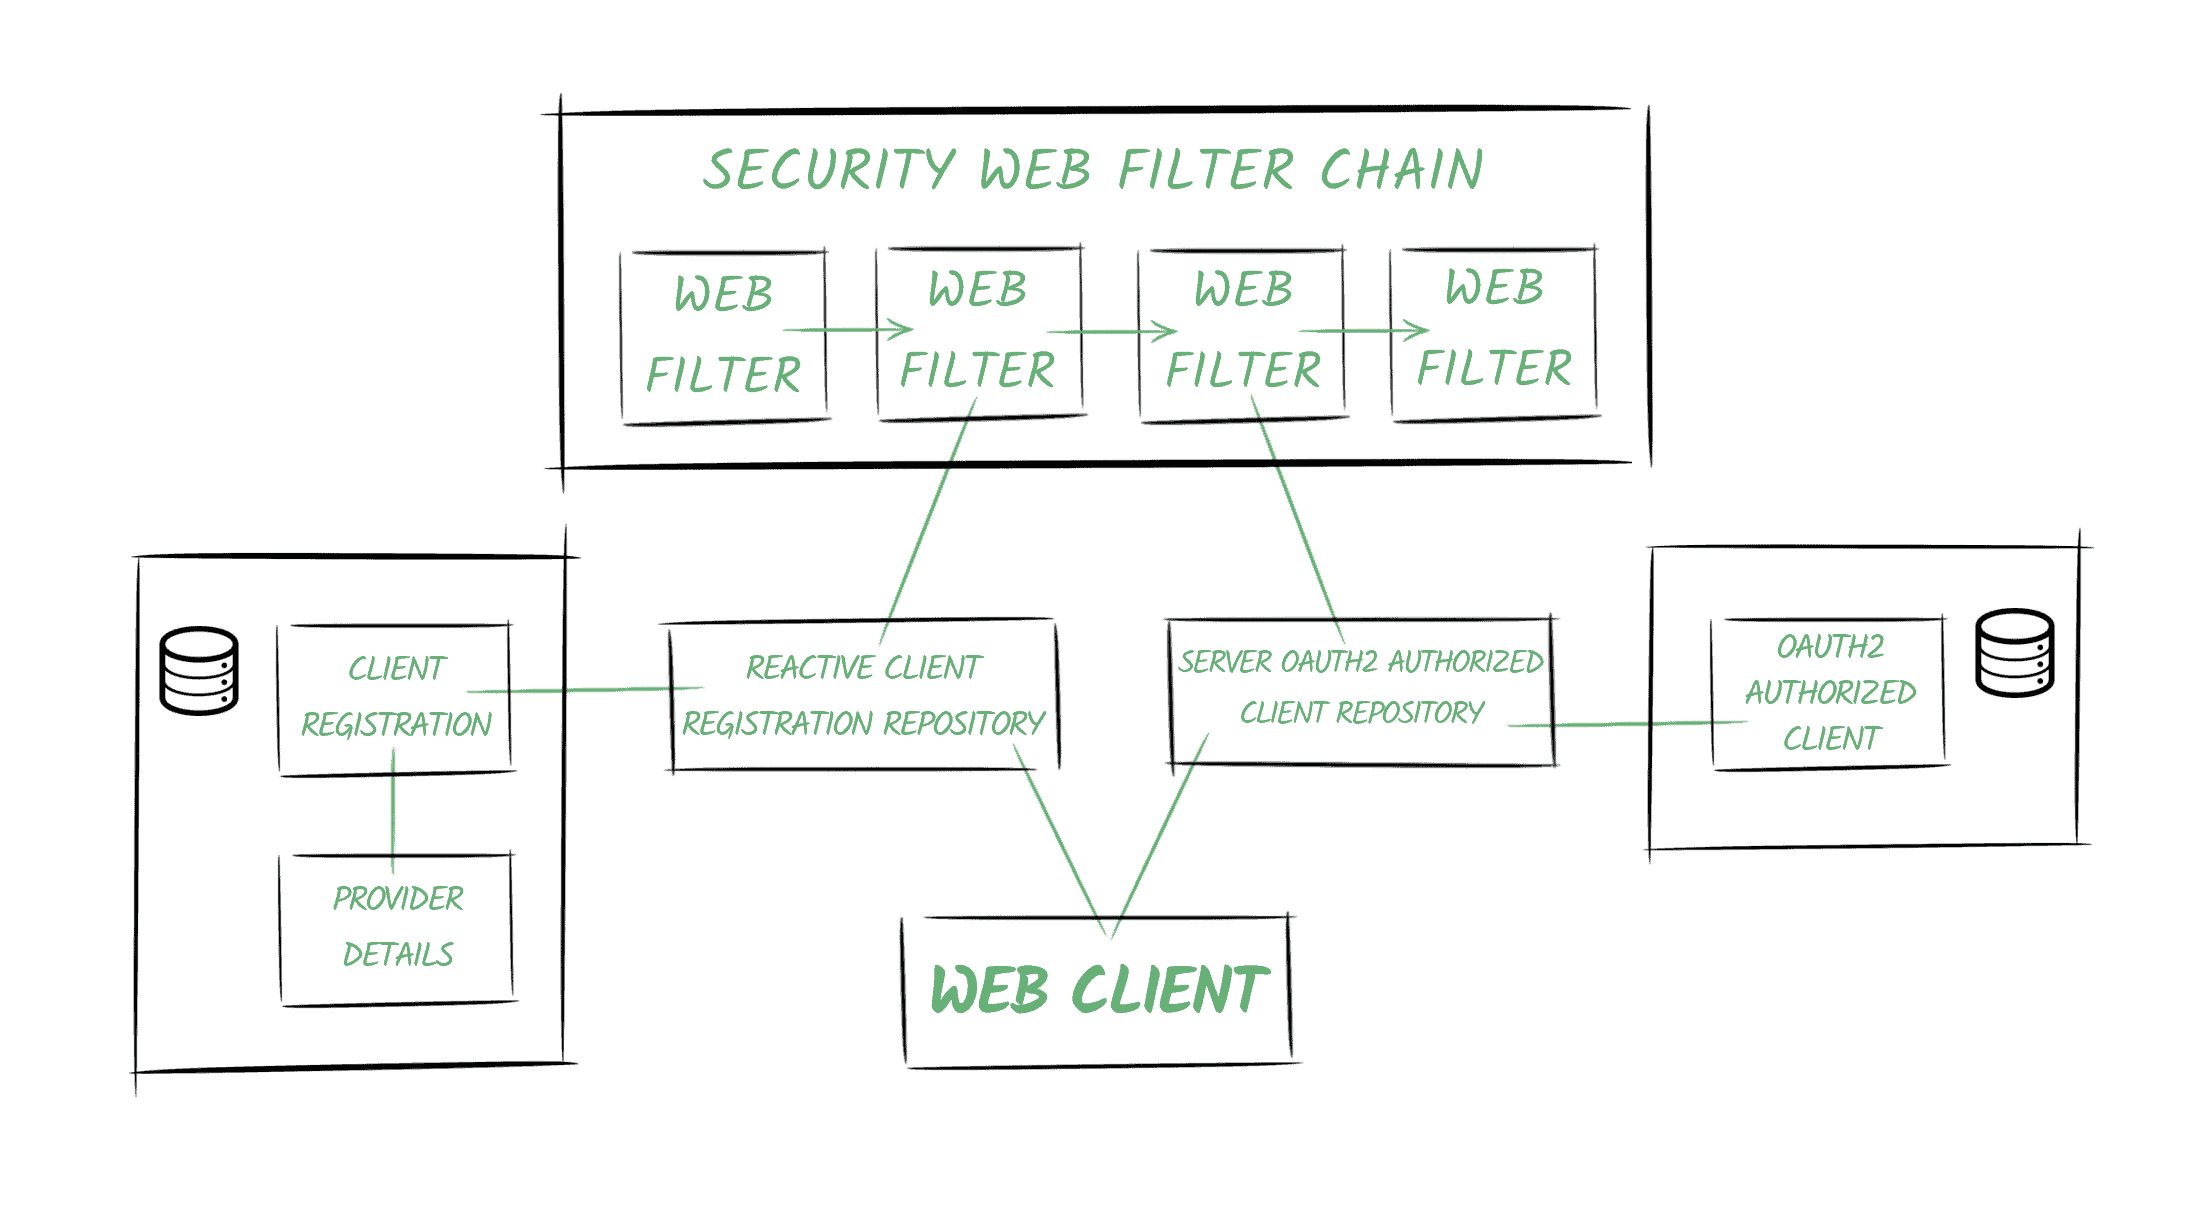
3.1. 提供者 (Providers)
Spring 定義了 OAuth2 提供者角色,負責公開 OAuth 2.0 保護的資源。
在我們的示例中,我們的身份驗證服務將提供提供者功能。
3.2. 客户端註冊
客户端註冊 是一個實體,包含 OAuth2(或 OpenID)提供商註冊的特定客户端的所有相關信息。
在我們的場景中,它指的是在身份驗證服務器註冊的客户端,通過 bael-client-id ID 標識。
3.3. 授權客户端
一旦最終用户(也稱為資源所有者)授予客户端對其資源的訪問權限,將會創建一個 OAuth2AuthorizedClient 實體。
它將負責將訪問令牌與客户端註冊和資源所有者(由 Principal 對象表示)關聯起來。
3.4. 倉庫
此外,Spring Security 還提供用於訪問上述實體的倉庫類。
特別是,<em >ReactiveClientRegistrationRepository</em> 和 <em >ServerOAuth2AuthorizedClientRepository</em> 類在反應式堆棧中使用,並且默認使用內存存儲。
Spring Boot 2.x 會為這些倉庫類創建 Bean 並自動將其添加到上下文中。
3.5. 安全 Web 過濾器鏈
Spring Security 5 中的關鍵概念之一是反應式 <em >SecurityWebFilterChain</em> 實體。
正如其名稱所示,它代表一個由 <em >WebFilter</em> 對象組成的鏈式集合。
當我們啓用應用程序中的 OAuth2 功能時,Spring Security 會將兩個過濾器添加到鏈中:
- 一個過濾器響應授權請求(`/oauth2/authorization/{registrationId}` URI)或拋出 `ClientAuthorizationRequiredException` 異常。它包含對 `ReactiveClientRegistrationRepository` 的引用,並負責創建重定向用户代理的授權請求。
- 第二個過濾器取決於我們添加的特性(OAuth2 客户端功能或 OAuth2 登錄功能)。在兩種情況下,該過濾器的主要職責是創建 `OAuth2AuthorizedClient` 實例並使用 `ServerOAuth2AuthorizedClientRepository` 存儲它。
3.6. Web 客户端
Web 客户端將配置一個包含對存儲庫的引用項的 ExchangeFilterFunction。
它將使用它們來獲取訪問令牌並將其自動添加到請求中。
4. Spring Security 5 支持 – 客户端憑據流
Spring Security 允許我們配置應用程序作為 OAuth2 客户端。
在本文中,我們將使用一個 WebClient 實例來使用“客户端憑據” grant type 檢索資源,然後使用“授權碼”流。
首先,我們需要配置客户端註冊以及我們將用於獲取訪問令牌的提供者。
4.1. 客户端和提供者配置
正如我們在 OAuth2 登錄文章中所看到的,我們可以通過編程方式進行配置,也可以依賴 Spring Boot 的自動配置,通過定義屬性來註冊我們的應用程序。
spring.security.oauth2.client.registration.bael.authorization-grant-type=client_credentials
spring.security.oauth2.client.registration.bael.client-id=bael-client-id
spring.security.oauth2.client.registration.bael.client-secret=bael-secret

spring.security.oauth2.client.provider.bael.token-uri=http://localhost:8085/oauth/token
以下是使用 客户端憑據 流檢索資源的所需所有配置。
4.2. 使用 WebClient
我們使用此授權類型在機器對機器通信中,當沒有終端用户與我們的應用程序交互時。
例如,假設我們有一個 cron 作業嘗試使用我們的應用程序中的 WebClient 訪問受保護的資源:
@Autowired
private WebClient webClient;

@Scheduled(fixedRate = 5000)
public void logResourceServiceResponse() {

    webClient.get()
      .uri("http://localhost:8084/retrieve-resource")
      .retrieve()
      .bodyToMono(String.class)
      .map(string
        -> "Retrieved using Client Credentials Grant Type: " + string)
      .subscribe(logger::info);
}
4.3. 配置 WebClient
接下來,我們將配置在調度任務中自動注入的 WebClient 實例:
@Bean
WebClient webClient(ReactiveClientRegistrationRepository clientRegistrations) {
    ServerOAuth2AuthorizedClientExchangeFilterFunction oauth =
      new ServerOAuth2AuthorizedClientExchangeFilterFunction(
        clientRegistrations,
        new UnAuthenticatedServerOAuth2AuthorizedClientRepository());
    oauth.setDefaultClientRegistrationId("bael");
    return WebClient.builder()
      .filter(oauth)
      .build();
}
正如我們之前提到的,客户端註冊存儲庫會自動創建並添加到上下文中,由 Spring Boot 完成。
接下來需要注意的是,我們使用的是 UnAuthenticatedServerOAuth2AuthorizedClientRepository 實例。這是因為沒有終端用户參與該過程,因為它是一種機器對機器的通信。 就像我們之前所説,我們將默認使用 bael 客户端註冊。
否則,我們需要在定義 cron 任務中的請求時進行指定:
webClient.get()
  .uri("http://localhost:8084/retrieve-resource")
  .attributes(
    ServerOAuth2AuthorizedClientExchangeFilterFunction
      .clientRegistrationId("bael"))
  .retrieve()
  // ...
4.4. 測試
如果我們將應用程序的日誌級別設置為 DEBUG,我們將能夠看到 Spring Security 執行的調用情況:
o.s.w.r.f.client.ExchangeFunctions:
  HTTP POST http://localhost:8085/oauth/token
o.s.http.codec.json.Jackson2JsonDecoder:
  Decoded [{access_token=89cf72cd-183e-48a8-9d08-661584db4310,
    token_type=bearer,
    expires_in=41196,
    scope=read
    (truncated)...]
o.s.w.r.f.client.ExchangeFunctions:
  HTTP GET http://localhost:8084/retrieve-resource
o.s.core.codec.StringDecoder:
  Decoded "This is the resource!"
c.b.w.c.service.WebClientChonJob:
  We retrieved the following resource using Client Credentials Grant Type: This is the resource!
我們還會注意到,當任務第二次運行時,應用程序會直接請求資源,而無需首先請求令牌,因為之前的令牌尚未過期。
5. Spring Security 5 支持 – 使用授權碼流程的實現
此授權類型通常用於在對信任度較低的第三方應用程序需要訪問資源的情況下。
5.1. 客户端和提供者配置
為了使用授權碼流程執行 OAuth2 過程,我們需要為客户端註冊和提供者定義更多屬性:
spring.security.oauth2.client.registration.bael.client-name=bael
spring.security.oauth2.client.registration.bael.client-id=bael-client-id
spring.security.oauth2.client.registration.bael.client-secret=bael-secret
spring.security.oauth2.client.registration.bael
  .authorization-grant-type=authorization_code
spring.security.oauth2.client.registration.bael
  .redirect-uri=http://localhost:8080/login/oauth2/code/bael

spring.security.oauth2.client.provider.bael.token-uri=http://localhost:8085/oauth/token
spring.security.oauth2.client.provider.bael
  .authorization-uri=http://localhost:8085/oauth/authorize
spring.security.oauth2.client.provider.bael.user-info-uri=http://localhost:8084/user
spring.security.oauth2.client.provider.bael.user-name-attribute=name
除了我們在上一節中使用的屬性外,這次還需要包含:
- Authentication 服務器上的一個端點進行身份驗證
- 包含用户信息的端點的 URL
- 用户代理在身份驗證後將被重定向到的應用程序中的端點 URL
當然,對於知名提供商,前兩個點無需指定。
重定向端點由 Spring Security 自動創建。
默認情況下,其配置 URL 為 /[action]/oauth2/code/[registrationId],僅允許 authorize 和 login 操作(為了避免無限循環)。
該端點負責:
- 接收身份驗證碼作為查詢參數
- 使用它獲取訪問令牌
- 創建 Authorized Client 實例
- 將用户代理重定向回原始端點
5.2. HTTP 安全配置
接下來,我們需要配置 SecurityWebFilterChain。
最常見的場景是使用 Spring Security 的 OAuth2 登錄功能來認證用户並授予他們訪問我們端點和資源的權限。
如果這是我們的情況,那麼僅僅在 ServerHttpSecurity 定義中包含 oauth2Login 指令就足以使我們的應用程序作為 OAuth2 客户端工作。
@Bean
public SecurityWebFilterChain springSecurityFilterChain(ServerHttpSecurity http) {
    http.authorizeExchange()
      .anyExchange()
      .authenticated()
      .and()
      .oauth2Login();
    return http.build();
}
5.3. 配置 WebClient</em/>
現在是時候將我們的 WebClient</em/> 實例部署到位:
@Bean
WebClient webClient(
  ReactiveClientRegistrationRepository clientRegistrations,
  ServerOAuth2AuthorizedClientRepository authorizedClients) {
    ServerOAuth2AuthorizedClientExchangeFilterFunction oauth =
      new ServerOAuth2AuthorizedClientExchangeFilterFunction(
        clientRegistrations,
        authorizedClients);
    oauth.setDefaultOAuth2AuthorizedClient(true);
    return WebClient.builder()
      .filter(oauth)
      .build();
}
本次我們正在從上下文中注入客户端註冊存儲庫和授權客户端存儲庫。
我們還啓用了setDefaultOAuth2AuthorizedClient選項。通過此選項,框架將嘗試從當前Authentication對象(在 Spring Security 中管理)中獲取客户端信息。
需要注意的是,啓用此選項後,所有 HTTP 請求都將包含訪問令牌,這可能不是期望的行為。
稍後我們將分析替代方案,以指示特定的WebClient事務將使用哪個客户端。
5.4. 使用 WebClient
授權碼需要一個能夠處理重定向(例如瀏覽器)的客户端才能執行該過程。
因此,當用户與我們的應用程序交互時(通常通過調用 HTTP 端點),我們可以利用此授權類型。
@RestController
public class ClientRestController {

    @Autowired
    WebClient webClient;

    @GetMapping("/auth-code")
    Mono<String> useOauthWithAuthCode() {
        Mono<String> retrievedResource = webClient.get()
          .uri("http://localhost:8084/retrieve-resource")
          .retrieve()
          .bodyToMono(String.class);
        return retrievedResource.map(string ->
          "We retrieved the following resource using Oauth: " + string);
    }
}
5.5. 測試
最後,我們將調用該端點並分析情況,通過檢查日誌條目進行驗證。
在調用該端點後,應用程序會驗證我們尚未在應用程序中進行身份驗證。
o.s.w.s.adapter.HttpWebHandlerAdapter: HTTP GET "/auth-code"
...
HTTP/1.1 302 Found
Location: /oauth2/authorization/bael
該應用程序會將請求重定向到授權服務的端點,以使用存儲在提供者註冊表中(在本例中,我們使用 bael-user/bael-password)的憑據進行身份驗證。
HTTP/1.1 302 Found
Location: http://localhost:8085/oauth/authorize
  ?response_type=code
  &client_id=bael-client-id
  &state=...
  &redirect_uri=http%3A%2F%2Flocalhost%3A8080%2Flogin%2Foauth2%2Fcode%2Fbael
在身份驗證成功後,用户代理會將代碼作為查詢參數以及先前發送的狀態值返回到重定向 URI,以避免跨站請求偽造(CSRF)攻擊:
o.s.w.s.adapter.HttpWebHandlerAdapter:HTTP GET "/login/oauth2/code/bael?code=...&state=...應用程序隨後使用代碼獲取訪問令牌:
o.s.w.r.f.client.ExchangeFunctions:HTTP POST http://localhost:8085/oauth/token它獲取用户信息:
o.s.w.r.f.client.ExchangeFunctions:HTTP GET http://localhost:8084/user它將用户代理重定向到原始端點:
HTTP/1.1 302 Found
Location: /auth-code
最後,我們的 WebClient 實例已成功請求受保護的資源:
o.s.w.r.f.client.ExchangeFunctions:HTTP GET http://localhost:8084/retrieve-resource
o.s.w.r.f.client.ExchangeFunctions:Response 200 OK
o.s.core.codec.StringDecoder :Decoded "This is the resource!"
6. 另一種方法 – 在調用中進行客户端註冊
之前,我們瞭解到使用
如果我們從配置中刪除此命令,那麼在我們定義請求時,我們需要顯式指定客户端註冊。
一種方法,當然是使用
@GetMapping("/auth-code-annotated")
Mono<String> useOauthWithAuthCodeAndAnnotation(
  @RegisteredOAuth2AuthorizedClient("bael") OAuth2AuthorizedClient authorizedClient) {
    Mono<String> retrievedResource = webClient.get()
      .uri("http://localhost:8084/retrieve-resource")
      .attributes(
        ServerOAuth2AuthorizedClientExchangeFilterFunction.oauth2AuthorizedClient(authorizedClient))
      .retrieve()
      .bodyToMono(String.class);
    return retrievedResource.map(string ->
      "Resource: " + string
        + " - Principal associated: " + authorizedClient.getPrincipalName()
        + " - Token will expire at: " + authorizedClient.getAccessToken()
          .getExpiresAt());
}
7. 避免 OAuth2 登錄功能
正如我們所提到的,最常見的場景是依賴 OAuth2 授權提供者為我們的應用程序登錄用户。
但是,如果我們要避免這樣做,同時仍然能夠使用 OAuth2 協議訪問受保護的資源呢?那麼我們需要在我們的配置中進行一些更改。
首先,為了明確統一,我們可以使用 authorize 操作而不是 login 操作來定義重定向 URI 屬性:
spring.security.oauth2.client.registration.bael
  .redirect-uri=http://localhost:8080/login/oauth2/code/bael
我們還可以刪除與用户相關的屬性,因為我們不會使用它們來創建應用程序中的 Principal。
現在我們將配置 SecurityWebFilterChain,但不包括 oauth2Login 命令,而是將包含 oauth2Client。
即使我們不想依賴 OAuth2 登錄,我們仍然希望在訪問端點之前對用户進行身份驗證。因此,我們還將包含 formLogin 指令:
@Bean
public SecurityWebFilterChain springSecurityFilterChain(ServerHttpSecurity http) {
    http.authorizeExchange()
      .anyExchange()
      .authenticated()
      .and()
      .oauth2Client()
      .and()
      .formLogin();
    return http.build();
}
現在讓我們運行該應用程序,並查看使用 /auth-code-annotated 端點時發生的情況。
首先,我們需要使用登錄表單登錄到我們的應用程序。
然後,應用程序會將我們重定向到授權服務登錄以授權訪問我們的資源。
注意:完成此操作後,我們應該被重定向回我們最初調用的端點。但是,Spring Security似乎將我們重定向回根路徑“/”而不是它,這似乎是一個 bug。觸發 OAuth2 舞蹈後的請求將成功運行。
我們可以看到端點響應中,本次授權的客户端與一個名為 bael-client-id 的主體關聯,而不是與 Authentication Service 中配置的用户 bael-user, 關聯。
8. Spring 框架支持 – 手動方法
默認情況下,Spring 5 僅提供一個與 OAuth2 相關的服務方法,用於輕鬆地將 Bearer 令牌頭添加到請求中。 它就是 HttpHeaders#setBearerAuth 方法。
現在,我們將通過一個示例來演示手動執行 OAuth2 舞蹈以獲取受保護資源所需要的內容。
簡單來説,我們需要鏈接兩個 HTTP 請求,一個用於從授權服務器獲取身份令牌,另一個使用該令牌獲取資源:
@Autowired
WebClient client;

public Mono<String> obtainSecuredResource() {
    String encodedClientData =
      Base64.getEncoder().encodeToString("bael-client-id:bael-secret".getBytes());
    Mono<String> resource = client.post()
      .uri("localhost:8085/oauth/token")
      .header("Authorization", "Basic " + encodedClientData)
      .body(BodyInserters.fromFormData("grant_type", "client_credentials"))
      .retrieve()
      .bodyToMono(JsonNode.class)
      .flatMap(tokenResponse -> {
          String accessTokenValue = tokenResponse.get("access_token")
            .textValue();
          return client.get()
            .uri("localhost:8084/retrieve-resource")
            .headers(h -> h.setBearerAuth(accessTokenValue))
            .retrieve()
            .bodyToMono(String.class);
        });
    return resource.map(res ->
      "Retrieved the resource using a manual approach: " + res);
}
這個示例旨在幫助我們理解使用符合 OAuth2 規範的請求可能多麼繁瑣,並展示如何使用 setBearerAuth 方法。
在實際場景中,我們讓 Spring Security 負責所有繁瑣的工作,就像在之前章節中所做的那樣。
9. 結論
在本文中,我們學習瞭如何將我們的應用程序設置為 OAuth2 客户端,更具體地説,我們如何配置和使用 WebClient 以在完全反應式堆棧中檢索受保護的資源。
然後,我們分析了 Spring Security 5 OAuth2 機制在底層如何運作,以符合 OAuth2 規範。
