1. 概述
React 是由 Facebook 構建的基於組件的 JavaScript 庫。藉助 React,我們可以輕鬆構建複雜的 Web 應用程序。 在本文中,我們將使 Spring Security 與 React 登錄頁面協同工作。
我們將利用先前示例中 Spring Security 的現有配置。 因此,我們將在此之前關於使用 Spring Security 創建表單登錄頁面的文章基礎上進行擴展。
2. 設置 React
首先,我們使用命令行工具 create-react-app 創建一個應用程序。通過執行命令“create-react-app react”。
我們將在 react/package.json 中擁有如下配置:
{
    "name": "react",
    "version": "0.1.0",
    "private": true,
    "dependencies": {
        "react": "^16.4.1",
        "react-dom": "^16.4.1",
        "react-scripts": "1.1.4"
    },
    "scripts": {
        "start": "react-scripts start",
        "build": "react-scripts build",
        "test": "react-scripts test --env=jsdom",
        "eject": "react-scripts eject"
    }
}
然後,我們將使用 frontend-maven-plugin 來幫助我們使用 Maven 構建 React 項目:
<plugin>
    <groupId>com.github.eirslett</groupId>
    <artifactId>frontend-maven-plugin</artifactId>
    <version>1.6</version>
    <configuration>
        <nodeVersion>v8.11.3</nodeVersion>
        <npmVersion>6.1.0</npmVersion>
        <workingDirectory>src/main/webapp/WEB-INF/view/react</workingDirectory>
    </configuration>
    <executions>
        <execution>
            <id>install node and npm</id>
            <goals>
                <goal>install-node-and-npm</goal>
            </goals>
        </execution>
        <execution>
            <id>npm install</id>
            <goals>
                <goal>npm</goal>
            </goals>
        </execution>
        <execution>
            <id>npm run build</id>
            <goals>
                <goal>npm</goal>
            </goals>
            <configuration>
                <arguments>run build</arguments>
            </configuration>
        </execution>
    </executions>
</plugin>最新版本的插件可以在這裏找到:這裏。
當我們運行 mvn compile 時,該插件將下載 node 和 npm,安裝所有 node 模塊依賴項併為我們構建 react 項目。
以下是一些我們需要解釋的配置屬性。我們指定了 node 和 npm 的版本,以便插件知道下載哪個版本。
我們的 React 登錄頁面將作為 Spring 中的靜態頁面,因此我們使用 “webapp/WEB-INF/view/react” 作為 npm 的工作目錄。
3. Spring Security 配置
在深入瞭解 React 組件之前,我們更新 Spring 配置以提供 React 應用的靜態資源:
@EnableWebMvc
@Configuration
public class MvcConfig extends WebMvcConfigurer {

    @Override
    public void addResourceHandlers(
      ResourceHandlerRegistry registry) {

        registry.addResourceHandler("/static/**")
          .addResourceLocations("/WEB-INF/view/react/build/static/");
        registry.addResourceHandler("/*.js")
          .addResourceLocations("/WEB-INF/view/react/build/");
        registry.addResourceHandler("/*.json")
          .addResourceLocations("/WEB-INF/view/react/build/");
        registry.addResourceHandler("/*.ico")
          .addResourceLocations("/WEB-INF/view/react/build/");
        registry.addResourceHandler("/index.html")
          .addResourceLocations("/WEB-INF/view/react/build/index.html");
    }
}請注意,我們添加了登錄頁面 “index.html” 作為靜態資源,而不是動態提供的 JSP。
接下來,我們更新 Spring Security 配置以允許訪問這些靜態資源。
與我們在之前的表單登錄文章中使用的 “login.jsp” 相比,這裏我們使用 “index.html” 作為我們的 Login 頁面:
@Configuration
@EnableWebSecurity
@Profile("!https")
public class SecSecurityConfig {

    //...

    @Bean
    public SecurityFilterChain filterChain(HttpSecurity http) throws Exception {
      return http.csrf(csrf -> csrf.csrfTokenRepository(CookieCsrfTokenRepository.withHttpOnlyFalse()))
          .authorizeHttpRequests(request -> request.requestMatchers("/admin/**")
            .hasRole("ADMIN")
            .requestMatchers("/anonymous*")
            .anonymous()
            .requestMatchers(HttpMethod.GET, "/index*", "/static/**", "/*.js", "/*.json", "/*.ico", "/rest")
            .permitAll()
            .anyRequest()
            .authenticated())
          .formLogin(form -> form.loginPage("/index.html")
            .loginProcessingUrl("/perform_login")
            .defaultSuccessUrl("/homepage.html", true)
            .failureUrl("/index.html?error=true"))
          .logout(logout -> logout.logoutUrl("/perform_logout")
            .deleteCookies("JSESSIONID"))
          .build();
    }
}如上所示,當我們將表單數據提交到“/perform_login”時,Spring會在憑據匹配成功時將我們重定向到“/homepage.html”,否則將重定向到“/index.html?error=true”。
4. React 組件
現在,讓我們用 React 動手實踐一下。我們將使用組件構建和管理一個登錄表單。
請注意,我們將使用 ES6 (ECMAScript 2015) 語法來構建我們的應用程序。
4.1. 輸入
讓我們從一個 Input 組件開始,它支持登錄表單中的 <input /> 元素,位於 react/src/Input.js 中。
import React, { Component } from 'react'
import PropTypes from 'prop-types'

class Input extends Component {
    constructor(props){
        super(props)
        this.state = {
            value: props.value? props.value : '',
            className: props.className? props.className : '',
            error: false
        }
    }

    //...

    render () {
        const {handleError, ...opts} = this.props
        this.handleError = handleError
        return (
          <input {...opts} value={this.state.value}
            onChange={this.inputChange} className={this.state.className} />
        )
    }
}

Input.propTypes = {
  name: PropTypes.string,
  placeholder: PropTypes.string,
  type: PropTypes.string,
  className: PropTypes.string,
  value: PropTypes.string,
  handleError: PropTypes.func
}

export default Input
如上所示,我們將<input /> 元素包裹在一個 React 控制組件中,以便管理其狀態並執行字段驗證。
React 提供了使用 PropTypes 進行類型驗證的方式。具體來説,我們使用 Input.propTypes = {…} 來驗證用户傳入的屬性類型。
請注意,PropType 驗證僅用於開發階段。PropType 驗證用於檢查我們對組件所做的所有假設是否得到滿足。
擁有它比在生產環境中遇到隨機問題要好得多。
4.2. 表單
接下來,我們將創建一個通用的 Form 組件,位於 Form.js 文件中,該組件將結合多個 Input 組件,這些組件將作為我們登錄表單的基礎。
在 Form 組件中,我們從 HTML <input/> 元素的屬性中創建 Input 組件。
然後,Input 組件和驗證錯誤消息將被插入到 Form 中。
import React, { Component } from 'react'
import PropTypes from 'prop-types'
import Input from './Input'

class Form extends Component {

    //...

    render() {
        const inputs = this.props.inputs.map(
          ({name, placeholder, type, value, className}, index) => (
            <Input key={index} name={name} placeholder={placeholder} type={type} value={value}
              className={type==='submit'? className : ''} handleError={this.handleError} />
          )
        )
        const errors = this.renderError()
        return (
            <form {...this.props} onSubmit={this.handleSubmit} ref={fm => {this.form=fm}} >
              {inputs}
              {errors}
            </form>
        )
    }
}

Form.propTypes = {
  name: PropTypes.string,
  action: PropTypes.string,
  method: PropTypes.string,
  inputs: PropTypes.array,
  error: PropTypes.string
}

export default Form
現在我們來探討一下如何管理字段驗證錯誤和登錄錯誤:
class Form extends Component {

    constructor(props) {
        super(props)
        if(props.error) {
            this.state = {
              failure: 'wrong username or password!',
              errcount: 0
            }
        } else {
            this.state = { errcount: 0 }
        }
    }

    handleError = (field, errmsg) => {
        if(!field) return

        if(errmsg) {
            this.setState((prevState) => ({
                failure: '',
                errcount: prevState.errcount + 1,
                errmsgs: {...prevState.errmsgs, [field]: errmsg}
            }))
        } else {
            this.setState((prevState) => ({
                failure: '',
                errcount: prevState.errcount===1? 0 : prevState.errcount-1,
                errmsgs: {...prevState.errmsgs, [field]: ''}
            }))
        }
    }

    renderError = () => {
        if(this.state.errcount || this.state.failure) {
            const errmsg = this.state.failure
              || Object.values(this.state.errmsgs).find(v=>v)
            return <div className="error">{errmsg}</div>
        }
    }

    //...

}
在片段中,我們定義了 handleError 函數來管理表單的狀態。 提醒一下,我們還將其用於 Input 字段驗證。 實際上,handleError() 作為回調函數傳遞給 Input Components 在 render() 函數中。
我們使用 renderError() 來構建錯誤消息元素。 請注意,Form’s 構造函數消耗一個 error 屬性。 此屬性指示登錄操作是否失敗。
然後是表單提交處理程序:
class Form extends Component {

    //...

    handleSubmit = (event) => {
        event.preventDefault()
        if(!this.state.errcount) {
            const data = new FormData(this.form)
            fetch(this.form.action, {
              method: this.form.method,
              body: new URLSearchParams(data)
            })
            .then(v => {
                if(v.redirected) window.location = v.url
            })
            .catch(e => console.warn(e))
        }
    }
}
我們將所有表單字段包裝成 FormData,並通過 Fetch API 發送給服務器。
別忘了我們的登錄表單帶有 successUrl 和 failureUrl,這意味着無論請求是否成功,響應都需要進行重定向。
因此,我們需要在響應回調中處理重定向。
4.3. 表單渲染
現在我們已經設置好所需的各個組件,就可以將它們添加到 DOM 中。基本 HTML 結構如下(可在 react/public/index.html 找到):
<!DOCTYPE html>
<html lang="en">
  <head>
    <!-- ... -->
  </head>
  <body>

    <div id="root">
      <div id="container"></div>
    </div>

  </body>
</html>
最後,我們將表單渲染到 <em>div</em> 中,該 <em>div</em> 的 id 為 “container”,位於 <em>react/src/index.js</em> 中。
import React from 'react'
import ReactDOM from 'react-dom'
import './index.css'
import Form from './Form'

const inputs = [{
  name: "username",
  placeholder: "username",
  type: "text"
},{
  name: "password",
  placeholder: "password",
  type: "password"
},{
  type: "submit",
  value: "Submit",
  className: "btn"
}]

const props = {
  name: 'loginForm',
  method: 'POST',
  action: '/perform_login',
  inputs: inputs
}

const params = new URLSearchParams(window.location.search)

ReactDOM.render(
  <Form {...props} error={params.get('error')} />,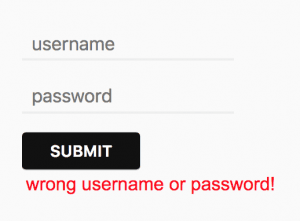
document.getElementById('container'))我們的表單現在包含兩個輸入字段:username 和 password,以及一個提交按鈕。
我們通過將error 屬性傳遞給Form 組件,以便在重定向到失敗 URL 時處理登錄錯誤:/index.html?error=true。
現在我們已經使用 React 構建了一個 Spring Security 登錄應用程序。最後我們需要執行 mvn compile 命令。
在過程中,Maven 插件將幫助構建我們的 React 應用程序,並將構建結果收集到 src/main/webapp/WEB-INF/view/react/build 目錄中。
5. 結論
在本文中,我們介紹瞭如何構建一個 React 登錄應用並使其與 Spring Security 後端進行交互。更復雜的應用程序將涉及使用 React Router 或 Redux 進行狀態轉換和路由,但這些超出了本文的範圍。
