1. 概述
使用人工智能技術已成為現代開發中的關鍵技能。 在本文中,我們將構建一個基於 RAG Wiki 應用程序,該應用程序可以根據存儲的文檔回答問題。
我們將使用 Spring AI 將我們的應用程序與 MongoDB 向量數據庫和LLM集成。
2. RAG 應用
我們使用檢索增強生成 (RAG) 應用,當自然語言生成需要依賴上下文數據時。 RAG 應用的關鍵組成部分是向量數據庫,它在有效地管理和檢索這些數據方面發揮着至關重要的作用:
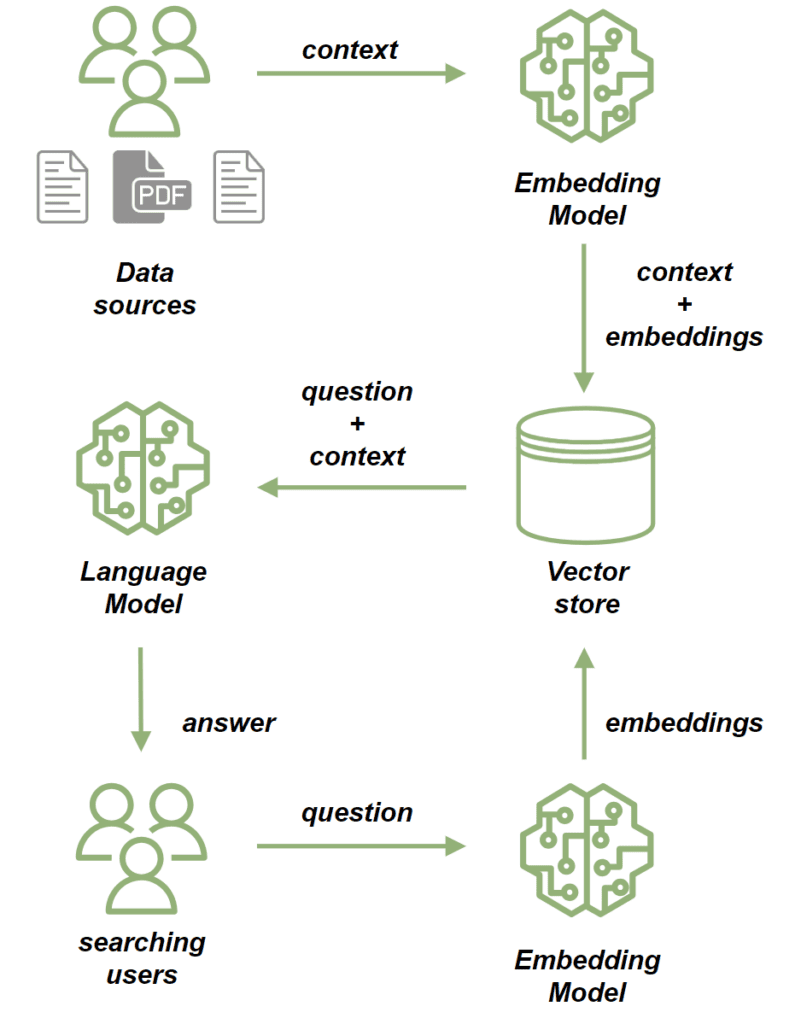
我們使用 嵌入模型 處理源文檔。 嵌入模型將我們文檔中的文本轉換為高維向量。 這些向量捕捉了內容的語義含義,允許我們根據上下文而不是僅僅關鍵詞匹配來比較和檢索相似內容。 然後我們將文檔存儲在向量存儲中。
在將文檔保存後,我們可以按照以下方式發送提示:
- 首先,我們使用嵌入模型處理問題,將其轉換為捕捉其語義含義的向量。
- 接下來,我們執行相似性搜索,將問題的向量與向量存儲中存儲的向量進行比較。
- 從最相關的文檔中,我們構建問題的上下文。
- 最後,我們將問題及其上下文發送到 LLM,該 LLM 會構建與查詢相關的響應,並受提供的上下文豐富。
3. MongoDB Atlas 向量搜索
在本教程中,我們將使用 MongoDB Atlas Search 作為我們的向量存儲。它提供 向量搜索 功能,以滿足我們本項目的需求。為了在測試目的下設置本地 MongoDB Atlas Search 實例,我們將使用 mongodb-atlas-local Docker 容器。讓我們創建一個 docker-compose.yml 文件:
version: '3.1'

services:
  my-mongodb:
    image: mongodb/mongodb-atlas-local:7.0.9
    container_name: my-mongodb
    environment:
      - MONGODB_INITDB_ROOT_USERNAME=wikiuser
      - MONGODB_INITDB_ROOT_PASSWORD=password
    ports:
      - 27017:27017
4. 依賴項和配置
首先,添加必要的依賴項。由於我們的應用程序將提供 HTTP API,我們將包含 <em >spring-boot-starter-web</em> 依賴項:依賴項。
<dependency>
    <groupId>org.springframework.boot</groupId>
    <artifactId>spring-boot-starter-web</artifactId>
    <version>LATEST_VERSION</version>
</dependency>
此外,我們還將使用 Open AI API 客户端 與 LLM 連接,因此我們還需要添加它的 依賴項:
<dependency>
    <groupId>org.springframework.ai</groupId>
    <artifactId>spring-ai-openai-spring-boot-starter</artifactId>
    <version>LATEST_VERSION</version>
</dependency>
最後,我們將添加 MongoDB Atlas Store 依賴項:。
<dependency>
    <groupId>org.springframework.ai</groupId>
    <artifactId>spring-ai-mongodb-atlas-store-spring-boot-starter</artifactId>
    <version>LATEST_VERSION</version>
</dependency>
現在,讓我們為我們的應用程序添加配置屬性:
spring:
  data:
    mongodb:
      uri: mongodb://wikiuser:password@localhost:27017/admin
      database: wiki
  ai:
    vectorstore:
      mongodb:
        collection-name: vector_store
        initialize-schema: true
        path-name: embedding
        indexName: vector_index
    openai:
      api-key: ${OPENAI_API_KEY}
      chat:
        options:
          model: gpt-3.5-turbo
我們已指定 MongoDB URL 和數據庫,並已通過設置集合名稱、嵌入字段名稱和向量索引名稱配置了我們的向量存儲。多虧了 initialize-schema 屬性,所有這些 Artifacts 將由 Spring AI 框架自動創建。
最後,我們添加了 OpenAI API 密鑰和模型版本。
5. 將文檔保存到向量存儲
現在,我們將添加將數據保存到向量存儲的流程。我們的應用程序將負責根據現有文檔為用户提供答案——本質上,它將作為一個類似於維基的系統運行。
讓我們添加一個模型,用於存儲文件的內容以及文件路徑:
public class WikiDocument {
    private String filePath;
    private String content;

    // standard getters and setters
}
下一步,我們將添加 WikiDocumentsRepository。 在這個倉庫中,我們封裝了所有的持久化邏輯:
import org.springframework.ai.document.Document;
import org.springframework.ai.transformer.splitter.TokenTextSplitter;

@Component
public class WikiDocumentsRepository {
    private final VectorStore vectorStore;

    public WikiDocumentsRepository(VectorStore vectorStore) {
        this.vectorStore = vectorStore;
    }

    public void saveWikiDocument(WikiDocument wikiDocument) {

        Map<String, Object> metadata = new HashMap<>();
        metadata.put("filePath", wikiDocument.getFilePath());
        Document document = new Document(wikiDocument.getContent(), metadata);
        List<Document> documents = new TokenTextSplitter().apply(List.of(document));

        vectorStore.add(documents);
    }
}
在這裏,我們注入了 VectorStore 接口 Bean,它將被 MongoDBAtlasVectorStore 實現,該實現由 spring-ai-mongodb-atlas-store-spring-boot-starter 提供。 在 saveWikiDocument 方法中,我們創建了一個 Document 實例並用內容和元數據填充它。
Then we use TokenTextSplitter to break the document into smaller chunks and save them in our vector store。
@Service
public class WikiDocumentsServiceImpl {
    private final WikiDocumentsRepository wikiDocumentsRepository;

    // constructors

    public void saveWikiDocument(String filePath) {
        try {
            String content = Files.readString(Path.of(filePath));
            WikiDocument wikiDocument = new WikiDocument();
            wikiDocument.setFilePath(filePath);
            wikiDocument.setContent(content);

            wikiDocumentsRepository.saveWikiDocument(wikiDocument);
        } catch (IOException e) {
            throw new RuntimeException(e);
        }
    }
}
在服務層,我們檢索文件內容,創建 WikiDocument 實例,並將它們發送到存儲庫進行持久化。
在控制器中,我們只需將文件路徑傳遞到服務層,並在文檔保存成功時返回 201 狀態碼:
@RestController
@RequestMapping("wiki")
public class WikiDocumentsController {
    private final WikiDocumentsServiceImpl wikiDocumentsService;

    // constructors

    @PostMapping
    public ResponseEntity<Void> saveDocument(@RequestParam String filePath) {
        wikiDocumentsService.saveWikiDocument(filePath);

        return ResponseEntity.status(201).build();
    }
}我們應該關注該端點的安全方面。存在潛在漏洞,用户可能通過該端點上傳意外的文件,例如配置或系統文件。作為解決方案,我們可以限制允許上傳的目錄。現在,讓我們啓動我們的應用程序並查看我們的流程如何運行。讓我們添加 Spring Boot 測試依賴項,這將允許我們設置測試 Web 上下文:
<dependency>
    <groupId>org.springframework.boot</groupId>
    <artifactId>spring-boot-starter-test</artifactId>
    <version>LATEST_VERSION</version>
</dependency>
現在,我們將啓動測試應用程序實例並調用 POST 端點,處理兩個文檔:
@AutoConfigureMockMvc
@ExtendWith(SpringExtension.class)
@SpringBootTest
class RAGMongoDBApplicationManualTest {

    @Autowired
    private MockMvc mockMvc;

    @Test
    void givenMongoDBVectorStore_whenCallingPostDocumentEndpoint_thenExpectedResponseCodeShouldBeReturned() throws Exception {
        mockMvc.perform(post("/wiki?filePath={filePath}",
          "src/test/resources/documentation/owl-documentation.md"))
          .andExpect(status().isCreated());

        mockMvc.perform(post("/wiki?filePath={filePath}",
          "src/test/resources/documentation/rag-documentation.md"))
          .andExpect(status().isCreated());
    }
}
兩個調用都應返回 201 狀態碼,因此文檔已成功添加。我們可以使用 MongoDB Compass 來確認文檔是否已成功保存到向量存儲中:
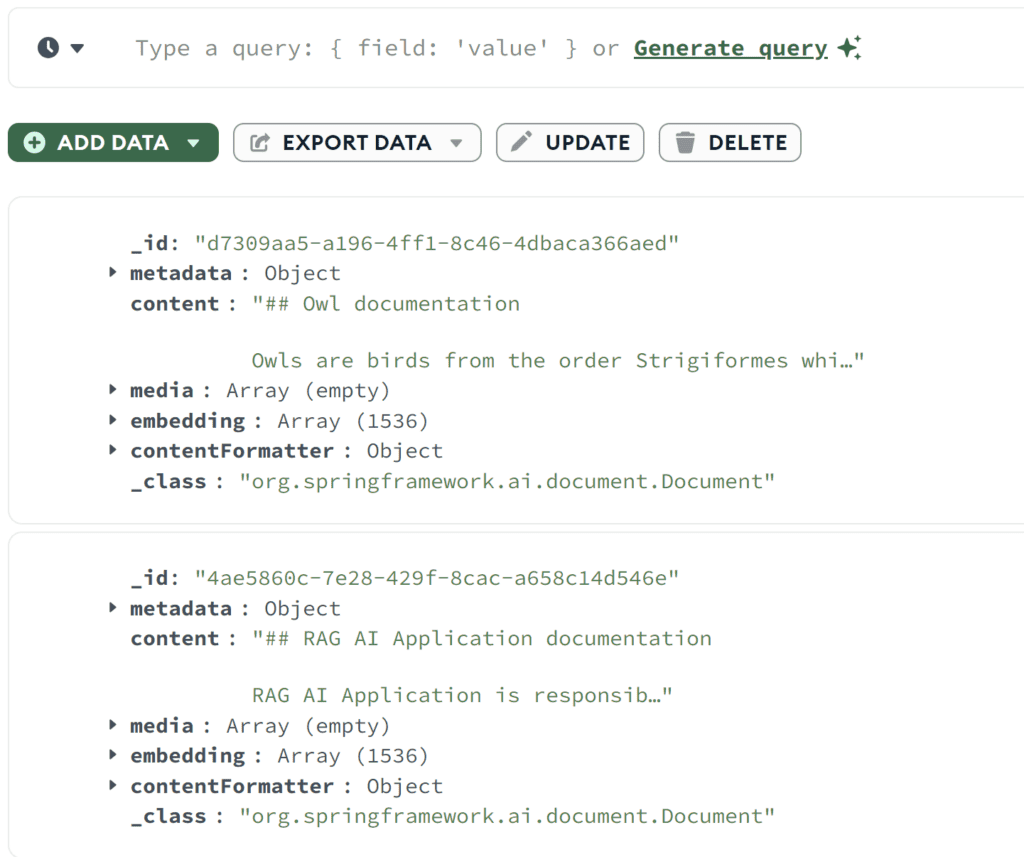
如我們所見 – 兩個文檔都已保存。 我們可以查看原始內容以及嵌入數組。
6. 相似性搜索
讓我們添加相似性搜索功能。我們將包含一個 findSimilarDocuments 方法在我們的存儲庫中:
@Component
public class WikiDocumentsRepository {
    private final VectorStore vectorStore;

    public List<WikiDocument> findSimilarDocuments(String searchText) {

        return vectorStore
          .similaritySearch(SearchRequest
            .query(searchText)
            .withSimilarityThreshold(0.87)
            .withTopK(10))
          .stream()
          .map(document -> {
              WikiDocument wikiDocument = new WikiDocument();
              wikiDocument.setFilePath((String) document.getMetadata().get("filePath"));
              wikiDocument.setContent(document.getContent());

              return wikiDocument;
          })
          .toList();
    }
}
我們調用了 VectorStore 中的 similaritySearch 方法。除了搜索文本之外,我們還指定了結果限制和相似度閾值。 相似度閾值參數允許我們控制文檔內容與搜索文本的匹配程度。
在服務層中,我們將調用到存儲庫:
public List<WikiDocument> findSimilarDocuments(String searchText) {
    return wikiDocumentsRepository.findSimilarDocuments(searchText);
}
在控制器中,讓我們添加一個 GET 端點,它接收搜索文本作為參數並將其傳遞給服務:
@RestController
@RequestMapping("/wiki")
public class WikiDocumentsController {
    @GetMapping
    public List<WikiDocument> get(@RequestParam("searchText") String searchText) {
        return wikiDocumentsService.findSimilarDocuments(searchText);
    }
}
現在讓我們調用我們的新端點,並查看相似性搜索是如何工作的:
@Test
void givenMongoDBVectorStoreWithDocuments_whenMakingSimilaritySearch_thenExpectedDocumentShouldBePresent() throws Exception {
    String responseContent = mockMvc.perform(get("/wiki?searchText={searchText}", "RAG Application"))
      .andExpect(status().isOk())
      .andReturn()
      .getResponse()
      .getContentAsString();

    assertThat(responseContent)
      .contains("RAG AI Application is responsible for storing the documentation");
}
我們使用包含非精確匹配的搜索文本調用了該端點。 但是,我們仍然檢索到了包含相似內容的文檔,並確認該文檔中包含我們在 rag-documentation.md文件中存儲的文本。
7. 提示端點
讓我們開始構建提示流程,這是我們應用程序的核心功能。我們將從 AdvisorConfiguration 開始:
@Configuration
public class AdvisorConfiguration {

    @Bean
    public QuestionAnswerAdvisor questionAnswerAdvisor(VectorStore vectorStore) {
        return new QuestionAnswerAdvisor(vectorStore, SearchRequest.defaults());
    }
}
我們已創建了一個 QuestionAnswerAdvisor Bean,負責構建提示請求,包括初始問題。 此外,它還將向量存儲的相似性搜索響應作為上下文附加到問題中。 接下來,讓我們為我們的 API 添加搜索端點:
@RestController
@RequestMapping("/wiki")
public class WikiDocumentsController {
    private final WikiDocumentsServiceImpl wikiDocumentsService;
    private final ChatClient chatClient;
    private final QuestionAnswerAdvisor questionAnswerAdvisor;

    public WikiDocumentsController(WikiDocumentsServiceImpl wikiDocumentsService,
                                   @Qualifier("openAiChatModel") ChatModel chatModel,
                                   QuestionAnswerAdvisor questionAnswerAdvisor) {
        this.wikiDocumentsService = wikiDocumentsService;
        this.questionAnswerAdvisor = questionAnswerAdvisor;
        this.chatClient = ChatClient.builder(chatModel).build();
    }

    @GetMapping("/search")
    public String getWikiAnswer(@RequestParam("question") String question) {
        return chatClient.prompt()
          .user(question)
          .advisors(questionAnswerAdvisor)
          .call()
          .content();
    }
}
在這裏,我們通過將用户的輸入添加到提示中並附加我們的 QuestionAnswerAdvisor,構建了提示請求。
最後,我們調用端點並查看它對 RAG 應用所提供的信息。
@Test
void givenMongoDBVectorStoreWithDocumentsAndLLMClient_whenAskQuestionAboutRAG_thenExpectedResponseShouldBeReturned() throws Exception {
    String responseContent = mockMvc.perform(get("/wiki/search?question={question}", "Explain the RAG Applications"))
      .andExpect(status().isOk())
      .andReturn()
      .getResponse()
      .getContentAsString();

    logger.atInfo().log(responseContent);

    assertThat(responseContent).isNotEmpty();
}
我們將問題“解釋 RAG 應用”發送到我們的端點,並記錄了 API 響應:
b.s.r.m.RAGMongoDBApplicationManualTest : Based on the context provided, the RAG AI Application is a tool
used for storing documentation and enabling users to search for specific information efficiently...如我們所見,端點返回了關於基於我們先前在向量數據庫中保存的文檔文件的 RAG 應用的信息。
現在,讓我們嘗試詢問一些我們肯定沒有在知識庫中:
@Test
void givenMongoDBVectorStoreWithDocumentsAndLLMClient_whenAskUnknownQuestion_thenExpectedResponseShouldBeReturned() throws Exception {
    String responseContent = mockMvc.perform(get("/wiki/search?question={question}", "Explain the Economic theory"))
      .andExpect(status().isOk())
      .andReturn()
      .getResponse()
      .getContentAsString();

    logger.atInfo().log(responseContent);

    assertThat(responseContent).isNotEmpty();
}
現在我們已經討論了經濟理論,以下是對此的回答:
b.s.r.m.RAGMongoDBApplicationManualTest : I'm sorry, but the economic theory is not directly related to the information provided about owls and the RAG AI Application.
If you have a specific question about economic theory, please feel free to ask.這次,我們的應用程序沒有找到任何相關文檔,並且沒有使用任何其他來源提供答案。
8. 結論
在本文中,我們成功地使用 Spring AI 框架構建了一個 RAG 應用,這是一個集成的各種 AI 技術的高效工具。 此外, MongoDB 也被證明是處理向量存儲的強大選擇。
憑藉這種強大的組合,我們可以為各種目的構建現代 AI 驅動的應用,包括聊天機器人、自動化維基系統和搜索引擎。
如往常一樣,代碼可以在 GitHub 上找到。
