1. 概述
Spring Authorization Server 的默認實現將所有內容存儲在內存中。例如 RegisteredClient、Token 存儲、授權狀態等,都會在 JVM 啓動/停止時創建和刪除。這在某些情況下,如演示和測試中是有益的。但是,在實際應用中,它 會導致問題,因為它不支持水平擴展、重啓和其他類似場景。
為了解決這個問題,Spring 提供了使用 Redis 實現 Spring Authorization Service 的核心服務的方法。 這樣,我們就可以擁有 Token 和註冊客户端的持久性和耐久性。 此外,我們還可以享受更好的質量和安全性,並可以訪問管理 Token。 我們可以擴展 Authorization Server,提供可觀測性和事件溯源,並在多個節點上訪問撤銷 Token,以及其他好處。
在本文中,我們將探討如何使用 Redis 實現 Spring Authorization Service 的核心服務。 我們將研究需要更改或添加的組件,並提供代碼示例以實現這些更改。 我們將使用嵌入式 Redis Server 作為演示目的。 但是,所有內容都應該在容器化或部署實例中以相同的方式工作。
2. 基礎項目為了本教程,我們將基於現有的 Spring Security OAuth 項目,該項目將所有內容存儲在內存中。然後,我們將介紹 Spring Authorization Service 的核心服務,並使用 Redis。
現有的項目是一個 REST API,它提供了一份文章列表。但是,端點已受保護,需要身份驗證和授權,如鏈接文章中所述。在本教程的範圍內,我們不會對服務本身進行任何更改。
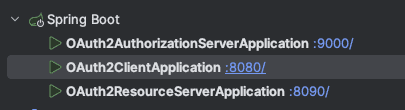
2.1. 項目結構基礎項目包含三個模塊:
在本文中,我們將使用與基礎項目相同的代碼,但 Authorization Server 會進行一些更改。
2.2. 依賴項首先,讓我們為所有模塊定義 Spring 依賴項的常見版本。要實現這一點,所有模塊都將使用一個通用的父模塊,而該父模塊反過來又使用 spring-boot-starter-parent
<parent>
    <groupId>org.springframework.boot</groupId>
    <artifactId>spring-boot-starter-parent</artifactId>
    <version>3.5.0</version>
</parent>
<parent>
<groupId>org.springframework.boot</groupId>
<artifactId>spring-boot-starter-parent</artifactId>
<version>3.5.0</version>
</parent>
我們需要提及的另一個版本是嵌入式 Redis Server 依賴項,用於在 Authorization Server 中使用:
<dependency>
    <groupId>com.github.codemonstur</groupId>
    <artifactId>embedded-redis</artifactId>
    <version>1.4.2</version>
</dependency>
3. Spring Authorization Server With Redis
Spring Authorization Server, by default, uses in-memory implementations for:
- RegisteredClientRepository
- Token stores
- Authorization consents
- Authorization states
This is beneficial in certain scenarios, particularly when we need to act quickly without requiring long-term storage. Such scenarios could be running tests, demonstration purposes, and others. But if the use case is more complex, with requirements for long-term storage, scalability, and monitoring, then the Authorization Server needs to be able to store things in a database.
Spring offers this option to implement the Core Services of Spring Authorization Service with Redis. To do that, we need to:
- Define the entity model
- Create Spring Data repositories
- Implement core services
- Configure core services
3.1. Entity Model of the Authorization Service With Redis
First, we need to define some entities to represent the core components: RegisteredClient, OAuth2Authorization, and OAuth2AuthorizationConsent. We broke the OAuth2Authorization class down based on the authorization grant type. Let’s examine the entities we’ll be creating:
- Registered Client Entity (OAuth2RegisteredClient) is used to persist information mapped from the RegisteredClient
- Authorization Consent Entity (OAuth2UserConsent) is used to persist information mapped from the OAuth2AuthorizationConsent
- Authorization Grant Base Entity (OAuth2AuthorizationGrantAuthorization) is the base entity to persist information mapped to OAuth2Authorization and has common attributes for each authorization grant type
- Authorization Code Grant Entity for OAuth 2.0 (OAuth2AuthorizationCodeGrantAuthorization) defines additional attributes for the OAuth 2.0 “authorization_code” grant type
- Authorization Code Grant Entity for OpenID Connect 1.0 (OidcAuthorizationCodeGrantAuthorization) defines additional attributes for the OpenID Connect 1.0 “authorization_code” grant type
- Client Credentials Grant Entity (OAuth2ClientCredentialsGrantAuthorization) defines additional attributes for the “client_credentials” grant type
- Device Code Grant Entity (OAuth2DeviceCodeGrantAuthorization) defines additional attributes for the “urn:ietf:params:oauth:grant-type:device_code” grant type
- Token Exchange Grant Entity (OAuth2TokenExchangeGrantAuthorization) defines additional attributes for the “urn:ietf:params:oauth:grant-type:token-exchange” grant type
3.2. Spring Data Repositories of the Authorization Service With Redis
Then, we create the minimal set of repositories that we need to implement the Core Services of Spring Authorization Service with Redis.
- Registered Client Repository (RedisRegisteredClientRepository) to find the OAuth2RegisteredClient by id or clientId
- Authorization Consent Repository (OAuth2UserConsentRepository) to find and delete any OAuth2UserConsent record by the registeredClientId and principalName
- Authorization Grant Repository (OAuth2AuthorizationGrantAuthorizationRepository) to find an OAuth2AuthorizationGrantAuthorization by id, state, deviceCode, etc, depending on the grant type
3.3. Core Services of the Authorization Service With Redis
Similarly, we want to construct the services corresponding to the previous Core Services of the Authorization Service.
- Model Mapper (ModelMapper) is not a core service, but it’s one we’ll use in all the following core services to do mappings between entity objects and domain objects
- Registered Client Repository (RedisRegisteredClientRepository) combines OAuth2RegisteredClient, OAuth2RegisteredClient, and the ModelMapper classes to persist RegisteredClient objects
- Authorization Consent Service (RedisOAuth2AuthorizationConsentService) combines OAuth2UserConsentRepository, OAuth2UserConsent, and the ModelMapper classes to persist OAuth2AuthorizationConsent objects
- Authorization Service (RedisOAuth2AuthorizationService) combines OAuth2AuthorizationGrantAuthorizationRepository, OAuth2AuthorizationGrantAuthorization, and the ModelMapper classes to persist OAuth2Authorization objects
We can find the implementation code of the services on GitHub.
3.4. Spring Configuration of the Authorization Service With Redis
Last, SecurityConfig class should contain the same beans as in the base project. The user credentials we register and will use later in the demonstration are username “admin”, password “password”. Let’s look at the configuration for Redis:
@Configuration(proxyBeanMethods = false)
@EnableRedisRepositories
public class RedisConfig {
    // fields omitted

    @PostConstruct
    public void postConstruct() throws IOException {
        redisServer.start();
    }

    @PreDestroy
    public void preDestroy() throws IOException {
        redisServer.stop();
    }

    @Bean
    @Order(1)
    public JedisConnectionFactory redisConnectionFactory() {
        RedisStandaloneConfiguration redisStandaloneConfiguration
          = new RedisStandaloneConfiguration(redisHost, redisPort);

        return new JedisConnectionFactory(redisStandaloneConfiguration);
    }

    @Bean
    @Order(2)
    public RedisTemplate<?, ?> redisTemplate(JedisConnectionFactory connectionFactory) {
        RedisTemplate<byte[], byte[]> template = new RedisTemplate<>();
        template.setConnectionFactory(connectionFactory);
        return template;
    }

    @Bean
    @Order(3)
    public RedisCustomConversions redisCustomConversions() {
        return new RedisCustomConversions(
          Arrays.asList(
            new UsernamePasswordAuthenticationTokenToBytesConverter(),
            new BytesToUsernamePasswordAuthenticationTokenConverter(),
            new OAuth2AuthorizationRequestToBytesConverter(),
            new BytesToOAuth2AuthorizationRequestConverter(),
            new ClaimsHolderToBytesConverter(),
            new BytesToClaimsHolderConverter()));
    }

    @Bean
    @Order(4)
    public RedisRegisteredClientRepository registeredClientRepository(
      OAuth2RegisteredClientRepository registeredClientRepository) {
        RedisRegisteredClientRepository redisRegisteredClientRepository
          = new RedisRegisteredClientRepository(registeredClientRepository);
        redisRegisteredClientRepository.save(RegisteredClients.messagingClient());

        return redisRegisteredClientRepository;
    }

    @Bean
    @Order(5)
    public RedisOAuth2AuthorizationService authorizationService(
      RegisteredClientRepository registeredClientRepository,
      OAuth2AuthorizationGrantAuthorizationRepository authorizationGrantAuthorizationRepository) {
        return new RedisOAuth2AuthorizationService(registeredClientRepository,
          authorizationGrantAuthorizationRepository);
    }

    @Bean
    @Order(6)
    public RedisOAuth2AuthorizationConsentService authorizationConsentService(
      OAuth2UserConsentRepository userConsentRepository) {
        return new RedisOAuth2AuthorizationConsentService(userConsentRepository);
    }
}
The RedisConfig class provides the Spring beans for Redis and the Core Components of the Authorization Service with Redis:
- @PostConstruct and @PreDestroy annotations are used to start and stop the embedded Redis Server
- JedisConnectionFactory and RedisTemplate beans are used for connecting to Redis
- The RedisCustomConversions bean is needed for the Object-to-hash conversions needed for persisting to Redis
- RedisRegisteredClientRepository is used to set the registeredClientRepository bean and then register a client, as we’ll be explained in the next section
- RedisOAuth2AuthorizationService is registered as the authorizationService bean, with the appropriate repositories set
- Similarly, RedisOAuth2AuthorizationConsentService is registered as the authorizationConsentService bean
3.5. Registered Clients
. This is a built-in feature for the Spring Authorization Service, starting from version 3.1.0, that uses the OAuth2AuthorizationServerProperties class.
.
We can follow different approaches to resolve this, like using the OAuth2AuthorizationServerProperties class and doing the mapping and storage to the custom repository, using hardcoded values directly, and more. Since this is a tutorial, we’ll go with the less complex way, which is to use hardcoded values and store the RegisteredClient in the RedisRegisteredClientRepository directly, in the config (as shown in the previous section).
Let’s create a RegisteredClient using code:
public class RegisteredClients {
    public static RegisteredClient messagingClient() {
        return RegisteredClient.withId(UUID.randomUUID().toString())
          .clientId("articles-client")
          .clientSecret("{noop}secret")
          .clientAuthenticationMethod(ClientAuthenticationMethod.CLIENT_SECRET_BASIC)
          .authorizationGrantType(AuthorizationGrantType.AUTHORIZATION_CODE)
          .authorizationGrantType(AuthorizationGrantType.REFRESH_TOKEN)
          .authorizationGrantType(AuthorizationGrantType.CLIENT_CREDENTIALS)
          .authorizationGrantType(AuthorizationGrantType.DEVICE_CODE)
          .redirectUri("http://127.0.0.1:8080/login/oauth2/code/articles-client-oidc")
          .redirectUri("http://127.0.0.1:8080/authorized")
          .postLogoutRedirectUri("http://127.0.0.1:9000/login")
          .scope(OidcScopes.OPENID)
          .scope("articles.read")
          .build();
    }
}
This configuration should be familiar, since it is a copy of the property-based registered clients from the base project. Note that we use all four authorization grant types we created entities for.
4. 使用 Redis 的授權服務演示
讓我們看看如何訪問 articles 資源。首先啓動所有三個模塊。我們這裏使用 IntelliJ 來完成:
現在,導航到 http://127.0.0.1:8080/articles。該頁面會將我們重定向到登錄頁面:

在該頁面,用户可以選擇通過點擊 articles-client-authorization-code 或 articles-client-oidc 進行身份驗證。在兩種情況下,他們都需要提供用户名和密碼 (“admin”, “password”, 作為 UserDetailsService bean 中設置的)
這樣,他們驗證了授權服務器,並獲得了訪問 articles-client 的權限。如果用户選擇第一個選項進行身份驗證,登錄成功後,他們必須點擊第二個鏈接才能導航到 articles 頁面。如果用户選擇了第二個選項,則一切自動完成:

在圖像中,我們可以看到,在成功登錄後,用户可以訪問資源。我們還可以看到添加到瀏覽器的 cookie。
另外需要注意的是,由於我們實現了 Spring Authorization Service 的核心服務,因此現在我們可以看到 Redis 服務器存儲了會話信息以及更多信息:
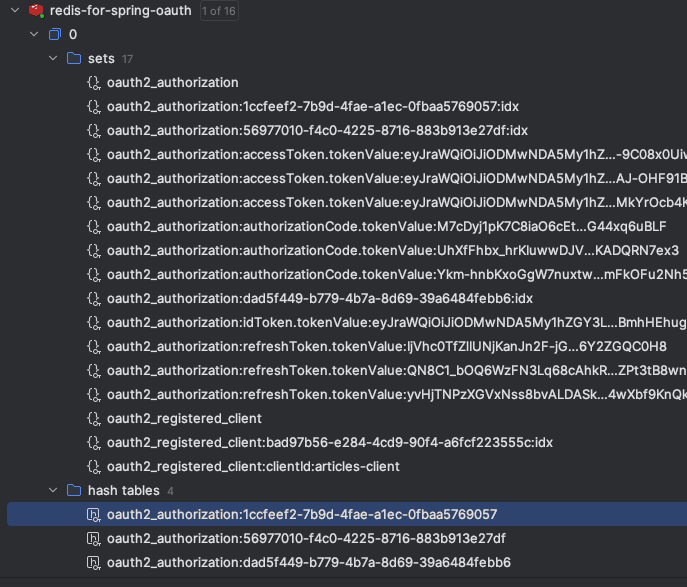
oauth2_registered_client 對象是在登錄之前在 Redis 中存在的唯一對象。登錄成功後,其餘所有數據都是我們存儲的。
5. 結論
在本文中,我們討論了 Spring Authorization Service 與 Redis 的核心服務。我們回顧了需要修改以從默認的內存存儲切換到使用 Redis 的組件。最後,我們觀察了授權用户訪問資源的過程,以及 Authorization Server 如何在 Redis 中存儲令牌。
