1. 概述
測試是編程中最重要的話題之一。Spring Framework 和 Spring Boot 都提供了良好的支持,通過提供測試框架擴展以及引導我們編寫大量的自動化測試,從而使我們能夠編寫可測試的最小代碼。要運行 Spring Boot 集成測試,我們只需在測試類中添加 @SpringBootTest。 您可以在“Spring Boot 中的測試”中找到簡短的介紹。 即使我們不使用 Spring Boot,但仍然可以使用 Spring Framework 能夠非常高效地進行集成測試。
但是,測試越容易開發,就越容易陷入陷阱。 在本教程中,我們將探索 Spring Boot 測試的執行方式以及編寫測試時需要考慮的內容。
2. 陷阱示例
我們先從一個簡單的示例開始:讓我們實現一個用於管理寵物(一個 PetService)的服務,例如如下所示:
public record Pet(String name) {}@Service
public class PetService {
private final Set<Pet> pets = new HashSet<>();
public Set<Pet> getPets() {
return Collections.unmodifiableSet(pets);
}
public boolean add(Pet pet) {
return this.pets.add(pet);
}
}該服務不應允許重複,因此測試可能如下所示:
@SpringBootTest
class PetServiceIntegrationTest {
@Autowired
PetService service;
@Test
void shouldAddPetWhenNotAlreadyExisting() {
var pet = new Pet("Dog");
var result = service.add(pet);
assertThat(result).isTrue();
assertThat(service.getPets()).hasSize(1);
}
@Test
void shouldNotAddPetWhenAlreadyExisting() {
var pet = new Pet("Cat");
var result = service.add(pet);
assertThat(result).isTrue();
// try a second time
result = service.add(pet);
assertThat(result).isFalse();
assertThat(service.getPets()).hasSize(1);
}
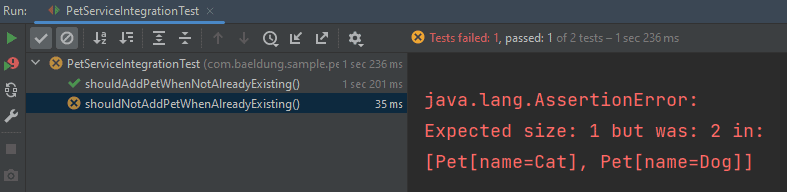
}當我們在單獨執行每個測試時一切正常。但是,當我們一起執行它們時,我們會得到測試失敗:
但為什麼測試會失敗?我們如何防止這種情況發生?我們將對此進行澄清,但首先,讓我們從一些基本概念開始。
3. 功能測試的設計目標
我們編寫功能測試,以記錄需求並確保應用程序代碼正確實現這些需求。因此,測試本身也必須正確,並且易於理解,理想情況下,它應該具有自解釋性。但是,對於本文,我們將重點關注進一步的設計目標:
- 迴歸:測試必須可重複。它們必須產生確定性的結果
- 隔離:測試之間不能相互影響。無論它們以何種順序執行,甚至是否並行執行,都不會重要
- 性能:測試應該儘可能快速且節約資源,特別是那些作為 CI 管道或 TDD 的一部分的測試
關於 Spring Boot 測試,我們需要意識到它們是一種集成測試,因為它們會導致 ApplicationContext 的初始化,即 bean 被初始化並使用依賴注入進行綁定。因此,隔離需要特別關注——而且上面示例似乎存在隔離問題。另一方面,Spring Boot 測試也面臨着良好的性能挑戰。
作為第一結論,我們可以説,避免集成測試是最重要的。PetService 測試的最佳選擇將是單元測試:
// no annotation here
class PetServiceUnitTest {

    PetService service = new PetService();

    // ...
}
我們應該只編寫 Spring Boot 測試,當需要時,例如當我們想要測試應用程序代碼是否能夠被框架正確處理(生命週期管理、依賴注入、事件處理)或者當我們想要測試特定層(HTTP 層、持久化層)時。
4. 上下文緩存
顯然,當我們向測試類添加 @SpringBootTest 時,ApplicationContext 會啓動,並且 Bean 會被初始化。但是,為了支持隔離,JUnit 會為每個測試方法初始化這個步驟。這會導致每個測試用例只有一個 ApplicationContext,從而顯著降低測試性能。為了避免這種情況,Spring Test Framework 緩存上下文並允許在多個測試用例中重複使用它。當然,這也會導致 Bean 實例的重複使用。這就是 PetService 測試失敗的原因——兩個測試方法都處理同一個 PetService 實例。
只有當不同的 ApplicationContext 與彼此不同時,才會創建不同的 ApplicationContext——例如,如果它們包含不同的 Bean 或具有不同的應用程序屬性。有關此信息的詳細説明,請參閲 Spring Test Framework 文檔。
由於 ApplicationContext 的配置在類級別完成,因此測試類中的所有方法默認情況下共享同一個上下文。
以下示意圖展示了這種情況:

上下文緩存作為一種性能優化手段與隔離性相悖,因此我們只能在隔離性得到保證的情況下才重複使用 ApplicationContext。這是最重要的原因,Spring Boot 測試僅應在滿足某些條件時在同一 JVM 內並行運行。雖然可以使用不同的 JVM 進程運行測試(例如,通過設置 forkMode 對於 Maven Surefire 插件),但這樣會繞過緩存機制。
4.1. PetService 示例解決方案
關於 PetService 測試,可能存在多種解決方案。所有這些解決方案都適用,因為 PetService 是一個狀態類。
一種解決方案是在每個測試方法上添加 @DirtiesContext 註解。這會將 ApplicationContext 標記為髒污狀態,因此在測試完成後,它會被關閉並從緩存中移除。這會阻止性能優化,並且不應作為首選方法:
@SpringBootTest
class PetServiceIntegrationTest {

    @Autowired
    PetService service;

    @Test
    @DirtiesContext
    void shouldAddPetWhenNotAlreadyExisting() {
        // ...
    }

    @Test
    @DirtiesContext
    void shouldNotAddPetWhenAlreadyExisting() {
        // ...
    }
}
另一個解決方案是在每次測試後重置 PetService 的狀態:
@SpringBootTest
class PetServiceIntegrationTest {

    @Autowired
    PetService service;

    @AfterEach
    void resetState() {
        service.clear(); // deletes all pets
    }

    // ...
}但是,最佳解決方案是實現PetService無狀態。目前,寵物沒有存儲在內存中,這從來都不是一個好的做法,尤其是在可擴展的環境中。
4.2. 潛在問題:過多的上下文
為了避免無意識地初始化額外的 <em >ApplicationContexts</em>,我們需要了解導致不同配置的原因。 最明顯的是直接配置 Bean,例如使用 <em >@ComponentScan</em>、<em >@Import</em>、<em >@AutoConfigureXXX</em>(例如 <em >@AutoConfigureTestDatabase</em>)。 但派生也可能由啓用 Profile(<em >@ActiveProfiles</em>)或記錄事件(<em >@RecordApplicationEvents</em>)引起:
@SpringBootTest
// each of them derives from the original (cached) context
@ComponentScan(basePackages = "com.baeldung.sample.blogposts")
@Import(PetServiceTestConfiguration.class)
@AutoConfigureTestDatabase
@ActiveProfiles("test")
@RecordApplicationEvents
class PetServiceIntegrationTest {
    // ...
}
我們可以在 Spring 測試框架文檔 中找到詳細信息。
4.3. 陷阱:偽裝(Mocking)
Spring Test Framework 包含 Mockito,用於創建和使用 Mock 對象。當使用 @MockBean 時,Mockito 會創建一個 Mock 實例並將其注入到 ApplicationContext 中。該實例僅限於測試類。 這意味着我們不能與其他的測試類共享 ApplicationContext:
@SpringBootTest
class PetServiceIntegrationTest {

    // context is not shareable with other test classes
    @MockBean
    PetServiceRepository repository;

    // ...
}
一個建議是避免使用 Mock 並直接測試整個應用程序。但是,如果我們想要測試異常處理,就無法總是避免 Mock。如果我們仍然希望與其它測試類共享 ApplicationContext,我們也必須共享 Mock 實例。這在定義一個 @TestConfiguration 來創建 Mock 並替換原始 Bean 在 ApplicationContext 中時是可行的。但是,我們必須意識到隔離問題。
正如我們所知,緩存和重用 ApplicationContext 假設在上下文中在每次測試後重置每個狀態化 Bean。Mock 是狀態化 Bean 的一種特殊類型,因為它們被配置為返回值或拋出異常,並且為每個測試用例記錄每個方法調用以進行驗證。在測試後,我們也需要重置它們。這在使用 @MockBean 時會自動完成,但當我們創建一個 @TestConfiguration 中的 Mock 時,我們負責重置。幸運的是,Mockito 本身提供了設置。因此,整個解決方案可能是:
@TestConfiguration
public class PetServiceTestConfiguration {

    @Primary
    @Bean
    PetServiceRepository createRepositoryMock() {
        return mock(
          PetServiceRepository.class,
          MockReset.withSettings(MockReset.AFTER)
        );
    }
}
@SpringBootTest
@Import(PetServiceTestConfiguration.class) // if not automatically detected
class PetServiceIntegrationTest {

    @Autowired
    PetService repository;
    @Autowired // Mock
    PetServiceRepository repository;

    // ...
}
4.4. 配置上下文緩存
如果我們要了解在測試執行期間 ApplicationContext 初始化發生的頻率,可以設置 application.properties 中的日誌級別:
logging.level.org.springframework.test.context.cache=DEBUG我們隨後會獲得包含統計信息的日誌輸出,例如:
org.springframework.test.context.cache:
  Spring test ApplicationContext cache statistics:
  [DefaultContextCache@34585ac9 size = 1, maxSize = 32, parentContextCount = 0, hitCount = 8, missCount = 1]
默認緩存大小為 32 (LRU)。如果需要調整大小,可以指定其他緩存大小:
spring.test.context.cache.maxSize=50如果我們想要深入研究緩存機制的代碼,org.springframework.test.context.cache.ContextCache 接口可以作為起點。
5. 環境配置
除了緩存目的外,為了優化 <em >ApplicationContext</em> 的初始化性能,我們可能需要優化配置。 減少初始化次數可以加快測試環境的搭建速度。 我們可以配置測試用例以啓用懶加載的 Bean 初始化,但必須注意潛在的副作用。 另一種可能性是減少 Bean 的數量。
5.1. 配置檢測
@SpringBootTest 默認情況下,會在測試類所在的當前包中搜索,然後向上通過包結構搜索,查找帶有 @SpringBootConfiguration 註解的類,並從中讀取配置以創建應用程序上下文。這個類通常是我們主要的應用程序,因為 @SpringBootApplication 註解包含了 @SpringBootConfiguration 註解。它會創建一個類似於在生產環境中啓動的應用程序上下文。
5.2. 最小化 ApplicationContext
如果我們需要為我們的測試類創建不同的(最小化)ApplicationContext,我們可以創建一個靜態內部 @Configuration 類:
@SpringBootTest
class PetServiceIntegrationTest {

    @Autowired
    PetService service;

    @Configuration
    static class MyCustomConfiguration {

        @Bean
        PetService createMyPetService() {
            // create your custom pet service
        }
    }

    // ...
}
與使用 @TestConfiguration 不同,這完全阻止了 @SpringBootConfiguration 的自動檢測。
另一種減小 ApplicationContext 大小的辦法是使用 @SpringBootTest(classes=…)。這也會忽略內部的 @Configuration 類,並只初始化給定的類。
@SpringBootTest(classes = PetService.class)
public class PetServiceIntegrationTest {

    @Autowired
    PetService service;

    // ...
}
如果不需要 Spring Boot 的某些功能,例如配置文件和讀取應用程序屬性,我們可以替換 @SpringBootTest。 讓我們來了解一下這個註解背後的內容:
@ExtendWith(SpringExtension.class)
@BootstrapWith(SpringBootTestContextBootstrapper.class)
public @interface SpringBootTest {
    // ...
}
我們能看出,這個註解僅啓用 JUnit 的 SpringExtension(它是 Spring Framework 的一部分,而不是 Spring Boot 的一部分),並聲明瞭 Spring Boot 提供的 TestContextBootstrapper,該類實現了搜索機制。 如果移除 @BootstrapWith,則會使用 DefaultTestContextBootstrapper,該類不具備 SpringBoot 意識。 此時,我們需要使用 @ContextConfiguration 來指定上下文。
@ExtendWith(SpringExtension.class)
@ContextConfiguration(classes = PetService.class)
class PetServiceIntegrationTest {

    @Autowired
    PetService service;

    // ...
}
5.3. 測試切片
Spring Boot 的自動配置系統對於應用程序來説通常表現良好,但有時可能過於冗餘,尤其是在測試中。為了測試應用程序的“切片”,通常有必要僅加載所需配置的一部分。例如,我們可能想測試 Spring MVC 控制器是否正確地映射 URL,並且不想在這些測試中涉及數據庫調用;或者我們可能想測試 JPA 實體,並且在這些測試運行時不關心 Web 層。
我們可以查閲可用的測試切片概述,請參考 Spring Boot 文檔。
5.4. 上下文優化與緩存
上下文優化可以縮短單個測試的啓動時間,但我們應意識到這會導致不同的配置,從而增加 <em ApplicationContext</em>> 的初始化次數。總而言之,整個測試執行時間可能會增加。因此,跳過上下文優化可能更好,但使用與測試用例要求相匹配的現有配置。
6. 提案:自定義切片
正如我們已經學到的,我們必須在計數和 ApplicationContext 的大小之間找到平衡。 挑戰在於跟蹤配置信息。 一種可能的解決方案是定義一些自定義切片(可能一個用於每個層級,一個用於整個應用程序),並在所有測試中使用它們,即避免在測試類中進一步配置和使用 @MockBean。
針對寵物領域層面的解決方案可以是:
@Documented
@Inherited
@Retention(RetentionPolicy.RUNTIME)
@Target(ElementType.TYPE)
@ExtendWith(SpringExtension.class)
@ComponentScan(basePackageClasses = PetsDomainTest.class)
@Import(PetsDomainTest.PetServiceTestConfiguration.class)
// further features that can help to configure and execute tests
@ActiveProfiles({"test", "domain-test"})
@Tag("integration-test")
@Tag("domain-test")
public @interface PetsDomainTest {

    @TestConfiguration
    class PetServiceTestConfiguration {

        @Primary
        @Bean
        PetServiceRepository createRepositoryMock() {
            return mock(
              PetServiceRepository.class,
              MockReset.withSettings(MockReset.AFTER)
            );
        }
    }
}
它可以如下所示使用:
@PetsDomainTest
public class PetServiceIntegrationTest {

    @Autowired
    PetService service;
    @Autowired // Mock
    PetServiceRepository repository;

    // ...
}
7. 進一步的陷阱
This section details potential pitfalls that can arise during the implementation of the system. Understanding these risks and having mitigation strategies in place is crucial for a successful deployment.
7.1 Data Migration Challenges
Data migration is often the most complex and time-consuming aspect of any system implementation. Several challenges can arise:
- Data Quality Issues: Existing data may be inconsistent, inaccurate, or incomplete. Thorough data cleansing and validation are essential.
- Schema Mapping Complexity: Mapping the source database schema to the target schema can be intricate, especially when dealing with legacy systems.
- Data Volume and Performance: Migrating large datasets can strain system resources and impact performance. Careful planning and optimization are required.
7.2 Integration Difficulties
Integrating the new system with existing infrastructure and applications can present significant hurdles:
- API Compatibility: Ensuring compatibility between the new system's APIs and those of existing systems is paramount.
- Legacy System Dependencies: The new system may rely on legacy systems, which can introduce complexities and potential bottlenecks.
- Security Considerations: Integrating with existing systems requires careful attention to security vulnerabilities and access controls.
7.3 Performance Bottlenecks
Identifying and addressing performance bottlenecks is critical for ensuring the system's responsiveness and scalability:
- Database Optimization: Inefficient database queries and schema design can severely impact performance.
- Application Code Optimization: Poorly written application code can contribute to performance issues.
- Resource Constraints: Insufficient server resources (CPU, memory, network bandwidth) can limit the system's capacity.
7.1. 試件配置推導
集成測試的一個基本原則是在儘可能接近生產環境的狀態下測試應用程序。我們只針對特定試件進行配置。不幸的是,測試框架本身會重新配置應用程序的行為,因此我們需要對此保持警惕。例如,內置的可觀測性功能在測試期間已禁用,如果我們想要測試應用程序中的可觀測性,則需要顯式地使用 @AutoConfigureObservability 重新啓用它。
7.2. 包結構
當我們要測試應用程序的切片時,需要聲明哪些組件需要在 ApplicationContext 中進行初始化。我們可以通過列出相應的類來完成,但為了獲得更穩定的測試配置,最好指定包。例如,我們有一個映射器如下:
@Component
public class PetDtoMapper {

    public PetDto map(Pet source) {
        // ...
    }
}
我們需要這個mapper在我們的測試中使用;我們可以使用這個簡潔的解決方案來配置測試:
@ExtendWith(SpringExtension.class)
@ContextConfiguration(classes = PetDtoMapper.class)
class PetDtoMapperIntegrationTest {

    @Autowired
    PetDtoMapper mapper;

    // ...
}
如果我們用 MapStruct 替換 mapper 的實現,PetDtoMapper 類型將變為接口,並且 MapStruct 會在同一包中生成實現類。因此,除非我們導入整個包,否則給定的測試才會失敗:
@ExtendWith(SpringExtension.class)
public class PetDtoMapperIntegrationTest {

    @Configuration
    @ComponentScan(basePackageClasses = PetDtoMapper.class)
    static class PetDtoMapperTestConfig {}

    @Autowired
    PetDtoMapper mapper;

    // ...
}
這會導致所有位於同一包及其子包中的其他 Bean 初始化。因此,我們應該根據切片(slices)的結構來創建包結構。這包括領域特定的組件、用於安全相關的全局配置、Web 或持久化層,以及事件處理程序。
8. 結論
在本教程中,我們探討了編寫 Spring Boot 測試的陷阱。我們瞭解到 ApplicationContext 被緩存並重用,因此我們需要考慮隔離性。
