1. 概述
Spring Cloud Gateway 是一個智能代理服務,通常用於微服務架構中。它實現了請求的集中處理,通過單一入口點將請求路由到相應的服務。其最引人注目的特性是 過濾器 (WebFilter 或 GatewayFilter) 的概念。
WebFilter,與 Predicate 工廠一起,構成了完整的路由機制。Spring Cloud Gateway 提供了許多內置的 WebFilter 工廠,允許在請求到達代理服務之前以及將結果傳遞給客户端之前與 HTTP 請求進行交互。 還可以實現自定義過濾器。
在本教程中,我們將重點介紹項目中的內置 WebFilter 工廠及其在高級用例中的使用方法。
2. WebFilter 工廠
WebFilter (或 GatewayFilter) 工廠允許修改傳入的 HTTP 請求和傳出的 HTTP 響應。從這個意義上講,它提供了一套有趣的特性,用於在與下游服務交互之前和之後應用。
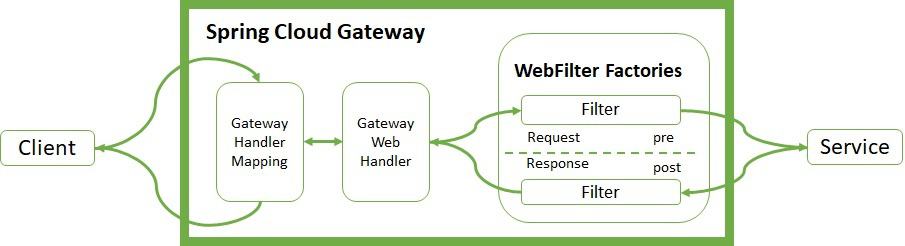
Handler Mapping 管理客户端的請求。它檢查請求是否與已配置的路由匹配。然後,它將請求發送到 Web Handler 以執行特定路由的過濾器鏈。
點線分割表示預過濾器邏輯和後過濾器邏輯之間的邏輯分割。傳入的過濾器在代理請求之前運行。輸出過濾器在收到代理響應時生效。過濾器提供機制,用於在兩者之間修改流程。
3. 實現 WebFilter 工廠
讓我們回顧一下 Spring Cloud Gateway 項目中整合的關鍵 WebFilter 工廠。有 兩種實現方式,使用 YAML 或 Java DSL 。
讓我們來看一下這兩種方式的示例。
3.1. HTTP 請求
內置 <em >WebFilter</em> 工廠 允許與 HTTP 請求的頭部和參數進行交互。我們可以使用 <a href="https://cloud.spring.io/spring-cloud-gateway/reference/html/#the-addrequestheader-gatewayfilter-factory">添加</a> (AddRequestHeader), <a href="https://docs.spring.io/spring-cloud-gateway/docs/4.0.0/reference/html/#the-addrequestheadersifnotpresent-gatewayfilter-factory">修改</a> (AddRequestHeadersIfNotPresent) (從 4.0 版本開始), <a href="https://cloud.spring.io/spring-cloud-gateway/reference/html/#the-maprequestheader-gatewayfilter-factory">映射</a> (MapRequestHeader), <a href="https://cloud.spring.io/spring-cloud-gateway/reference/html/#the-setrequestheader-gatewayfilter-factory">設置或替換</a> (SetRequestHeader), 以及 <a href="https://cloud.spring.io/spring-cloud-gateway/reference/html/#the-removerequestheader-gatewayfilter-factory">移除</a> (RemoveRequestHeader) 頭部值並將其發送到代理服務。
原始主機頭部也可以保留 (PreserveHostHeader)。
同樣,我們可以使用 <a href="https://cloud.spring.io/spring-cloud-gateway/reference/html/#the-addrequestparameter-gatewayfilter-factory">添加</a> (AddRequestParameter) 和 <a href="https://cloud.spring.io/spring-cloud-gateway/reference/html/#the-removerequestparameter-gatewayfilter-factory">移除</a> (RemoveRequestParameter) 參數供下游服務處理:
- id: add_request_header_route
  uri: https://httpbin.org
  predicates:
  - Path=/get/**
  filters:
  - AddRequestHeader=My-Header-Good,Good
  - AddRequestHeader=My-Header-Remove,Remove
  - AddRequestHeadersIfNotPresent=My-Header-Absent:Absent
  - AddRequestParameter=var, good
  - AddRequestParameter=var2, remove
  - MapRequestHeader=My-Header-Good, My-Header-Bad
  - MapRequestHeader=My-Header-Set, My-Header-Bad
  - SetRequestHeader=My-Header-Set, Set
  - RemoveRequestHeader=My-Header-Remove
  - RemoveRequestParameter=var2
讓我們檢查一切是否按預期工作。為此,我們將使用 curl 及其公開可用的 httpbin.org:
$ curl http://localhost:8080/get
{
  "args": {
    "var": "good"
  },
  "headers": {
    "Host": "localhost",
    "My-Header-Bad": "Good",
    "My-Header-Good": "Good",
    "My-Header-Set": "Set",
  },
  "origin": "127.0.0.1, 90.171.125.86",
  "url": "https://localhost:8080/get?var=good"
}
我們能看到 curl 響應是由於配置的請求過濾器造成的。它們添加了 My-Header-Good,值為 Good,並將內容映射到 My-Header-Bad。它們刪除了 My-Header-Remove,並設置了一個新的值到 My-Header-Set。在 args 和 url 部分,我們可以看到添加了一個新的參數 var。此外,最後一個過濾器刪除了 var2 參數。
此外,我們可以 修改請求體 在到達代理服務之前 。 此過濾器只能使用 Java DSL 語法進行配置,如下所示,只是將響應體的內容轉換為大寫:
@Bean
public RouteLocator routes(RouteLocatorBuilder builder) {
     return builder.routes()
       .route("modify_request_body", r -> r.path("/post/**")
         .filters(f -> f.modifyRequestBody(
           String.class, Hello.class, MediaType.APPLICATION_JSON_VALUE,
           (exchange, s) -> Mono.just(new Hello(s.toUpperCase()))))
         .uri("https://httpbin.org"))
       .build();
}
為了測試該片段,讓我們使用 curl 命令,通過添加 -d 選項來包含正文 “Content”:
$ curl -X POST "http://localhost:8080/post" -i -d "Content"
"data": "{\"message\":\"CONTENT\"}",
"json": {
    "message": "CONTENT"
}
我們能看到,由於過濾器,
的內容現在已經轉換為大寫——CONTENT。3.2. HTTP 響應
正如上面所述,我們可以通過使用 <a href="https://cloud.spring.io/spring-cloud-gateway/reference/html/#the-addresponseheader-gatewayfilter-factory">add</a> (AddResponseHeader), <a href="https://cloud.spring.io/spring-cloud-gateway/reference/html/#the-setresponseheader-gatewayfilter-factory">set</a> 或替換 (<em>SetResponseHeader</em>), 刪除 (<a href="https://cloud.spring.io/spring-cloud-gateway/reference/html/#removeresponseheader-gatewayfilter-factory">remove</a>) (RemoveResponseHeader) 和重寫 (<a href="https://cloud.spring.io/spring-cloud-gateway/reference/html/#the-rewriteresponseheader-gatewayfilter-factory">rewrite</a>) (RewriteResponseHeader) 來修改響應頭。
另一個響應功能是使用 <a href="https://cloud.spring.io/spring-cloud-gateway/reference/html/#the-deduperesponseheader-gatewayfilter-factory">dedupe</a> (DedupeResponseHeader) 來覆蓋策略並避免在它們中重複出現。 通過使用另一個內置工廠 (RemoveLocationResponseHeader),我們可以消除關於版本、位置和主機等後端特定細節。
從版本 4.0 開始,我們可以使用 <a href="https://docs.spring.io/spring-cloud-gateway/docs/4.0.0/reference/html/#removejsonattributesresponsebody-gatewayfilter-factory">remove</a> (RemoveJsonAttributesResponseBody) 來從 JSON 響應體內容中刪除多個屬性。 默認情況下,它只會刪除根級別的屬性。 在 JSON 結構末尾添加一個真屬性將刪除任何 JSON 結構級別的屬性。
以下是一個完整的示例:
- id: response_header_route
  uri: https://httpbin.org
  predicates:
  - Path=/header/post/**
  filters:
  - DedupeResponseHeader=Access-Control-Allow-Credentials Access-Control-Allow-Origin
  - SetResponseHeader=My-Header-Set, Set
  - RemoveResponseHeader=My-Header-Remove
  - RewriteResponseHeader=My-Header-Rewrite, password=[^&]+, password=***
  - RewriteLocationResponseHeader=AS_IN_REQUEST, Location, ,
  - RemoveJsonAttributesResponseBody=form,Accept,true
  - AddResponseHeader=My-Header-Good,Good
  - AddResponseHeader=My-Header-Set,Good
  - AddResponseHeader=My-Header-Remove,Remove
  - AddResponseHeader=My-Header-Rewrite,password=12345678
  - StripPrefix=1
讓我們使用 curl 來顯示響應頭:
$ curl -X POST "http://localhost:8080/header/post" -s -o /dev/null -D -
HTTP/1.1 200 OK
My-Header-Good: Good
Access-Control-Allow-Origin: *
Access-Control-Allow-Credentials: true
My-Header-Rewrite: password=***
My-Header-Set: Set
類似於 HTTP 請求,我們可以 修改響應體。 在本示例中,我們覆蓋了 PUT 響應的體:
@Bean
public RouteLocator responseRoutes(RouteLocatorBuilder builder) {
    return builder.routes()
      .route("modify_response_body", r -> r.path("/put/**")
        .filters(f -> f.modifyResponseBody(
          String.class, Hello.class, MediaType.APPLICATION_JSON_VALUE,
          (exchange, s) -> Mono.just(new Hello("New Body"))))
        .uri("https://httpbin.org"))
      .build();
}
讓我們使用 PUT 終點來測試功能:
$ curl -X PUT "http://localhost:8080/put" -i -d "CONTENT"
{"message":"New Body"}
3.3. 路徑
WebFilter 工廠提供的特性之一是與客户端配置的路徑進行交互。您可以設置不同的路徑(<em>SetPath</em>)、重寫路徑(<em>RewritePath</em>)、添加前綴(<em>PrefixPath</em>)以及去除前綴(<em>StripPrefix</em>),以提取路徑的一部分。
請注意,過濾器按照它們在 YAML 文件中的位置執行,順序取決於其位置。
- id: path_route
  uri: https://httpbin.org
  predicates:
  - Path=/new/post/**
  filters:
  - RewritePath=/new(?<segment>/?.*), $\{segment}
  - SetPath=/post
這兩個過濾器會移除 /new 路徑前綴,在到達代理服務之前。
我們用 curl 測試一下:
$ curl -X POST "http://localhost:8080/new/post" -i
"X-Forwarded-Prefix": "/new"
"url": "https://localhost:8080/post"
我們還可以使用 StripPrefix工廠。通過設置 StripPrefix=1, ,我們可以去除與下游服務通信時的前置路徑。
3.4. 相關 HTTP 狀態
RedirectTo 組件有兩個參數:狀態和 URL。狀態必須是一個 300 系列的 HTTP 重定向代碼,URL 必須是有效的 URL。 SetStatus 組件則只有一個參數,即狀態,該狀態可以是 HTTP 代碼或其字符串表示形式。
- id: redirect_route
  uri: https://httpbin.org
  predicates:
  - Path=/fake/post/**
  filters:
  - RedirectTo=302, https://httpbin.org
- id: status_route
  uri: https://httpbin.org
  predicates:
  - Path=/delete/**
  filters:
  - SetStatus=401
第一步過濾器作用於 /fake/post 路徑,客户端會被重定向到 https://httpbin.org,並返回 HTTP 狀態碼 302:
$ curl -X POST "http://localhost:8080/fake/post" -i
HTTP/1.1 302 Found
Location: https://httpbin.org
第二個過濾器檢測到 /delete 路徑,並設置 HTTP 狀態碼 401:
$ curl -X DELETE "http://localhost:8080/delete" -i
HTTP/1.1 401 Unauthorized
3.5. 請求大小限制
最後,我們可以限制請求的大小限制(RequestSize)。
如果請求大小超過限制,網關拒絕訪問服務:
- id: size_route
  uri: https://httpbin.org
  predicates:
  - Path=/anything
  filters:
  - name: RequestSize
    args:
       maxSize: 5000000
4. 高級使用場景
Spring Cloud Gateway 提供其他高級 <em >WebFilter</em> 工廠,以支持微服務模式的基礎功能。
4.1. 電路斷路器
Spring Cloud Gateway 具有內置的 WebFilter 工廠,用於實現電路斷路器功能。該工廠允許配置不同的回退策略和 Java DSL 路由配置:
- id: circuitbreaker_route
  uri: https://httpbin.org
  predicates:
  - Path=/status/504
  filters:
  - name: CircuitBreaker
    args:
      name: myCircuitBreaker
      fallbackUri: forward:/anything
  - RewritePath=/status/504, /anything
對於斷路器的配置,我們使用了 Resilience4J,通過添加 spring-cloud-starter-circuitbreaker-reactor-resilience4j 依賴項:
<dependency>
    <groupId>org.springframework.cloud</groupId>
    <artifactId>spring-cloud-starter-circuitbreaker-reactor-resilience4j</artifactId>
</dependency>
再次,我們可以使用 curl 測試功能:
$ curl http://localhost:8080/status/504
"url": "https://localhost:8080/anything"
4.2. 重試
另一個高級功能允許客户端在代理服務出現問題時重試訪問。它接受多個參數,例如重試次數、HTTP 狀態碼狀態碼、以及方法,系列、異常和退避間隔,用於在每次重試後等待:
- id: retry_test
  uri: https://httpbin.org
  predicates:
  - Path=/status/502
  filters:
  - name: Retry
    args:
       retries: 3
       statuses: BAD_GATEWAY
       methods: GET,POST
       backoff:
          firstBackoff: 10ms
          maxBackoff: 50ms
          factor: 2
          basedOnPreviousValue: false
當客户端遇到 /status/502 (Bad Gateway) 錯誤時,過濾器會重試三次,等待每次執行後配置的退避間隔。
下面我們來查看它的工作原理:
$ curl http://localhost:8080/status/502同時,還需要檢查服務器上的網關日誌:
Mapping [Exchange: GET http://localhost:8080/status/502] to Route{id='retry_test', ...}
Handler is being applied: {uri=https://httpbin.org/status/502, method=GET}
Received last HTTP packet
Handler is being applied: {uri=https://httpbin.org/status/502, method=GET}
Received last HTTP packet
Handler is being applied: {uri=https://httpbin.org/status/502, method=GET}
Received last HTTP packet
當網關收到 502 狀態碼時,過濾器會嘗試三次,並採用此退避策略對 GET 和 POST 方法進行重試。
4.3. 保存會話和安全頭部
<a href="https://cloud.spring.io/spring-cloud-gateway/reference/html/#the-secureheaders-gatewayfilter-factory"><em>SecureHeader</em></a> 工廠添加了 HTTP 安全頭部到響應中。 同樣,<a href="https://cloud.spring.io/spring-cloud-gateway/reference/html/#the-savesession-gatewayfilter-factory"><em>SaveSession</em></a> 在與 <em>Spring Session</em> 和 <em>Spring Security</em> 一起使用時尤其重要:
filters:
- SaveSession此過濾器存儲會話狀態,在轉發調用之前。
4.4. 請求速率限制器
RequestRateLimiter 工廠 確定請求是否可以繼續。如果不能,它返回 HTTP 狀態碼 429 – 請求過多。它使用不同的參數和解析器來指定速率限制器。
RedisRateLimiter 使用了廣為人知的 Redis 數據庫來檢查桶可以保持的令牌數量。
它需要以下依賴項:
<dependency>
    <groupId>org.springframework.boot</groupId>
    <artifactId>spring-boot-starter-data-redis-reactive</artifactId>
 </dependency>
Consequently, it also needs the configuration of Spring Redis:
spring:
  redis:
    host: localhost
port: 6379過濾器具有多個屬性。第一個參數,replenishRate,表示每秒允許的請求數量。第二個參數,burstCapacity,是單個秒鐘內的最大請求數量。第三個參數,requestedTokens,表示請求的成本(請求消耗的 token 數量)。下面是一個示例實現:
- id: request_rate_limiter
  uri: https://httpbin.org
  predicates:
  - Path=/redis/get/**
  filters:
  - StripPrefix=1
  - name: RequestRateLimiter
    args:
      redis-rate-limiter.replenishRate: 10
      redis-rate-limiter.burstCapacity: 5
      redis-rate-limiter.requestedTokens: 1
讓我們使用 curl 測試過濾器。在進行測試之前,我們應該確保 Redis 實例已啓動,例如使用 Docker:Docker。
$ curl "http://localhost:8080/redis/get" -i
HTTP/1.1 200 OK
X-RateLimit-Remaining: 4
X-RateLimit-Requested-Tokens: 1
X-RateLimit-Burst-Capacity: 5
X-RateLimit-Replenish-Rate: 10
當剩餘速率限制降至零時,網關會返回 HTTP 狀態碼 429。為了測試其行為,我們可以使用單元測試。
我們啓動一個嵌入式 Redis 服務器,並並行運行 RepeatedTests。當桶達到限制時,錯誤開始顯示:
00:57:48.263 [main] INFO  c.b.s.w.RedisWebFilterFactoriesLiveTest - Received: status->200, reason->OK, remaining->[4]
00:57:48.394 [main] INFO  c.b.s.w.RedisWebFilterFactoriesLiveTest - Received: status->200, reason->OK, remaining->[3]
00:57:48.530 [main] INFO  c.b.s.w.RedisWebFilterFactoriesLiveTest - Received: status->200, reason->OK, remaining->[2]
00:57:48.667 [main] INFO  c.b.s.w.RedisWebFilterFactoriesLiveTest - Received: status->200, reason->OK, remaining->[1]
00:57:48.826 [main] INFO  c.b.s.w.RedisWebFilterFactoriesLiveTest - Received: status->200, reason->OK, remaining->[0]
00:57:48.851 [main] INFO  c.b.s.w.RedisWebFilterFactoriesLiveTest - Received: status->429, reason->Too Many Requests, remaining->[0]
00:57:48.894 [main] INFO  c.b.s.w.RedisWebFilterFactoriesLiveTest - Received: status->429, reason->Too Many Requests, remaining->[0]
00:57:49.135 [main] INFO  c.b.s.w.RedisWebFilterFactoriesLiveTest - Received: status->200, reason->OK, remaining->[4]
4.5. 緩存支持
從 4.0 版本開始,Spring Cloud Gateway 提供了用於請求(CacheRequestBody)和響應(LocalCacheResponseBody)的緩存過濾器。
要配置 CacheRequestBody 過濾器,只需設置將請求體轉換為的類類型即可:
- id: cache_request_body_route
  uri: https://httpbin.org
  predicates:
  - Path=/cache/post/**
  filters:
  - StripPrefix=1
  - name: CacheRequestBody
    args:
      bodyClass: java.lang.String
緩存內容將在 ServerWebExchange.getAttributes() 中可用,其鍵定義在 ServerWebExchangeUtils.CACHED_REQUEST_BODY_ATTR 中,用於在後續過濾器中使用。
在配置 LocalCacheResponseBody 過濾器之前,我們需要添加 spring-boot-starter-cache 和 caffeine 依賴項或其他 Spring Cache 實現:
<dependency>
    <groupId>org.springframework.boot</groupId>
    <artifactId>spring-boot-starter-cache</artifactId>
</dependency>
<dependency>
    <groupId>com.github.ben-manes.caffeine</groupId>
    <artifactId>caffeine</artifactId>
</dependency>
我們可以通過將以下屬性設置為 spring.cloud.gateway.filter.local-response-cache.enabled 為 true 來全局激活此緩存過濾器。它還提供了兩個附加屬性 timeToLive 和 size。 timeToLive 屬性設置緩存條目過期時間。 size 屬性設置緩存的最大大小,用於驅逐條目。
spring:
  cloud:
    gateway:
      filter:
        local-response-cache:
          enabled: true
          timeToLive: 20m
          size: 6MB
我們還可以通過為每個路由配置過濾器來覆蓋全局配置。路由配置接受兩個參數。第一個參數將覆蓋緩存條目的過期時間,第二個參數將覆蓋該路由中用於驅逐緩存條目的最大大小。
- id: cache_response_body_route
  uri: https://httpbin.org
  predicates:
    - Path=/cache/get/**
  filters:
    - StripPrefix=1
    - LocalResponseCache=10s,20MB
在訪問此路徑後,我們將會找到一個響應頭,其值為
5. 結論
在本教程中,我們介紹了 Spring Cloud Gateway 的 <em >WebFilter</em> 工廠。我們學習瞭如何與客户端在代理服務執行之前和之後請求和響應進行交互。
