1. 概述
本教程將教您如何使用 Spring Security 5 設置 OAuth 2.0 資源服務器。
我們將使用 JWT(JSON Web Token)以及 Spring Security 支持的兩種類型的 bearer 令牌(即 opaque tokens)來實現。
在深入瞭解實現和代碼示例之前,我們首先需要建立一些背景知識。
2. 背景介紹
這段文字提供了一些背景信息。
2.1. JWT 與 Opaque 令牌是什麼?
JWT(JSON Web Token),即 JSON Web Token,是一種在廣泛接受的 JSON 格式中安全地傳輸敏感信息的有效方式。其包含的信息可以是關於用户的信息,也可以是關於令牌本身的信息,例如其過期時間和頒發者。
另一方面,opaque 令牌,顧名思義,在攜帶的信息方面是“不透明”的。令牌只是一個標識符,指向授權服務器存儲的信息;它通過服務器端的事後驗證進行驗證。
2.2. 資源服務器是什麼?
在 OAuth 2.0 的背景下,資源服務器是指通過 OAuth 令牌保護資源的應用程序。這些令牌通常由授權服務器頒發給客户端應用程序。資源服務器的工作是驗證令牌,然後再將資源提供給客户端。
一個令牌的有效性取決於以下幾個因素:
- 該令牌是否來自配置的授權服務器?
- 它是否未過期?
- 這個資源服務器是否是其預期受眾?
- 該令牌是否有權訪問請求的資源?
為了可視化這一點,讓我們查看 授權碼流程 的序列圖,並查看所有參與者在行動中的情況:
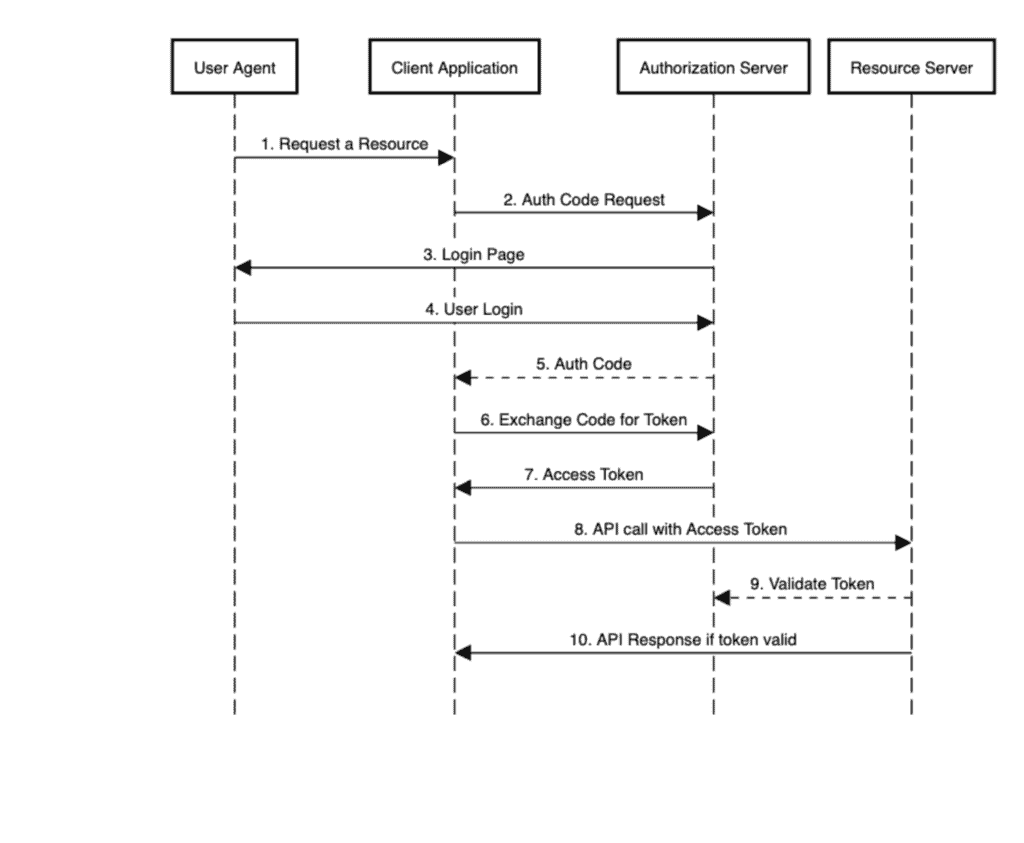
步驟 9 將是我們本教程重點關注的內容。
所以現在讓我們進入代碼部分。我們將使用 Keycloak 設置一個授權服務器,一個驗證 JWT 令牌的資源服務器,以及幾個 JUnit 測試來模擬客户端應用程序並驗證響應。
3. 授權服務器
首先,我們將設置一個授權服務器,該服務器負責頒發令牌。
為此,我們將使用嵌入在 Spring Boot 應用程序中的 Keycloak。Keycloak 是一個開源身份和訪問管理解決方案。由於本教程的重點是資源服務器,因此我們將不會深入研究它。
我們的嵌入式 Keycloak 服務器定義了兩個客户端,fooClient 和 barClient,它們對應於我們兩個資源服務器應用程序。
4. 資源服務器 – 使用 JWT
我們的資源服務器將包含四個主要組件:
- 模型 – 需要保護的資源
- API – 用於公開資源的 REST 控制器
- 安全配置 – 定義對公開資源的訪問控制的類,該類由 API 暴露
- application.yml – 一個配置文件,用於聲明屬性,包括授權服務器的信息
在快速瞭解依賴項之後,我們將逐一處理這些組件,以處理資源服務器中的 JWT 令牌。
4.1. Maven 依賴
主要我們需要 `spring-boot-starter-oauth2-resource-server,Spring Boot 的 starter,用於資源服務器支持。 此 starter 默認包含 Spring Security,因此我們無需顯式添加它:
<dependency>
    <groupId>org.springframework.boot</groupId>
    <artifactId>spring-boot-starter-web</artifactId>
    <version>2.7.5</version>
</dependency>
<dependency>
    <groupId>org.springframework.boot</groupId>
    <artifactId>spring-boot-starter-oauth2-resource-server</artifactId>
    <version>2.7.5</version>
</dependency>
<dependency>
    <groupId>org.apache.commons</groupId>
    <artifactId>commons-lang3</artifactId>
    <version>3.13.0</version>
</dependency>
除此之外,我們還將添加對Web的支持。
為了演示目的,我們將生成隨機資源,而不是從數據庫獲取,藉助 Apache 的 commons-lang3 庫。
4.2. 模型
為了保持簡潔,我們將使用 Foo,一個 POJO(Plain Old Java Object),作為我們的受保護資源:
public class Foo {
    private long id;
    private String name;

    // constructor, getters and setters
}
4.3. API
以下是我們用來使 Foo 可供操作的 REST 控制器:
@RestController
@RequestMapping(value = "/foos")
public class FooController {

    @GetMapping(value = "/{id}")
    public Foo findOne(@PathVariable Long id) {
        return new Foo(Long.parseLong(randomNumeric(2)), randomAlphabetic(4));
    }

    @GetMapping
    public List findAll() {
        List fooList = new ArrayList();
        fooList.add(new Foo(Long.parseLong(randomNumeric(2)), randomAlphabetic(4)));
        fooList.add(new Foo(Long.parseLong(randomNumeric(2)), randomAlphabetic(4)));
        fooList.add(new Foo(Long.parseLong(randomNumeric(2)), randomAlphabetic(4)));
        return fooList;
    }

    @ResponseStatus(HttpStatus.CREATED)
    @PostMapping
    public void create(@RequestBody Foo newFoo) {
        logger.info("Foo created");
    }
}
如你所見,我們提供以下功能:獲取所有 Foo,按 ID 獲取單個 Foo,以及發佈 Foo。
4.4. 安全配置
在配置類中,我們將定義我們資源的訪問級別:
@Configuration
public class JWTSecurityConfig {

    @Bean
    public SecurityFilterChain filterChain(HttpSecurity http) throws Exception {
        http.authorizeRequests(authz -> authz.antMatchers(HttpMethod.GET, "/foos/**")
            .hasAuthority("SCOPE_read")
            .antMatchers(HttpMethod.POST, "/foos")
            .hasAuthority("SCOPE_write")
            .anyRequest()
            .authenticated())
            .oauth2ResourceServer(oauth2 -> oauth2.jwt());
        return http.build();
    }
}
擁有具有 read 權限的訪問令牌的用户可以獲取 Foos。為了發佈新的 Foo,其令牌應具有 write 權限。
此外,我們將使用 jwt() 調用,並利用 oauth2ResourceServer() DSL 來指示我們服務器支持的令牌類型。
4.5. application.yml
在應用程序屬性中,除了常規的端口號和上下文路徑之外,我們需要定義授權服務器的 issuer URI 路徑,以便資源服務器可以發現其 提供者配置。
server:
  port: 8081
  servlet:
    context-path: /resource-server-jwt

spring:
  security:
    oauth2:
      resourceserver:
        jwt:
          issuer-uri: http://localhost:8083/auth/realms/baeldung
資源服務器利用這些信息來驗證客户端應用程序傳入的 JWT 令牌,按照我們的序列圖中的步驟 9 進行。
為了使用 issuer-uri 屬性進行驗證,授權服務器必須正在運行。否則,資源服務器將無法啓動。
如果需要獨立啓動它,則可以提供 jwk-set-uri 屬性來指向授權服務器的端點,該端點公開公共密鑰:
jwk-set-uri: http://localhost:8083/auth/realms/baeldung/protocol/openid-connect/certs這就是我們用來驗證 JWT 令牌所需的一切。
4.6. 測試
為了進行測試,我們將設置一個 JUnit。為了執行此測試,我們需要授權服務器以及資源服務器正常運行。
讓我們驗證我們是否可以使用具有“讀取”權限的令牌從 <em >resource-server-jwt</em> 獲取 <em >Foo</em> 對象:
@Test
public void givenUserWithReadScope_whenGetFooResource_thenSuccess() {
    String accessToken = obtainAccessToken("read");

    Response response = RestAssured.given()
      .header(HttpHeaders.AUTHORIZATION, "Bearer " + accessToken)
      .get("http://localhost:8081/resource-server-jwt/foos");
    assertThat(response.as(List.class)).hasSizeGreaterThan(0);
}在上述代碼中,在第3行,我們從授權服務器獲取了一個具有讀取權限的訪問令牌,覆蓋了我們序列圖的步驟1到7。
步驟8由RestAssured的get()調用執行。步驟9由資源服務器執行,配置我們之前所見,對我們這些用户來説是透明的。
5. 資源服務器 – 使用不透明令牌
接下來,讓我們看看對於處理不透明令牌的資源服務器的相同組件。
5.1. Maven 依賴
為了支持不透明令牌,我們需要額外的 <a href="https://mvnrepository.com/search?q=oauth2-oidc-sdk">oauth2-oidc-sdk</a> 依賴項:
<dependency>
    <groupId>com.nimbusds</groupId>
    <artifactId>oauth2-oidc-sdk</artifactId>
    <version>8.19</version>
    <scope>runtime</scope>
</dependency>
5.2. 模型與控制器
對於這個,我們將添加一個 Bar 資源:
public class Bar {
    private long id;
    private String name;

    // constructor, getters and setters
}
我們還將擁有一個 BarController,其端點與我們之前的 FooController 類似,用於提供 Bar 對象。
5.3. application.yml</h3
在 application.yml 中,我們需要添加與我們的授權服務器的隱式驗證端點對應的 introspection-uri。 如前所述,這就是隱式令牌如何進行驗證的方式:
server:
  port: 8082
  servlet:
    context-path: /resource-server-opaque

spring:
  security:
    oauth2:
      resourceserver:
        opaque:
          introspection-uri: http://localhost:8083/auth/realms/baeldung/protocol/openid-connect/token/introspect
          introspection-client-id: barClient
          introspection-client-secret: barClientSecret
5.4. 安全配置
將訪問級別與 Foo 資源類似地保持一致,同時,此配置類還通過使用 oauth2ResourceServer() DSL 調用 opaqueToken(),以指示使用不透明令牌類型。
@Configuration
public class OpaqueSecurityConfig {

    @Value("${spring.security.oauth2.resourceserver.opaque.introspection-uri}")
    String introspectionUri;

    @Value("${spring.security.oauth2.resourceserver.opaque.introspection-client-id}")
    String clientId;

    @Value("${spring.security.oauth2.resourceserver.opaque.introspection-client-secret}")
    String clientSecret;

    @Bean
    public SecurityFilterChain filterChain(HttpSecurity http) throws Exception {
        http.authorizeRequests(authz -> authz.antMatchers(HttpMethod.GET, "/bars/**")
            .hasAuthority("SCOPE_read")
            .antMatchers(HttpMethod.POST, "/bars")
            .hasAuthority("SCOPE_write")
            .anyRequest()
            .authenticated())
            .oauth2ResourceServer(oauth2 -> oauth2.opaqueToken
                (token -> token.introspectionUri(this.introspectionUri)
                .introspectionClientCredentials(this.clientId, this.clientSecret)));
        return http.build();
    }
}
我們還會指定與授權服務器客户端相對應的客户端憑據。我們之前在 application.yml 中定義了這些憑據。
5.5. 測試
我們將為我們的基於OPAQUE令牌的資源服務器設置JUnit,類似於我們為JWT所做的那樣。
在這種情況下,我們將檢查一個具有寫入權限的OPAQUE令牌是否可以向resource-server-opaque POST一個Bar。
@Test
public void givenUserWithWriteScope_whenPostNewBarResource_thenCreated() {
    String accessToken = obtainAccessToken("read write");
    Bar newBar = new Bar(Long.parseLong(randomNumeric(2)), randomAlphabetic(4));

    Response response = RestAssured.given()
      .contentType(ContentType.JSON)
      .header(HttpHeaders.AUTHORIZATION, "Bearer " + accessToken)
      .body(newBar)
      .log()
      .all()
      .post("http://localhost:8082/resource-server-opaque/bars");
    assertThat(response.getStatusCode()).isEqualTo(HttpStatus.CREATED.value());
}
如果收到 CREATED 狀態,這意味着資源服務器已成功驗證了不透明令牌併為我們創建了 Bar。
6. 結論
在本文中,我們學習瞭如何配置基於 Spring Security 的資源服務器應用程序,用於驗證 JWT 以及其他不透明令牌。
正如我們所見,通過最小的配置,Spring 使我們能夠無縫地使用發行者驗證令牌並向請求方(在本例中,JUnit 測試)發送資源。
