1. 簡介
模塊化單體架構是一種架構風格,其中我們的源代碼按照模塊的概念進行結構化。對於許多組織而言,模塊化單體架構是一種極佳的選擇。它有助於保持一定程度的獨立性,從而在需要時可以過渡到微服務架構。
Spring Modulith 是 Spring 項目的一個組件,可用於構建模塊化單體應用程序,並指導開發人員查找和使用應用程序模塊。它還支持構建結構良好、與領域對齊的 Spring Boot 應用程序。
在本教程中,我們將討論 Spring Modulith 項目的基礎知識,並展示其在實踐中的一個示例。
2. 模塊化單體架構
我們為應用程序的代碼結構提供了多種選項。傳統上,我們設計軟件解決方案圍繞基礎設施展開。但是,當我們將應用程序設計為圍繞業務展開時,這有助於更好地理解和維護系統。模塊化單體架構就是其中一種設計。
模塊化單體架構因其簡潔性和可維護性,在架構師和開發人員中越來越受歡迎。如果我們將領域驅動設計(DDD)應用於現有的單體應用程序,就可以將其重構為模塊化單體架構:

我們可以通過識別應用程序的領域並定義邊界上下文來將單體核心分割成模塊。
讓我們看看如何在 Spring Boot 框架中實現模塊化單體應用程序。Spring Modulith 是一組庫,幫助開發人員構建模塊化 Spring Boot 應用程序。
3. Spring Modulith 基礎
Spring Modulith 幫助開發者使用基於領域的應用程序模塊進行工作。它還支持對這些模塊化結構進行驗證和文檔化。
3.1. Maven 依賴
首先,將 spring-modulith-bom 作為 Bill of Materials (BOM) 導入到 <dependencyManagement> 部分的 <pom.xml> 中:
<dependencyManagement>
    <dependencies>
        <dependency>
            <groupId>org.springframework.modulith</groupId>
            <artifactId>spring-modulith-bom</artifactId>
            <version>1.2.2</version>
            <scope>import</scope>
            <type>pom</type>
        </dependency>
    </dependencies>
</dependencyManagement>
我們還需要一些核心 Spring Modulith 依賴項:
<dependency>
    <groupId>org.springframework.modulith</groupId>
    <artifactId>spring-modulith-api</artifactId>
</dependency>
<dependency>
    <groupId>org.springframework.modulith</groupId>
    <artifactId>spring-modulith-starter-test</artifactId>
    <scope>test</scope>
</dependency>
3.2. 應用模塊
Spring Modulith 的核心概念是應用模塊。 應用模塊是一個功能單元,它向其他模塊暴露一個 API。 此外,它還具有一些內部實現,這些實現不應被其他模塊訪問。 在設計我們的應用程序時,我們為每個領域考慮一個應用模塊。
Spring Modulith 提供多種表達模塊的方式。 我們可以將應用程序的領域或業務模塊視為主包的直接子包。 換句話説,應用模塊是位於與 Spring Boot 主類(帶有 @SpringBootApplication 註解的類)相同級別的包:
├───pom.xml
├───src
    ├───main
    │   ├───java
    │   │   └───main-package
    │   │       └───module A
    │   │       └───module B
    │   │           ├───sub-module B
    │   │       └───module C
    │   │           ├───sub-module C
    │   │       │ MainApplication.java
現在,讓我們來看一個包含 產品 和 通知 領域的簡單應用程序。在這個示例中,我們從 產品 模塊中調用一個服務,然後 產品 模塊調用 通知 模塊中的一個服務。
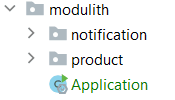
首先,我們將創建兩個應用程序模塊:產品 和 通知。為此,我們需要在主包中創建兩個直接子包:
以下是 產品 模塊的示例。我們有一個簡單的 Product 類,位於 產品 模塊中:
public class Product {

    private String name;
    private String description;
    private int price;

    public Product(String name, String description, int price) {
        this.name = name;
        this.description = description;
        this.price = price;
    }

    // getters and setters

}
然後,讓我們在 product 模塊中定義 ProductService Bean:
@Service
public class ProductService {

    private final NotificationService notificationService;

    public ProductService(ApplicationEventPublisher events, NotificationService notificationService) {
        this.events = events;
        this.notificationService = notificationService;
    }

    public void create(Product product) {
        notificationService.createNotification(new Notification(new Date(), NotificationType.SMS, product.getName()));
    }
}在本類中,create()方法調用notification模塊中暴露的NotificationService API,並同時創建一個Notification類的實例。
讓我們來查看notification模塊。
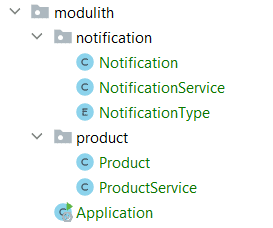
notification模塊包含Notification、NotificationType和NotificationService類。
讓我們查看NotificationService Bean:
@Service
public class NotificationService {

    private static final Logger LOG = LoggerFactory.getLogger(NotificationService.class);

    public void createNotification(Notification notification) {
        LOG.info("Received notification by module dependency for product {} in date {} by {}.",
          notification.getProductName(),
          notification.getDate(),
          notification.getFormat());
    }
}
本服務僅記錄創建的產品。
最後,在 main() 方法中,我們從 product 模塊調用 ProductService API 的 create() 方法:
@SpringBootApplication
public class Application {

    public static void main(String[] args) {
        SpringApplication.run(Application.class, args)
          .getBean(ProductService.class)
          .create(new Product("baeldung", "course", 10));
    }
}
以下目錄結構如圖所示:
3.3 應用模塊模型
我們可以通過分析我們的代碼庫來推導出應用模塊模型,基於其排列方式。 ApplicationModules 類提供創建應用模塊排列的功能。
讓我們創建一個應用模塊模型:
@Test
void createApplicationModuleModel() {
    ApplicationModules modules = ApplicationModules.of(Application.class);
    modules.forEach(System.out::println);
}
如果我們查看控制枱輸出,就可以看到我們的應用程序模塊佈局:
# Notification
> Logical name: notification
> Base package: com.baeldung.ecommerce.notification
> Spring beans:
  + ….NotificationService

# Product
> Logical name: product
> Base package: com.baeldung.ecommerce.product
> Spring beans:
+ ….ProductService如我們所見,它檢測了我們的兩個模塊:notification 和 product。 此外,它還列出了每個模塊的 Spring 組件。
3.4 模塊封裝
值得注意的是,當前設計存在問題。 ProductService API 訪問了 Notification 類,而 Notification 類是 notification 模塊的內部功能。
在模塊化設計中,必須保護和隱藏特定信息,並控制對內部實現的訪問。 Spring Modulith 通過應用模塊基礎包的子包來提供模塊封裝。
此外,它還隱藏了類型不能被其他包中的代碼引用。一個模塊可以訪問其他模塊的內容,但不能訪問其他模塊的子包。
現在,讓我們在每個模塊中創建內部 子包,並將內部實現移動到其中:
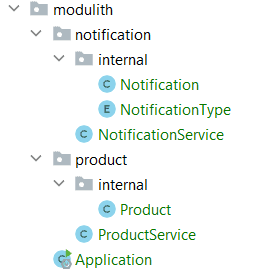
在這種安排下,notification 包被認為是 API 包。 其他應用模塊的代碼可以引用該包中的類型。 但是,notification.internal 包中的代碼不能被其他模塊引用。
3.5. 驗證模塊結構
設計中存在另一個問題。在上例中,<em >Notification</em> 類位於 <em >notification.internal</em> 包中。但是,我們從其他包中引用了 <em >Notification</em> 類,例如 <em >product</em> 包:
public void create(Product product) {
    notificationService.createNotification(new Notification(new Date(), NotificationType.SMS, product.getName()));
}
不幸的是,這也違反了模塊訪問規則。在這種情況下,Spring Modulith 無法阻止 Java 編譯失敗以防止這些非法引用。它使用單元測試代替:
@Test
void verifiesModularStructure() {
    ApplicationModules modules = ApplicationModules.of(Application.class);
    modules.verify();
}
我們使用 verify() 方法在 ApplicationModules 實例上進行驗證,以確定我們的代碼佈局是否符合預期的約束。Spring Modulith 使用 ArchUnit 項目來實現這一功能。
對於上述示例,我們的驗證測試失敗並拋出 org.springframework.modulith.core.Violations 異常。
org.springframework.modulith.core.Violations:
- Module 'product' depends on non-exposed type com.baeldung.modulith.notification.internal.Notification within module 'notification'!
Method <com.baeldung.modulith.product.ProductService.create(com.baeldung.modulith.product.internal.Product)> calls constructor <com.baeldung.modulith.notification.internal.Notification.<init>(java.util.Date, com.baeldung.modulith.notification.internal.NotificationType, java.lang.String)> in (ProductService.java:25)
測試失敗是因為 product 模塊試圖訪問 notification 模塊的內部類 Notification。
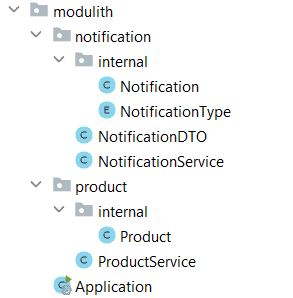
現在,我們通過在 notification 模塊中添加 NotificationDTO 類來解決這個問題:
public class NotificationDTO {
    private Date date;
    private String format;
    private String productName;

    // getters and setters
}
之後,我們使用 NotificationDTO 實例而不是在 product 模塊中使用 Notification 。
public void create(Product product) {
    notificationService.createNotification(new NotificationDTO(new Date(), "SMS", product.getName()));
}
以下是最終目錄結構:
3.6. 模塊文檔
我們可以記錄項目的模塊之間的關係。
Spring Modulith 提供基於 PlantUML 的圖表生成功能,支持使用 UML 或 C4 皮膚。
讓我們將應用程序模塊導出為 C4 組件圖:
@Test
void createModuleDocumentation() {
    ApplicationModules modules = ApplicationModules.of(Application.class);
    new Documenter(modules)
      .writeDocumentation()
      .writeIndividualModulesAsPlantUml();
}
C4 圖將創建在 target/modulith-docs 目錄下,以 puml 文件形式保存。
讓我們使用在線 PlantUML 服務器渲染生成的組件圖:http://www.plantuml.com/plantuml/uml/SyfFKj2rKt3CoKnELR1Io4ZDoSa70000
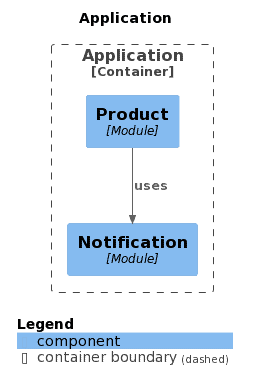
該圖顯示,product 模塊使用 notification 模塊的 API。
4. 通過事件進行模塊間交互
我們為模塊間交互提供了兩種方法:通過其他應用程序模塊的 Spring Bean 或使用事件。
在上一部分中,我們已將 通知模塊的 API 注入到 產品模塊中。但是,Spring Modulith 鼓勵使用 Spring Framework 應用程序事件進行模塊間通信。為了使應用程序模塊儘可能地解耦,我們使用事件發佈和消費作為主要的交互方式。
4.1. 發佈事件
現在,讓我們使用 Spring 的 ApplicationEventPublisher 來發佈一個領域事件:
@Service
public class ProductService {

    private final ApplicationEventPublisher events;

    public ProductService(ApplicationEventPublisher events, NotificationService notificationService) {
        this.events = events;
        this.notificationService = notificationService;
    }

    public void create(Product product) {
        events.publishEvent(new NotificationDTO(new Date(), "SMS", product.getName()));
    }
}
我們直接注入了 ApplicationEventPublisher,並使用了 publishEvent() API。
4.2. 應用模塊監聽器
為了註冊監聽器,Spring Modulith 提供 @ApplicationModuleListener 標註:
@Service
public class NotificationService {
    @ApplicationModuleListener
    public void notificationEvent(NotificationDTO event) {
        Notification notification = toEntity(event);
        LOG.info("Received notification by event for product {} in date {} by {}.",
          notification.getProductName(),
          notification.getDate(),
          notification.getFormat());
    }
我們可以使用 @ApplicationModuleListener 註解在方法級別上使用。在上面的示例中,我們消費了 @NotificationDTO 事件並記錄了詳細信息。
4.3. 異步事件處理
對於異步事件處理,我們可以使用 @ApplicationModuleListener 註解,該註解已經包含了 @Async、@Transactional 和 @TransactionalEventListener 的功能。 因此,我們無需單獨添加 @Async 註解:
@ApplicationModuleListener
public void notificationEvent(NotificationDTO event) {
    // ...
}
此外,還需要在 Spring 上下文中啓用異步行為,通過在類上添加 @EnableAsync 註解來實現。可以將該註解添加到主應用程序類中:
@EnableAsync
@SpringBootApplication
public class Application {

    public static void main(String[] args) {
        // ...
    }
}
5. 結論
本指南重點介紹了並涵蓋了 Spring Modulith 項目的基礎知識。我們首先討論了模塊化單體設計是什麼。
接下來,我們討論了應用程序模塊。我們還詳細介紹了應用程序模塊模型的創建以及結構驗證。
最後,我們通過事件解釋了模塊間交互。
