1. 概述
在本教程中,我們將涵蓋 Spring Cloud Netflix Hystrix – 容錯庫。我們將使用該庫並實現 Circuit Breaker 企業模式,該模式描述了在應用程序的不同級別防止級聯故障的策略。
其原理類似於電子學:Hystrix 會監視對相關服務的失敗調用方法。如果存在此類失敗,它將打開電路並將調用轉發到備用方法。
該庫將容忍失敗,直到達到閾值。超過該閾值,它將保持電路打開。這意味着,它將將所有後續調用轉發到備用方法,以防止未來的故障。 這為相關的服務從其失敗狀態中恢復提供了一個時間緩衝。
2. REST Producer
為了創建一個演示 Circuit Breaker 模式的場景,我們需要一個服務。 我們將其命名為“REST Producer”,因為它為啓用了 Hystrix 的“REST Consumer”提供數據,我們將會在下一步中創建該消費者。
讓我們使用 spring-boot-starter-web 依賴項創建一個新的 Maven 項目:
<dependency>
    <groupId>org.springframework.boot</groupId>
    <artifactId>spring-boot-starter-web</artifactId>
    <version>2.2.6.RELEASE</version>
</dependency>
該項目本身被故意保持簡單。 它包含一個接口,其中有一個帶有 @RequestMapping 註解的 GET 方法,該方法返回一個簡單的 String,一個實現該接口的 @RestController,以及一個 @SpringBootApplication。
我們將從接口開始:
public interface GreetingController {
    @GetMapping("/greeting/{username}")
    String greeting(@PathVariable("username") String username);
}
以及實現:
@RestController
public class GreetingControllerImpl implements GreetingController {

    @Override
    public String greeting(@PathVariable("username") String username) {
        return String.format("Hello %s!\n", username);
    }
}
接下來,我們將編寫主應用程序類:
@SpringBootApplication
public class RestProducerApplication {
    public static void main(String[] args) {
        SpringApplication.run(RestProducerApplication.class, args);
    }
}
為了完成這一部分,唯一需要做的是配置一個應用程序端口,我們將監聽該端口。 我們不會使用默認端口 8080,因為該端口應保留供下一項描述的應用程序使用。
此外,我們定義了一個應用程序名稱,以便從稍後介紹的客户端應用程序中查找我們的生產者。
然後,我們將指定端口 9090 和名稱 rest-producer在我們的 application.properties文件中:
server.port=9090
spring.application.name=rest-producer
現在,我們可以使用 cURL 測試我們的生產者:
$> curl http://localhost:9090/greeting/Cid
Hello Cid!
3. REST Consumer With Hystrix
For our demonstration scenario, we’ll be implementing a web application, which is consuming the REST service from the previous step using RestTemplate and Hystrix. For the sake of simplicity, we’ll call it the “REST Consumer”.
Consequently, we create a new Maven project with spring-cloud-starter-hystrix, spring-boot-starter-web and spring-boot-starter-thymeleaf as dependencies:
<dependency>
    <groupId>org.springframework.cloud</groupId>
    <artifactId>spring-cloud-starter-hystrix</artifactId>
    <version>1.4.7.RELEASE</version>
</dependency>
<dependency>
    <groupId>org.springframework.boot</groupId>
    <artifactId>spring-boot-starter-web</artifactId>
    <version>2.2.6.RELEASE</version>
</dependency>
<dependency>
    <groupId>org.springframework.boot</groupId>
    <artifactId>spring-boot-starter-thymeleaf</artifactId>
    <version>2.2.6.RELEASE</version>
</dependency>
</code>
For the Circuit Breaker to work, Hystix will scan @Component or @Service annotated classes for @HystixCommand annotated methods, implement a proxy for it and monitor its calls.
We’re going to create a @Service class first, which will be injected to a @Controller. Since we’re building a web application using Thymeleaf, we also need an HTML template to serve as a view.
This will be our injectable @Service implementing a @HystrixCommand with an associated fallback method. This fallback has to use the same signature as the original:
@Service
public class GreetingService {
    @HystrixCommand(fallbackMethod = "defaultGreeting")
    public String getGreeting(String username) {
        return new RestTemplate()
          .getForObject("http://localhost:9090/greeting/{username}",
          String.class, username);
    }

    private String defaultGreeting(String username) {
        return "Hello User!";
    }
}
RestConsumerApplication will be our main application class. The @EnableCircuitBreaker annotation will scan the classpath for any compatible Circuit Breaker implementation.
To use Hystrix explicitly, we have to annotate this class with @EnableHystrix:
@SpringBootApplication
@EnableCircuitBreaker
public class RestConsumerApplication {
    public static void main(String[] args) {
        SpringApplication.run(RestConsumerApplication.class, args);
    }
}
We’ll set up the controller using our GreetingService:
@Controller
public class GreetingController {

    @Autowired
    private GreetingService greetingService;

    @GetMapping("/get-greeting/{username}")
    public String getGreeting(Model model, @PathVariable("username") String username) {
        model.addAttribute("greeting", greetingService.getGreeting(username));
        return "greeting-view";
    }
}
And here’s the HTML template:
<!DOCTYPE html>
<html xmlns:th="http://www.thymeleaf.org">
    <head>
        <title>Greetings from Hystrix</title>
    </head>
    <body>
        <h2 th:text="${greeting}"/>
    </body>
</html>
To ensure that the application is listening on a defined port, we put the following in an application.properties file:
server.port=8080
To see a Hystix circuit breaker in action, we’re starting our consumer and pointing our browser to http://localhost:8080/get-greeting/Cid . Under normal circumstances, the following will be shown:
Hello Cid!
To simulate a failure of our producer, we’ll simply stop it, and after we finished refreshing the browser we should see a generic message, returned from the fallback method in our @Service:
Hello User!
4. REST Consumer With Hystrix and Feign
現在,我們將修改來自上一步驟的項目,使用 Spring Netflix Feign 作為聲明式 REST 客户端,而不是 Spring RestTemplate
優勢在於,我們後來可以輕鬆地重構我們的 Feign 客户端接口,以使用 Spring Netflix Eureka 進行服務發現。
為了啓動新項目,我們將複製我們的消費者,並添加我們的生產者和 spring-cloud-starter-feign
        com.baeldung.spring.cloud
        spring-cloud-hystrix-rest-producer
        1.0.0-SNAPSHOT


        org.springframework.cloud
        spring-cloud-starter-feign
        1.1.5.RELEASE
現在,我們可以使用我們的 GreetingController 來擴展一個 Feign 客户端。 我們將實現 Hystrix 降級作為靜態嵌套類,並使用 @Component 標註。
或者,我們可以定義一個 @Bean 標註的方法,返回該降級類的實例。
@FeignClient 的 name 屬性是必填的。 它用於通過 Eureka 客户端查找應用程序,或者如果提供此屬性,則通過 URL。
    @FeignClient(
        name = "rest-producer"
        url = "http://localhost:9090",
        fallback = GreetingClient.GreetingClientFallback.class
    )
    public interface GreetingClient extends GreetingController {

        @Component
        public static class GreetingClientFallback implements GreetingController {

            @Override
            public String greeting(@PathVariable("username") String username) {
                return "Hello User!";
            }
        }
    }
有關使用 Spring Netflix Eureka 進行服務發現的更多信息,請查看這篇博文。
在 RestConsumerFeignApplication 中,我們將添加額外的註解來啓用 Feign 集成,實際上是 @EnableFeignClients,到主應用程序類中:
    @SpringBootApplication
    @EnableCircuitBreaker
    @EnableFeignClients
    public class RestConsumerFeignApplication {

        public static void main(String[] args) {
            SpringApplication.run(RestConsumerFeignApplication.class, args);
        }
    }
我們將修改控制器以使用自動注入的 Feign 客户端,而不是先前注入的 @Service,以檢索我們的問候語:
    @Controller
    public class GreetingController {
        @Autowired
        private GreetingClient greetingClient;

        @GetMapping("/get-greeting/{username}")
        public String getGreeting(Model model, @PathVariable("username") String username) {
            model.addAttribute("greeting", greetingClient.greeting(username));
            return "greeting-view";
        }
    }
為了將此示例與上一項區分開來,我們將更改應用程序監聽端口在 application.properties 中:
server.port=8082
最後,我們將測試此 Feign 啓用的消費者,就像上一節中的一樣。 預期結果將相同。
5. 緩存回退與 Hystrix
現在,我們將向我們的 Spring Cloud 項目添加 Hystrix。 在這個雲項目中,我們有一個評分服務,它與數據庫通信並獲取書籍的評分。
假設我們的數據庫是一個資源,可能會受到併發請求的影響,並且響應延遲可能會隨時間變化或在某些時候不可用。 我們將使用 Hystrix 斷路器,通過從緩存中獲取數據來處理這種情況。
5.1. 設置和配置
讓我們將 spring-cloud-starter-hystrix 依賴項添加到評分模塊中:
<dependency>
    <groupId>org.springframework.cloud</groupId>
    <artifactId>spring-cloud-starter-hystrix</artifactId>
</dependency>
當評分被插入/更新/刪除到數據庫時,我們將通過 Repository 將其複製到 Redis 緩存中。 要了解更多關於 Redis 的信息,請查看這篇文章。
讓我們更新 RatingService 以將數據庫查詢方法包裝在 Hystrix 命令中使用 @HystrixCommand,並配置其具有從 Redis 讀取的 fallback:
@HystrixCommand(
  commandKey = "ratingsByIdFromDB",
  fallbackMethod = "findCachedRatingById",
  ignoreExceptions = { RatingNotFoundException.class })
public Rating findRatingById(Long ratingId) {
    return Optional.ofNullable(ratingRepository.findOne(ratingId))
      .orElseThrow(() ->
        new RatingNotFoundException("Rating not found. ID: " + ratingId));
}

public Rating findCachedRatingById(Long ratingId) {
    return cacheRepository.findCachedRatingById(ratingId);
}
請注意,fallback 方法的簽名應與包裝的方法相同,並且必須位於同一類中。 現在,當 findRatingById 方法失敗或延遲超過給定閾值時,Hystrix 會回退到 findCachedRatingById 方法。
由於 Hystrix 的功能被透明地注入為 AOP 建議,因此在有其他建議(例如 Spring 的事務建議)的情況下,我們需要調整建議的堆疊順序。 在這裏,我們調整了 Spring 的事務 AOP 建議,使其優先級低於 Hystrix AOP 建議:
@EnableHystrix
@EnableTransactionManagement(
  order=Ordered.LOWEST_PRECEDENCE,
  mode=AdviceMode.ASPECTJ)
public class RatingServiceApplication {
    @Bean
    @Primary
    @Order(value=Ordered.HIGHEST_PRECEDENCE)
    public HystrixCommandAspect hystrixAspect() {
        return new HystrixCommandAspect();
    }

    // other beans, configurations
}
在這裏,我們調整了 Spring 的事務 AOP 建議,使其優先級低於 Hystrix AOP 建議。
5.2. 測試 Hystrix 回退
現在我們已經配置了斷路器,可以通過將與我們的 H2 數據庫(該數據庫與我們的存儲庫交互)中斷來測試它。但是首先,讓我們以外部進程的方式運行 H2 實例,而不是將其作為嵌入式數據庫運行。
讓我們將 H2 庫(h2-1.4.193.jar)複製到已知的目錄,並啓動 H2 服務器:
> java -cp h2-1.4.193.jar org.h2.tools.Server -tcp
TCP 服務器運行在 tcp://192.168.99.1:9092 (僅允許本地連接)
現在,讓我們更新我們模塊的數據源 URL 在 rating-service.properties 中指向此 H2 服務器:
spring.datasource.url = jdbc:h2:tcp://localhost/~/ratings
我們可以按照我們之前 Spring Cloud 系列文章中提供的方法啓動我們的服務,並通過將我們正在運行的外部 H2 實例來測試每本書的評分。
我們可以看到,當 H2 數據庫不可訪問時,Hystrix 會自動回退到 Redis 以讀取每本書的評分。演示此用例的代碼可以在 這裏 找到。
6. 使用作用域通常,帶有 @HytrixCommand 註解的方法會在線程池上下文中執行。但有時需要在一個本地作用域中運行,例如一個 @SessionScope 或 @RequestScope。這可以通過向命令註解傳遞參數來實現:
@HystrixCommand(fallbackMethod = "getSomeDefault", commandProperties = {
  @HystrixProperty(name = "execution.isolation.strategy", value = "SEMAPHORE")
})
7. Hystrix儀表盤
Hystrix的一個可選特性是能夠通過儀表盤監控其狀態。
要啓用它,我們將把 spring-cloud-starter-hystrix-dashboard和spring-boot-starter-actuator添加到消費者的pom.xml中:
<dependency>
    <groupId>org.springframework.cloud</groupId>
    <artifactId>spring-cloud-starter-hystrix-dashboard</artifactId>
    <version>1.4.7.RELEASE</version>
</dependency>
<dependency>
    <groupId>org.springframework.boot</groupId>
    <artifactId>spring-boot-starter-actuator</artifactId>
    <version>2.2.6.RELEASE</version>
</dependency>
前者需要通過註解一個@Configuration,使用@EnableHystrixDashboard啓用,後者則會自動在我們的Web應用程序中啓用所需的指標。
在重啓應用程序後,我們將瀏覽器指向http://localhost:8080/hystrix,輸入Hystrix流的指標URL,並開始監控。
最後,我們應該看到類似的內容:
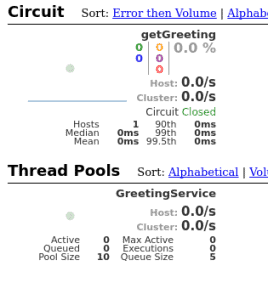
監控一個Hystrix流是很有用的,但如果需要監控多個啓用了Hystrix的應用程序,將會變得不便。為此,Spring Cloud提供了一個名為Turbine的工具,它可以聚合流以在一個Hystrix儀表盤中呈現。
配置Turbine超出了本文的範圍,但這裏應該提到這個可能性。因此,還可以通過消息傳遞收集這些流,使用Turbine流。
8. 結論
如前所述,我們現在可以使用 Spring Netflix Hystrix 與 Spring 的 RestTemplate 或 Spring Netflix Feign 結合,實現斷路器模式。
這意味着我們可以使用包含默認數據的降級方案來消費服務,並且可以監控這些數據的使用情況。
For our demonstration scenario, we’ll be implementing a web application, which is consuming the REST service from the previous step using
Consequently, we create a new Maven project with
<dependency>
<groupId>org.springframework.cloud</groupId>
<artifactId>spring-cloud-starter-hystrix</artifactId>
<version>1.4.7.RELEASE</version>
</dependency>
<dependency>
<groupId>org.springframework.boot</groupId>
<artifactId>spring-boot-starter-web</artifactId>
<version>2.2.6.RELEASE</version>
</dependency>
<dependency>
<groupId>org.springframework.boot</groupId>
<artifactId>spring-boot-starter-thymeleaf</artifactId>
<version>2.2.6.RELEASE</version>
</dependency>
</code>For the Circuit Breaker to work, Hystix will scan
We’re going to create a
This will be our injectable
@Service
public class GreetingService {
@HystrixCommand(fallbackMethod = "defaultGreeting")
public String getGreeting(String username) {
return new RestTemplate()
.getForObject("http://localhost:9090/greeting/{username}",
String.class, username);
}
private String defaultGreeting(String username) {
return "Hello User!";
}
}To use Hystrix explicitly, we have to annotate this class with
@SpringBootApplication
@EnableCircuitBreaker
public class RestConsumerApplication {
public static void main(String[] args) {
SpringApplication.run(RestConsumerApplication.class, args);
}
}We’ll set up the controller using our
@Controller
public class GreetingController {
@Autowired
private GreetingService greetingService;
@GetMapping("/get-greeting/{username}")
public String getGreeting(Model model, @PathVariable("username") String username) {
model.addAttribute("greeting", greetingService.getGreeting(username));
return "greeting-view";
}
}And here’s the HTML template:
<!DOCTYPE html>
<html xmlns:th="http://www.thymeleaf.org">
<head>
<title>Greetings from Hystrix</title>
</head>
<body>
<h2 th:text="${greeting}"/>
</body>
</html>To ensure that the application is listening on a defined port, we put the following in an
server.port=8080To see a Hystix circuit breaker in action, we’re starting our consumer and pointing our browser to
Hello Cid!To simulate a failure of our producer, we’ll simply stop it, and after we finished refreshing the browser we should see a generic message, returned from the fallback method in our
Hello User!4. REST Consumer With Hystrix and Feign
現在,我們將修改來自上一步驟的項目,使用 Spring Netflix Feign 作為聲明式 REST 客户端,而不是 Spring RestTemplate
優勢在於,我們後來可以輕鬆地重構我們的 Feign 客户端接口,以使用 Spring Netflix Eureka 進行服務發現。
為了啓動新項目,我們將複製我們的消費者,並添加我們的生產者和 spring-cloud-starter-feign
com.baeldung.spring.cloud
spring-cloud-hystrix-rest-producer
1.0.0-SNAPSHOT
org.springframework.cloud
spring-cloud-starter-feign
1.1.5.RELEASE
現在,我們可以使用我們的 GreetingController 來擴展一個 Feign 客户端。 我們將實現 Hystrix 降級作為靜態嵌套類,並使用 @Component 標註。
或者,我們可以定義一個 @Bean 標註的方法,返回該降級類的實例。
@FeignClient 的 name 屬性是必填的。 它用於通過 Eureka 客户端查找應用程序,或者如果提供此屬性,則通過 URL。
@FeignClient(
name = "rest-producer"
url = "http://localhost:9090",
fallback = GreetingClient.GreetingClientFallback.class
)
public interface GreetingClient extends GreetingController {
@Component
public static class GreetingClientFallback implements GreetingController {
@Override
public String greeting(@PathVariable("username") String username) {
return "Hello User!";
}
}
}
有關使用 Spring Netflix Eureka 進行服務發現的更多信息,請查看這篇博文。
在 RestConsumerFeignApplication 中,我們將添加額外的註解來啓用 Feign 集成,實際上是 @EnableFeignClients,到主應用程序類中:
@SpringBootApplication
@EnableCircuitBreaker
@EnableFeignClients
public class RestConsumerFeignApplication {
public static void main(String[] args) {
SpringApplication.run(RestConsumerFeignApplication.class, args);
}
}
我們將修改控制器以使用自動注入的 Feign 客户端,而不是先前注入的 @Service,以檢索我們的問候語:
@Controller
public class GreetingController {
@Autowired
private GreetingClient greetingClient;
@GetMapping("/get-greeting/{username}")
public String getGreeting(Model model, @PathVariable("username") String username) {
model.addAttribute("greeting", greetingClient.greeting(username));
return "greeting-view";
}
}
為了將此示例與上一項區分開來,我們將更改應用程序監聽端口在 application.properties 中:
server.port=8082最後,我們將測試此 Feign 啓用的消費者,就像上一節中的一樣。 預期結果將相同。
5. 緩存回退與 Hystrix
現在,我們將向我們的 Spring Cloud 項目添加 Hystrix。 在這個雲項目中,我們有一個評分服務,它與數據庫通信並獲取書籍的評分。
假設我們的數據庫是一個資源,可能會受到併發請求的影響,並且響應延遲可能會隨時間變化或在某些時候不可用。 我們將使用 Hystrix 斷路器,通過從緩存中獲取數據來處理這種情況。
5.1. 設置和配置
讓我們將 spring-cloud-starter-hystrix 依賴項添加到評分模塊中:
<dependency>
<groupId>org.springframework.cloud</groupId>
<artifactId>spring-cloud-starter-hystrix</artifactId>
</dependency>當評分被插入/更新/刪除到數據庫時,我們將通過 Repository 將其複製到 Redis 緩存中。 要了解更多關於 Redis 的信息,請查看這篇文章。
讓我們更新 RatingService 以將數據庫查詢方法包裝在 Hystrix 命令中使用 @HystrixCommand,並配置其具有從 Redis 讀取的 fallback:
@HystrixCommand(
commandKey = "ratingsByIdFromDB",
fallbackMethod = "findCachedRatingById",
ignoreExceptions = { RatingNotFoundException.class })
public Rating findRatingById(Long ratingId) {
return Optional.ofNullable(ratingRepository.findOne(ratingId))
.orElseThrow(() ->
new RatingNotFoundException("Rating not found. ID: " + ratingId));
}
public Rating findCachedRatingById(Long ratingId) {
return cacheRepository.findCachedRatingById(ratingId);
}請注意,fallback 方法的簽名應與包裝的方法相同,並且必須位於同一類中。 現在,當 findRatingById 方法失敗或延遲超過給定閾值時,Hystrix 會回退到 findCachedRatingById 方法。
由於 Hystrix 的功能被透明地注入為 AOP 建議,因此在有其他建議(例如 Spring 的事務建議)的情況下,我們需要調整建議的堆疊順序。 在這裏,我們調整了 Spring 的事務 AOP 建議,使其優先級低於 Hystrix AOP 建議:
@EnableHystrix
@EnableTransactionManagement(
order=Ordered.LOWEST_PRECEDENCE,
mode=AdviceMode.ASPECTJ)
public class RatingServiceApplication {
@Bean
@Primary
@Order(value=Ordered.HIGHEST_PRECEDENCE)
public HystrixCommandAspect hystrixAspect() {
return new HystrixCommandAspect();
}
// other beans, configurations
}在這裏,我們調整了 Spring 的事務 AOP 建議,使其優先級低於 Hystrix AOP 建議。
5.2. 測試 Hystrix 回退
現在我們已經配置了斷路器,可以通過將與我們的 H2 數據庫(該數據庫與我們的存儲庫交互)中斷來測試它。但是首先,讓我們以外部進程的方式運行 H2 實例,而不是將其作為嵌入式數據庫運行。
讓我們將 H2 庫(h2-1.4.193.jar)複製到已知的目錄,並啓動 H2 服務器:
> java -cp h2-1.4.193.jar org.h2.tools.Server -tcp
TCP 服務器運行在 tcp://192.168.99.1:9092 (僅允許本地連接)
現在,讓我們更新我們模塊的數據源 URL 在 rating-service.properties 中指向此 H2 服務器:
spring.datasource.url = jdbc:h2:tcp://localhost/~/ratings
我們可以按照我們之前 Spring Cloud 系列文章中提供的方法啓動我們的服務,並通過將我們正在運行的外部 H2 實例來測試每本書的評分。
我們可以看到,當 H2 數據庫不可訪問時,Hystrix 會自動回退到 Redis 以讀取每本書的評分。演示此用例的代碼可以在 這裏 找到。
6. 使用作用域通常,帶有 @HytrixCommand 註解的方法會在線程池上下文中執行。但有時需要在一個本地作用域中運行,例如一個 @SessionScope 或 @RequestScope。這可以通過向命令註解傳遞參數來實現:
@HystrixCommand(fallbackMethod = "getSomeDefault", commandProperties = {
@HystrixProperty(name = "execution.isolation.strategy", value = "SEMAPHORE")
})
7. Hystrix儀表盤
@HystrixCommand(fallbackMethod = "getSomeDefault", commandProperties = {
@HystrixProperty(name = "execution.isolation.strategy", value = "SEMAPHORE")
})Hystrix的一個可選特性是能夠通過儀表盤監控其狀態。
要啓用它,我們將把 spring-cloud-starter-hystrix-dashboard和spring-boot-starter-actuator添加到消費者的pom.xml中:
<dependency>
<groupId>org.springframework.cloud</groupId>
<artifactId>spring-cloud-starter-hystrix-dashboard</artifactId>
<version>1.4.7.RELEASE</version>
</dependency>
<dependency>
<groupId>org.springframework.boot</groupId>
<artifactId>spring-boot-starter-actuator</artifactId>
<version>2.2.6.RELEASE</version>
</dependency>
前者需要通過註解一個@Configuration,使用@EnableHystrixDashboard啓用,後者則會自動在我們的Web應用程序中啓用所需的指標。
在重啓應用程序後,我們將瀏覽器指向http://localhost:8080/hystrix,輸入Hystrix流的指標URL,並開始監控。
最後,我們應該看到類似的內容:
監控一個Hystrix流是很有用的,但如果需要監控多個啓用了Hystrix的應用程序,將會變得不便。為此,Spring Cloud提供了一個名為Turbine的工具,它可以聚合流以在一個Hystrix儀表盤中呈現。
配置Turbine超出了本文的範圍,但這裏應該提到這個可能性。因此,還可以通過消息傳遞收集這些流,使用Turbine流。
8. 結論
如前所述,我們現在可以使用 Spring Netflix Hystrix 與 Spring 的 RestTemplate 或 Spring Netflix Feign 結合,實現斷路器模式。
這意味着我們可以使用包含默認數據的降級方案來消費服務,並且可以監控這些數據的使用情況。
