1. 簡介
本文重點介紹 Spring 的 State Machine 項目 – 它可用於表示工作流或其他任何有限狀態自動機表示的問題。
2. Maven 依賴
為了開始,我們需要添加主要的 Maven 依賴:
<dependency>
    <groupId>org.springframework.statemachine</groupId>
    <artifactId>spring-statemachine-core</artifactId>
    <version>3.2.0.RELEASE</version>
</dependency>最新版本的該依賴項可以在這裏找到:這裏。
3. 狀態機配置
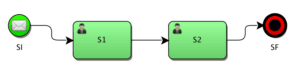
現在,我們開始定義一個簡單的狀態機:
@Configuration
@EnableStateMachine
public class SimpleStateMachineConfiguration
  extends StateMachineConfigurerAdapter<String, String> {

    @Override
    public void configure(StateMachineStateConfigurer<String, String> states)
      throws Exception {

        states
          .withStates()
          .initial("SI")
          .end("SF")
          .states(
            new HashSet<String>(Arrays.asList("S1", "S2", "S3")));

    }

    @Override
    public void configure(
      StateMachineTransitionConfigurer<String, String> transitions)
      throws Exception {

        transitions.withExternal()
          .source("SI").target("S1").event("E1").and()
          .withExternal()
          .source("S1").target("S2").event("E2").and()
          .withExternal()
          .source("S2").target("SF").event("end");
    }
}
請注意,該類被標記為標準的 Spring 配置,同時也是狀態機。它還需要擴展 StateMachineConfigurerAdapter,以便可以調用各種初始化方法。在其中一個配置方法中,我們定義了狀態機中的所有可能狀態,而在另一個方法中,則定義了事件如何改變當前狀態。
上述配置設置了一個相對簡單、直接的轉換狀態機,應該很容易理解。
現在,我們需要啓動 Spring 容器並獲取對我們配置中定義的狀態機的一份引用:
@Autowired
private StateMachine<String, String> stateMachine;
一旦我們有了狀態機,就需要啓動它:
stateMachine.start();現在我們的機器處於初始狀態,我們可以發送事件並因此觸發狀態轉換:
stateMachine.sendEvent("E1");我們始終可以檢查狀態機的當前狀態:
stateMachine.getState();4. Actions
讓我們添加一些用於執行狀態轉換周圍操作的動作。首先,我們將動作定義為在同一配置文件的 Spring 豆。
@Bean
public Action<String, String> initAction() {
    return ctx -> System.out.println(ctx.getTarget().getId());
}
然後,我們可以將上述創建的動作在配置類中註冊在過渡上:
@Override
public void configure(
  StateMachineTransitionConfigurer<String, String> transitions)
  throws Exception {

    transitions.withExternal()
      .source("SI").target("S1")
      .event("E1").action(initAction())
這段狀態轉換時,當狀態從 SI 變為 S1,並通過事件 E1 觸發時,該動作將被執行。動作可以附加到狀態本身:
@Bean
public Action<String, String> executeAction() {
    return ctx -> System.out.println("Do" + ctx.getTarget().getId());
}

states
  .withStates()
  .state("S3", executeAction(), errorAction());
此狀態定義函數接受一個在機器進入目標狀態時執行的操作,以及可選的錯誤處理函數。
錯誤處理函數與任何其他操作類似,但會在狀態動作評估期間任何拋出異常時被調用。
@Bean
public Action<String, String> errorAction() {
    return ctx -> System.out.println(
      "Error " + ctx.getSource().getId() + ctx.getException());
}
還可以註冊單個動作,用於 entry, do 和 exit 狀態轉換:
@Bean
public Action<String, String> entryAction() {
    return ctx -> System.out.println(
      "Entry " + ctx.getTarget().getId());
}

@Bean
public Action<String, String> executeAction() {
    return ctx ->
      System.out.println("Do " + ctx.getTarget().getId());
}

@Bean
public Action<String, String> exitAction() {
    return ctx -> System.out.println(
      "Exit " + ctx.getSource().getId() + " -> " + ctx.getTarget().getId());
}
states
.withStates()
.stateEntry("S3", entryAction())
.state("S3", executeAction())
.stateExit("S3", exitAction());相應操作將在相應的狀態轉換時執行。例如,我們可能希望在進入時驗證一些前提條件,或在退出時觸發一些報告。
5. 全局監聽器
可以為狀態機定義全局監聽器。這些監聽器將在狀態轉換髮生時被調用,可用於諸如日誌記錄或安全等用途。
首先,我們需要添加一種新的配置方法——一種不涉及狀態或轉換,而是與狀態機本身配置相關的配置方法。
需要通過擴展 StateMachineListenerAdapter 來定義監聽器。
public class StateMachineListener extends StateMachineListenerAdapter {

    @Override
    public void stateChanged(State from, State to) {
        System.out.printf("Transitioned from %s to %s%n", from == null ?
          "none" : from.getId(), to.getId());
    }
}
我們僅覆蓋了 stateChanged 事件,儘管還有許多其他事件鈎子可用。
6. 擴展狀態
Spring State Machine 跟蹤其狀態,但要跟蹤我們的應用程序狀態,例如計算出的值、管理員的錄入或調用外部系統的響應,我們需要使用稱為“擴展狀態”的機制。
假設我們希望確保一個賬户申請通過兩級審批。我們可以使用擴展狀態中存儲的整數來跟蹤審批計數:
@Bean
public Action<String, String> executeAction() {
    return ctx -> {
        int approvals = (int) ctx.getExtendedState().getVariables()
          .getOrDefault("approvalCount", 0);
        approvals++;
        ctx.getExtendedState().getVariables()
          .put("approvalCount", approvals);
    };
}
7. 守衞 (Guards)
守衞可用於在執行狀態過渡之前驗證某些數據。守衞與動作非常相似:
@Bean
public Guard<String, String> simpleGuard() {
    return ctx -> (int) ctx.getExtendedState()
      .getVariables()
      .getOrDefault("approvalCount", 0) > 0;
}
這裏最明顯的差異在於,一個守衞返回 true 或 false,這將告知狀態機過渡是否應該允許發生。
對 SPeL 表達式作為守衞的支持也已實現。上述示例也可以這樣編寫:
.guardExpression("extendedState.variables.approvalCount > 0")8. 從 Builder 創建狀態機
StateMachineBuilder 可用於在不使用 Spring 註解或創建 Spring 上下文的情況下創建狀態機。
StateMachineBuilder.Builder<String, String> builder
  = StateMachineBuilder.builder();
builder.configureStates().withStates()
  .initial("SI")
  .state("S1")
  .end("SF");

builder.configureTransitions()
  .withExternal()
  .source("SI").target("S1").event("E1")
  .and().withExternal()
  .source("S1").target("SF").event("E2");

StateMachine<String, String> machine = builder.build();
9. 層次狀態
層次狀態可以通過使用多個 <em withStates() 與 <em parent() 結合進行配置:
states
  .withStates()
    .initial("SI")
    .state("SI")
    .end("SF")
    .and()
  .withStates()
    .parent("SI")
    .initial("SUB1")
    .state("SUB2")
    .end("SUBEND");
這種配置允許狀態機擁有多個狀態,因此對 getState() 的調用會產生多個 ID。例如,啓動後立即,以下表達式會產生:
stateMachine.getState().getIds()
["SI", "SUB1"]
10. 交叉點 (選擇)
到目前為止,我們已經創建了線性性質的狀態轉換。這既不引人入勝,也不反映了開發人員需要實施的實際用例。條件路徑的實現幾乎必然,Spring 狀態機中的交叉點(或選擇點)允許我們做到這一點。
首先,我們需要將一個狀態標記為交叉點(選擇點)在狀態定義中:
states
  .withStates()
  .junction("SJ")
然後,在過渡過程中,我們定義了“first/then/last”選項,它們對應於 if-then-else 結構:
.withJunction()
  .source("SJ")
  .first("high", highGuard())
  .then("medium", mediumGuard())
.last("low")首先,first,然後接受一個第二個參數,即一個正則表達式guard,它將被調用以確定要選擇哪個路徑:
@Bean
public Guard<String, String> mediumGuard() {
    return ctx -> false;
}

@Bean
public Guard<String, String> highGuard() {
    return ctx -> false;
}
請注意,過渡不會在交叉節點處停止,而是會立即執行定義的守衞並跳轉到指定的路由。
如上例所示,指示狀態機跳轉到 SJ 將導致實際狀態變為 低,因為兩個守衞都返回了 false。
最後需要注意的是,API 提供了交叉點和選擇點。但是,從功能上講,它們在各個方面都完全相同。
11. 分支 (Fork)
有時,需要將執行過程分割成多個獨立的執行路徑。這可以通過使用 fork 功能來實現。
首先,我們需要指定一個節點作為分支節點,並創建狀態機將執行過程分割成若干個層次結構的區域:
states
  .withStates()
  .initial("SI")
  .fork("SFork")
  .and()
  .withStates()
    .parent("SFork")
    .initial("Sub1-1")
    .end("Sub1-2")
  .and()
  .withStates()
    .parent("SFork")
    .initial("Sub2-1")
    .end("Sub2-2");
然後定義分叉過渡:
.withFork()
  .source("SFork")
  .target("Sub1-1")
  .target("Sub2-1");
12. 聯合 (Join)
聯合操作的補操作是聯合。它允許我們設置狀態過渡到哪個狀態取決於完成其他狀態。

與分叉類似,我們需要在狀態定義中指定一個聯合節點。
states
  .withStates()
  .join("SJoin")
然後,在過渡中,我們定義了哪些狀態需要完成以啓用我們的join狀態:
transitions
  .withJoin()
    .source("Sub1-2")
    .source("Sub2-2")
    .target("SJoin");
這就是全部! 採用這種配置時,當 Sub1-2 和 Sub2-2 都實現時,狀態機將過渡到 SJoin
13. 使用枚舉而非字符串
在上述示例中,我們使用了字符串常量來定義狀態和事件,以提高清晰度和簡潔性。在實際的生產系統中,通常會使用 Java 的枚舉類型,以避免拼寫錯誤並獲得更高的類型安全性。
首先,我們需要定義系統中所有可能的狀態和事件:
public enum ApplicationReviewStates {
    PEER_REVIEW, PRINCIPAL_REVIEW, APPROVED, REJECTED
}

public enum ApplicationReviewEvents {
    APPROVE, REJECT
}
我們還需要在擴展配置時將我們的枚舉作為泛型參數傳遞:
public class SimpleEnumStateMachineConfiguration
  extends StateMachineConfigurerAdapter
  <ApplicationReviewStates, ApplicationReviewEvents>
定義完成後,我們可以使用枚舉常量而不是字符串。例如,定義一個過渡:
transitions.withExternal()
  .source(ApplicationReviewStates.PEER_REVIEW)
  .target(ApplicationReviewStates.PRINCIPAL_REVIEW)
  .event(ApplicationReviewEvents.APPROVE)
14. 結論
本文探討了 Spring 狀態機的一些特性。
