1. 概述
Spring Authorization Server 的默認實現將所有內容存儲在內存中。例如,註冊客户端、令牌存儲、授權狀態等,都會在 JVM 啓動/停止時創建和刪除。這在某些情況下,如演示和測試,是有益的。但是,在實際應用中,它 會導致問題,因為它不支持水平擴展、重啓和其他類似場景。
為了解決這個問題,Spring 提供方法,用於使用 Redis 實現 Spring Authorization Service 的核心服務。 這樣,我們就可以擁有令牌和註冊客户端的持久性和耐久性。此外,我們還可以享受更好的質量和安全性,並可以訪問管理令牌。我們可以擴展 Authorization Server,提供可觀測性和事件溯源,並可以在多個節點上訪問撤銷令牌,以及其他好處。
在本文中,我們將探討如何使用 Redis 實現 Spring Authorization Service 的核心服務。我們將研究需要更改或添加的組件,並提供代碼示例以實現這些功能。我們將使用嵌入式 Redis 服務器進行演示目的。但是,所有內容都應該在容器化或部署實例中以相同的方式工作。
2. 基礎項目
為了本教程,我們將基於現有的 Spring Security OAuth 項目進行演示代碼的構建,該項目將所有數據存儲在內存中。然後,我們將介紹 Spring Authorization Service 的核心服務以及 Redis 的使用。
現有的項目是一個 REST API,它提供了一份文章列表。但是,該端點已進行安全保護,需要身份驗證和授權,如鏈接文章中所述。在本教程的範圍內,我們不會對服務本身進行任何修改。
2.1. 項目結構
本項目的基線包含三個模塊:
- 身份驗證服務器作為文章資源和客户端服務器的身份驗證來源。
- 資源服務器在驗證身份驗證與身份驗證服務器的有效性後,提供文章列表。
- 客户端服務器是一個 REST API 客户端,在用户身份驗證後,向資源服務器發起授權請求,並獲取文章。
在本文中,我們將使用與基線項目相同的代碼,並對身份驗證服務器進行一些修改。
2.2. 依賴關係
首先,我們定義 Spring 依賴關係中的常用版本,以便在所有模塊中使用。為此,所有模塊都將使用一個通用的父模塊,該父模塊反過來使用 spring-boot-starter-parent 作為其父模塊:
<parent>
    <groupId>org.springframework.boot</groupId>
    <artifactId>spring-boot-starter-parent</artifactId>
    <version>3.5.0</version>
</parent>
我們需要提及的另一個版本是嵌入式 Redis Server 依賴,用於在授權服務器中使用:
<dependency>
    <groupId>com.github.codemonstur</groupId>
    <artifactId>embedded-redis</artifactId>
    <version>1.4.2</version>
</dependency>
3. 使用 Redis 的 Spring Authorization Server
Spring Authorization Server 默認情況下,對於以下內容使用內存實現:
- RegisteredClientRepository
- Token 存儲
- 授權同意
- 授權狀態
這在某些場景中很有益,尤其當我們無需長期存儲即可快速行動時。這些場景可能包括運行測試、演示目的以及其他情況。但是,如果用例更復雜,需要長期存儲、可擴展性以及監控要求,則 Authorization Server 需要能夠將內容存儲在數據庫中。
Spring 提供此選項,可以使用 Redis 實現 Spring Authorization Service 的核心服務。要做到這一點,我們需要:
- 定義實體模型
- 創建 Spring Data 存儲庫
- 實現核心服務
- 配置核心服務
3.1. 授權服務中的實體模型(帶 Redis)
首先,我們需要定義一些實體來表示核心組件:RegisteredClient、OAuth2Authorization 和 OAuth2AuthorizationConsent。 我們根據授權請求類型將 OAuth2Authorization 類分解了。
- RegisteredClient 實體(OAuth2RegisteredClient)用於持久化從 RegisteredClient 映射的信息。
- Authorization Consent 實體(OAuth2UserConsent)用於持久化從 OAuth2AuthorizationConsent 映射的信息。
- Authorization Grant 基礎實體(OAuth2AuthorizationGrantAuthorization)是用於持久化映射到 OAuth2Authorization 的基礎實體,並具有每個授權請求類型的通用屬性。
- OAuth 2.0 中 Authorization Code 實體(OAuth2AuthorizationCodeGrantAuthorization)定義了 OAuth 2.0 “authorization_code” 授權請求類型的附加屬性。
- OpenID Connect 1.0 中 Authorization Code 實體(OidcAuthorizationCodeGrantAuthorization)定義了 OpenID Connect 1.0 “authorization_code” 授權請求類型的附加屬性。
- Client Credentials 實體(OAuth2ClientCredentialsGrantAuthorization)定義了 “client_credentials” 授權請求類型的附加屬性。
- Device Code 實體(OAuth2DeviceCodeGrantAuthorization)定義了 “urn:ietf:params:oauth:grant-type:device_code” 授權請求類型的附加屬性。
- Token Exchange 實體(OAuth2TokenExchangeGrantAuthorization)定義了 “urn:ietf:params:oauth:grant-type:token-exchange” 授權請求類型的附加屬性。
3.2. 使用 Redis 實現的授權服務倉庫
然後,我們創建了為了實現 Spring 授權服務與 Redis 的核心服務所需的最小倉庫集。這些倉庫如下:
- OAuth2RegisteredClientRepository (註冊客户端倉庫) 用於通過 id 或 clientId 查找 OAuth2RegisteredClient
- OAuth2UserConsentRepository (授權同意倉庫) 用於通過 registeredClientId 和 principalName 查找和刪除 OAuth2UserConsent 記錄
- OAuth2AuthorizationGrantAuthorizationRepository (授權授權碼倉庫) 用於通過 id、state、deviceCode 等,根據授權碼類型查找 OAuth2AuthorizationGrantAuthorization
3.3. 授權服務的核心服務與 Redis
我們同樣希望構建與之前“授權服務的核心服務”相對應的服務。這些核心服務如下:
- Model Mapper (ModelMapper) 不是核心服務,但我們將會在後續的所有核心服務中使用它,用於在實體對象和領域對象之間進行映射。
- 註冊客户端倉庫 (RedisRegisteredClientRepository) 結合了 OAuth2RegisteredClientRepository、OAuth2RegisteredClient 和 ModelMapper 類,用於持久化 RegisteredClient 對象。
- 授權同意服務 (RedisOAuth2AuthorizationConsentService) 結合了 OAuth2UserConsentRepository、OAuth2UserConsent 和 ModelMapper 類,用於持久化 OAuth2AuthorizationConsent 對象。
- 授權服務 (RedisOAuth2AuthorizationService) 結合了 OAuth2AuthorizationGrantAuthorizationRepository、OAuth2AuthorizationGrantAuthorization 和 ModelMapper 類,用於持久化 OAuth2Authorization 對象。
可以從 GitHub 上找到這些服務的實現代碼。
3.4. 使用 Redis 配置 Spring Authorization 服務
最後,我們需要創建 Spring 配置文件,以啓用 Spring Authorization 服務的核心服務。
SecurityConfig 類應包含與基礎項目相同的 Bean。 我們註冊並稍後在演示中使用用户憑據為用户名“admin”,密碼“password”。 讓我們看一下 Redis 的配置:
@Configuration(proxyBeanMethods = false)
@EnableRedisRepositories
public class RedisConfig {
    // fields omitted

    @PostConstruct
    public void postConstruct() throws IOException {
        redisServer.start();
    }

    @PreDestroy
    public void preDestroy() throws IOException {
        redisServer.stop();
    }

    @Bean
    @Order(1)
    public JedisConnectionFactory redisConnectionFactory() {
        RedisStandaloneConfiguration redisStandaloneConfiguration
          = new RedisStandaloneConfiguration(redisHost, redisPort);

        return new JedisConnectionFactory(redisStandaloneConfiguration);
    }

    @Bean
    @Order(2)
    public RedisTemplate<?, ?> redisTemplate(JedisConnectionFactory connectionFactory) {
        RedisTemplate<byte[], byte[]> template = new RedisTemplate<>();
        template.setConnectionFactory(connectionFactory);
        return template;
    }

    @Bean
    @Order(3)
    public RedisCustomConversions redisCustomConversions() {
        return new RedisCustomConversions(
          Arrays.asList(
            new UsernamePasswordAuthenticationTokenToBytesConverter(),
            new BytesToUsernamePasswordAuthenticationTokenConverter(),
            new OAuth2AuthorizationRequestToBytesConverter(),
            new BytesToOAuth2AuthorizationRequestConverter(),
            new ClaimsHolderToBytesConverter(),
            new BytesToClaimsHolderConverter()));
    }

    @Bean
    @Order(4)
    public RedisRegisteredClientRepository registeredClientRepository(
      OAuth2RegisteredClientRepository registeredClientRepository) {
        RedisRegisteredClientRepository redisRegisteredClientRepository
          = new RedisRegisteredClientRepository(registeredClientRepository);
        redisRegisteredClientRepository.save(RegisteredClients.messagingClient());

        return redisRegisteredClientRepository;
    }

    @Bean
    @Order(5)
    public RedisOAuth2AuthorizationService authorizationService(
      RegisteredClientRepository registeredClientRepository,
      OAuth2AuthorizationGrantAuthorizationRepository authorizationGrantAuthorizationRepository) {
        return new RedisOAuth2AuthorizationService(registeredClientRepository,
          authorizationGrantAuthorizationRepository);
    }

    @Bean
    @Order(6)
    public RedisOAuth2AuthorizationConsentService authorizationConsentService(
      OAuth2UserConsentRepository userConsentRepository) {
        return new RedisOAuth2AuthorizationConsentService(userConsentRepository);
    }
}
RedisConfig 類提供了 Redis 和授權服務的核心組件的 Spring Bean:
@PostConstruct和@PreDestroy註解用於啓動和停止嵌入式 Redis 服務器JedisConnectionFactory和RedisTemplateBean 用於連接到 RedisRedisCustomConversionsBean 用於對象到哈希的轉換,以便將數據持久化到 RedisRedisRegisteredClientRepository用於設置registeredClientRepositoryBean,然後註冊客户端,如下一部分將解釋的RedisOAuth2AuthorizationService作為authorizationServiceBean 註冊,並設置了適當的 Repository- 同樣,
RedisOAuth2AuthorizationConsentService作為authorizationConsentServiceBean 註冊
3.5. 已註冊客户端
當我們使用 Spring OAuth Security 且使用默認的內存持久化時,可以使用屬性定義已註冊客户端。 這是在 Spring Authorization Service 從版本 3.1.0 開始的內置功能,它使用 OAuth2AuthorizationServerProperties 類。
但是,由於我們使用 Redis 實現 Spring Authorization Service 的核心服務,更具體地説,我們使用自定義的 RegisteredClientRepository,因此此功能默認不支持。
我們可以採用不同的方法來解決此問題,例如使用 OAuth2AuthorizationServerProperties 類並自行將映射和存儲到自定義倉庫中,直接使用硬編碼的值,以及更多方法。由於這是一個教程,我們將採用最簡單的方法,即使用硬編碼的值並將 RegisteredClient 存儲在 RedisRegisteredClientRepository 中,在配置中(如前一節所示)。
讓我們使用代碼創建一個 RegisteredClient:
public class RegisteredClients {
    public static RegisteredClient messagingClient() {
        return RegisteredClient.withId(UUID.randomUUID().toString())
          .clientId("articles-client")
          .clientSecret("{noop}secret")
          .clientAuthenticationMethod(ClientAuthenticationMethod.CLIENT_SECRET_BASIC)
          .authorizationGrantType(AuthorizationGrantType.AUTHORIZATION_CODE)
          .authorizationGrantType(AuthorizationGrantType.REFRESH_TOKEN)
          .authorizationGrantType(AuthorizationGrantType.CLIENT_CREDENTIALS)
          .authorizationGrantType(AuthorizationGrantType.DEVICE_CODE)
          .redirectUri("http://127.0.0.1:8080/login/oauth2/code/articles-client-oidc")
          .redirectUri("http://127.0.0.1:8080/authorized")
          .postLogoutRedirectUri("http://127.0.0.1:9000/login")
          .scope(OidcScopes.OPENID)
          .scope("articles.read")
          .build();
    }
}
此配置應該比較熟悉,因為它是在基礎項目中的基於屬性的註冊客户端的副本。請注意,我們使用了我們創建的四種授權請求類型中的所有類型。
4. 使用 Redis 演示授權服務
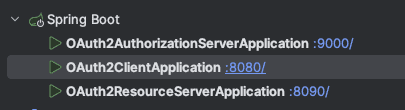
讓我們看看如何訪問 articles 資源。首先,啓動三個模塊。我們這裏使用 IntelliJ 來完成:
現在,導航到 http://127.0.0.1:8080/articles。該頁面會將我們重定向到登錄頁面:
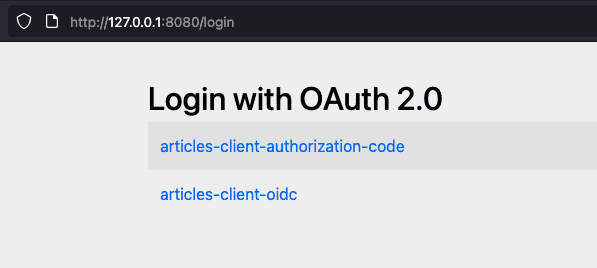
在該頁面,用户可以選擇通過點擊 articles-client-authorization-code 或 articles-client-oidc 進行身份驗證。無論哪種方式,他們都需要提供用户名和密碼(“admin”、“password”,在 UserDetailsService Bean 中設置)。
這樣,他們就向授權服務器進行身份驗證,並獲取訪問 articles-client 的權限。如果用户選擇第一個選項進行身份驗證,登錄成功後,他們會被重定向回該頁面,然後點擊第二個鏈接才能導航到 articles 頁面。如果用户選擇了第二個選項,則一切自動完成:
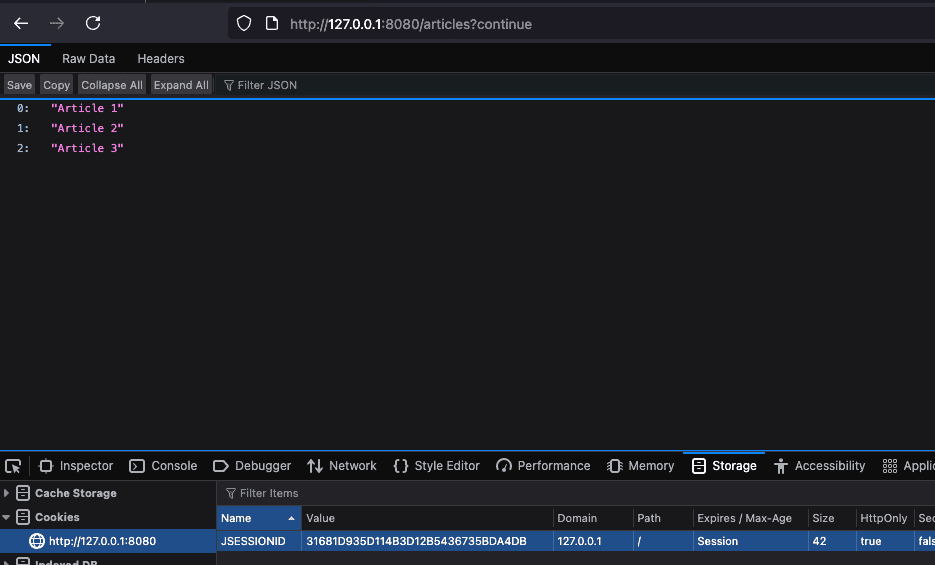
在圖像中,我們可以看到,在成功登錄後,用户可以訪問資源。我們還可以看到添加到瀏覽器的 Cookie。
另外需要注意的是,由於我們實現了 Spring 授權服務的核心服務,並且使用了 Redis,因此現在我們可以看到 Redis 服務器中包含有關活動會話以及更多信息:
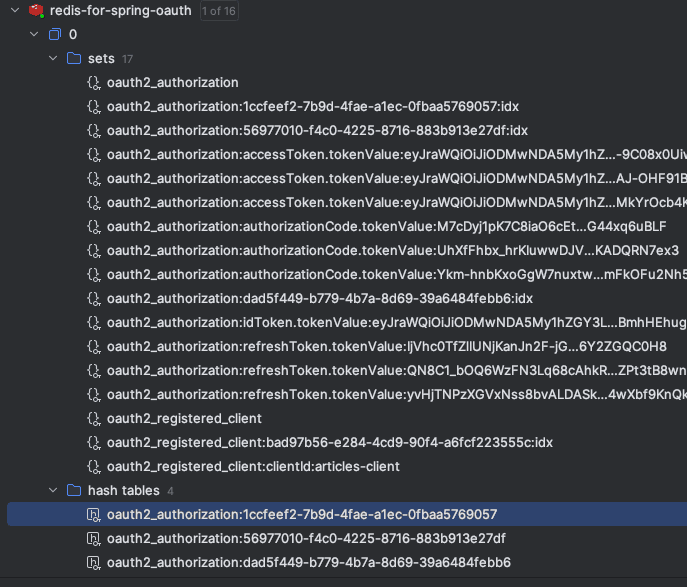
oauth2_registered_client 對象是在登錄之前在 Redis 中唯一存在的對象。登錄成功後,其餘所有數據都是我們存儲的。
5. 結論
本文介紹了 Spring Authorization Service 的核心服務以及與 Redis 的使用。我們回顧了從默認的內存存儲切換到使用 Redis 時需要修改的組件。最後,我們觀察了授權用户訪問資源的過程,以及 Authorization Server 如何在 Redis 中存儲令牌。
