1. 概述
安全性是 Spring 生態系統中不可或缺的組成部分。因此,OAuth2 幾乎無需任何配置即可與 Spring Web MVC 協同工作,這一點也不令人驚訝。
然而,原生 Spring 解決方案並非唯一實現呈現層的途徑。 Jersey,作為符合 JAX-RS 標準的實現,也可以與 Spring OAuth2 協同工作。
在本教程中,我們將瞭解如何使用 Spring Social Login 保護 Jersey 應用程序,該應用程序基於 OAuth2 標準實現。
2. Maven 依賴
以下內容將 Jersey 集成到 Spring Boot 應用程序中:spring-boot-starter-jersey 構件。
<dependency>
    <groupId>org.springframework.boot</groupId>
    <artifactId>spring-boot-starter-jersey</artifactId>
</dependency>
為了配置 Security OAuth2,我們需要 spring-boot-starter-security 和 spring-security-oauth2-client:
<dependency>
    <groupId>org.springframework.boot</groupId>
    <artifactId>spring-boot-starter-security</artifactId>
</dependency>
<dependency>
    <groupId>org.springframework.security</groupId>
    <artifactId>spring-security-oauth2-client</artifactId>
</dependency>
我們將會使用 Spring Boot Starter Parent 版本 2 來管理所有這些依賴項。
3. Jersey 呈現層
我們需要一個帶有幾個端點的資源類,以便使用 Jersey 作為呈現層。
3.1 資源類
以下是包含端點定義的類:
@Path("/")
public class JerseyResource {
    // endpoint definitions
}
這個類本身非常簡單,它只有一個 @Path 註解。這個註解的值 標識了類體內所有端點的基本路徑。
值得一提的是,這個資源類沒有為組件掃描攜帶任何類型註解。事實上,它也不需要成為 Spring Bean。原因是我們不依賴 Spring 來處理請求映射。
3.2. 登錄頁面
以下是處理登錄請求的方法:
@GET
@Path("login")
@Produces(MediaType.TEXT_HTML)
public String login() {
    return "Log in with <a href=\"/oauth2/authorization/github\">GitHub</a>";
}
此方法返回字符串,用於處理針對 /login 終點的 GET 請求。 text/html 內容類型指示用户的瀏覽器以可點擊的鏈接顯示響應。
我們將使用 GitHub 作為 OAuth2 提供者,因此鏈接是 /oauth2/authorization/github。 此鏈接將觸發重定向到 GitHub 授權頁面。
3.3. 主頁
讓我們定義一種方法來處理請求到根路徑:
@GET
@Produces(MediaType.TEXT_PLAIN)
public String home(@Context SecurityContext securityContext) {
    OAuth2AuthenticationToken authenticationToken = (OAuth2AuthenticationToken) securityContext.getUserPrincipal();
    OAuth2AuthenticatedPrincipal authenticatedPrincipal = authenticationToken.getPrincipal();
    String userName = authenticatedPrincipal.getAttribute("login");
    return "Hello " + userName;
}
此方法返回主頁,該主頁包含已登錄用户的字符串。請注意,在此情況下,我們從 login 屬性中提取了用户名。
另一個 OAuth2 提供程序可能使用不同的屬性來表示用户名,儘管如此。
顯然,上述方法僅適用於已認證的請求。如果請求未進行認證,則會重定向到 login 端點。
我們將在此部分 4 中探討如何配置此重定向。
3.4. 將 Jersey 註冊到 Spring 容器中
為了啓用 Jersey 服務,我們將資源類註冊到 Servlet 容器中。 幸運的是,這非常簡單:
@Component
public class RestConfig extends ResourceConfig {
    public RestConfig() {
        register(JerseyResource.class);
    }
}
通過在 ResourceConfig 子類中註冊 JerseyResource,我們告知了servlet容器該資源類中的所有端點。
最後一步是註冊 ResourceConfig 子類,在本例中是 RestConfig,與Spring容器註冊,我們使用 @Component 註解實現了該註冊。
4. 配置 Spring Security
我們可以像配置普通 Spring 應用一樣,為 Jersey 配置安全性:
@Configuration
public class SecurityConfig {

    @Bean
    public SecurityFilterChain filterChain(HttpSecurity http) throws Exception {
        http.authorizeRequests()
            .antMatchers("/login")
            .permitAll()
            .anyRequest()
            .authenticated()
            .and()
            .oauth2Login()
            .loginPage("/login");
        return http.build();
    }
}
給定鏈中最關鍵的方法是 oauth2Login。該方法 使用 OAuth 2.0 提供商配置身份驗證支持。 在本教程中,提供商是 GitHub。
另一個顯著的配置是登錄頁面。通過將字符串 “/login” 傳遞給 loginPage 方法,我們告訴 Spring 將未身份驗證的請求重定向到 /login 端點。
請注意,默認的安全配置也提供了一個自動生成的頁面在 /login 端點。因此,即使我們沒有配置登錄頁面,未身份驗證的請求仍然會被重定向到該端點。
與默認配置的區別在於,在默認情況下,應用程序返回生成的頁面,而不是我們的自定義字符串。
5. 應用程序配置
為了擁有 OAuth2 保護的應用程序,我們需要在 OAuth2 提供商處註冊一個客户端。之後,將客户端的憑據添加到應用程序中。
5.1. 註冊 OAuth2 客户端
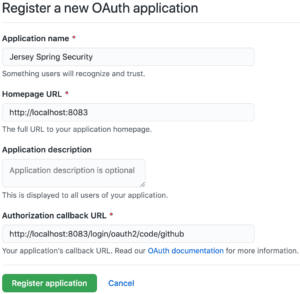
首先,通過 註冊一個 GitHub 應用。 訪問 GitHub 開發人員頁面,點擊 New OAuth App 按鈕,打開 Register a new OAuth application 表單。
接下來,填寫表單中的相應信息。 對於應用程序名稱,請輸入任何能夠使應用程序易於識別的字符串。 主頁 URL 可以設置為 http://localhost:8083, 授權回調 URL 為 http://localhost:8083/login/oauth2/code/github。
授權回調 URL 是瀏覽器在用户通過 GitHub 進行身份驗證並授予應用程序訪問權限後重定向到的路徑。
註冊表單可能如下所示:
現在,點擊 Register application 按鈕。 瀏覽器應該然後重定向到 GitHub 應用的主頁,該頁面會顯示客户端 ID 和客户端密鑰。
5.2. 配置 Spring Boot 應用
將一個名為 jersey-application.properties 的屬性文件添加到類路徑中:
server.port=8083
spring.security.oauth2.client.registration.github.client-id=<your-client-id>
spring.security.oauth2.client.registration.github.client-secret=<your-client-secret>
請務必將佔位符
最後,將此文件作為 Spring Boot 應用程序的屬性源添加:
@SpringBootApplication
@PropertySource("classpath:jersey-application.properties")
public class JerseyApplication {
    public static void main(String[] args) {
        SpringApplication.run(JerseyApplication.class, args);
    }
}
6. 身份驗證實踐
讓我們看看如何註冊後使用 GitHub 登錄我們的應用程序。
6.1. 訪問應用程序
首先啓動應用程序,然後通過地址 localhost:8083 訪問主頁。由於請求未進行身份驗證,因此將被重定向到 登錄 頁:

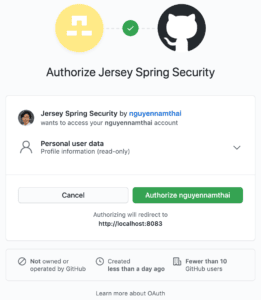
現在,當我們點擊 GitHub 鏈接時,瀏覽器將被重定向到 GitHub 授權頁:
通過查看 URL,我們可以看到重定向的請求攜帶了許多查詢參數,例如 response_type、client_id 和 scope。
https://github.com/login/oauth/authorize?response_type=code&client_id=c30a16c45a9640771af5&scope=read:user&state=dpTme3pB87wA7AZ--XfVRWSkuHD3WIc9Pvn17yeqw38%3D&redirect_uri=http://localhost:8083/login/oauth2/code/githubresponse_type 的值是 code,表示 OAuth2 授權類型。同時,client_id 參數有助於識別我們的應用程序。有關所有參數的含義,請參閲 GitHub 開發者頁面。
當授權頁面出現時,我們需要授權該應用程序以繼續操作。授權成功後,瀏覽器將重定向到我們的應用程序中預定義的端點,並附帶一些查詢參數:
http://localhost:8083/login/oauth2/code/github?code=561d99681feeb5d2edd7&state=dpTme3pB87wA7AZ--XfVRWSkuHD3WIc9Pvn17yeqw38%3D在幕後,應用程序將交換授權碼以獲取訪問令牌。隨後,它使用該令牌獲取已登錄用户的相關信息。
當對 localhost:8083/login/oauth2/code/github 的請求返回後,瀏覽器返回到主頁。此時,我們應該看到包含我們自身用户名問候消息:

6.2. 如何獲取用户名?
顯而易見的是,問候消息中的用户名是我們GitHub的用户名。此時,可能會產生一個問題:我們如何從已認證的用户那裏獲取用户名和其他信息?
在我們的示例中,我們從<em >login</em>屬性中提取了用户名。但是,這在所有OAuth2提供程序中並不相同。換句話説,提供程序可以自行決定在某些屬性中提供數據。 因此,在這方面根本沒有標準。
在GitHub的情況下,我們可以找到所需的屬性在 參考文檔 中。同樣,其他OAuth2提供程序也提供自己的參考文檔。
另一種解決方案是我們可以在調試模式下啓動應用程序,並在OAuth2AuthenticatedPrincipal對象創建後設置斷點。 通過檢查該對象的各個屬性,我們可以獲得用户的信息。
7. 測試
讓我們編寫一些測試以驗證應用程序的行為。
7.1. 環境搭建
以下是用於存放測試方法的類:
@RunWith(SpringRunner.class)
@SpringBootTest(webEnvironment = RANDOM_PORT)
@TestPropertySource(properties = "spring.security.oauth2.client.registration.github.client-id:test-id")
public class JerseyResourceUnitTest {
    @Autowired
    private TestRestTemplate restTemplate;

    @LocalServerPort
    private int port;

    private String basePath;

    @Before
    public void setup() {
        basePath = "http://localhost:" + port + "/";
    }

    // test methods
}
與其使用真實的 GitHub 客户端 ID,我們定義了一個測試 ID 用於 OAuth2 客户端。該 ID 被設置為 spring.security.oauth2.client.registration.github.client-id 屬性。
本測試類中的所有註解在 Spring Boot 測試中都是常見的,因此本教程中不會對它們進行詳細講解。如果您對這些註解有任何疑問,請查閲 Spring Boot 中的 Testing、Spring 中的 Integration Testing 或 Spring Boot TestRestTemplate。
7.2. 主頁
當未身份驗證的用户嘗試訪問主頁時,系統會將他們重定向到登錄頁面進行身份驗證:
@Test
public void whenUserIsUnauthenticated_thenTheyAreRedirectedToLoginPage() {
    ResponseEntity<Object> response = restTemplate.getForEntity(basePath, Object.class);
    assertThat(response.getStatusCode()).isEqualTo(HttpStatus.FOUND);
    assertThat(response.getBody()).isNull();

    URI redirectLocation = response.getHeaders().getLocation();
    assertThat(redirectLocation).isNotNull();
    assertThat(redirectLocation.toString()).isEqualTo(basePath + "login");
}
7.3. 登錄頁面
讓我們驗證訪問登錄頁面是否會導致授權路徑返回。
@Test
public void whenUserAttemptsToLogin_thenAuthorizationPathIsReturned() {
    ResponseEntity response = restTemplate.getForEntity(basePath + "login", String.class);
    assertThat(response.getHeaders().getContentType()).isEqualTo(TEXT_HTML);
    assertThat(response.getBody()).isEqualTo("Log in with GitHub");
}
7.4. 授權端點
當向授權端點發送請求時,瀏覽器將重定向到 OAuth2 提供商的 authorize 頁面,幷包含適當的參數:
@Test
public void whenUserAccessesAuthorizationEndpoint_thenTheyAresRedirectedToProvider() {
    ResponseEntity response = restTemplate.getForEntity(basePath + "oauth2/authorization/github", String.class);
    assertThat(response.getStatusCode()).isEqualTo(HttpStatus.FOUND);
    assertThat(response.getBody()).isNull();

    URI redirectLocation = response.getHeaders().getLocation();
    assertThat(redirectLocation).isNotNull();
    assertThat(redirectLocation.getHost()).isEqualTo("github.com");
    assertThat(redirectLocation.getPath()).isEqualTo("/login/oauth/authorize");

    String redirectionQuery = redirectLocation.getQuery();
    assertThat(redirectionQuery.contains("response_type=code"));
    assertThat(redirectionQuery.contains("client_id=test-id"));
    assertThat(redirectionQuery.contains("scope=read:user"));
}
8. 結論
在本教程中,我們已成功配置了 Spring Social Login 與 Jersey 應用程序的集成。 教程還包含了註冊 GitHub OAuth2 提供程序的步驟。
