1. 概述
Spring REST Docs 生成 RESTful 服務文檔,這些文檔既準確又易於閲讀。它將手寫文檔與使用 Spring 測試生成的自動生成文檔片段相結合。
2. 優點
該項目的核心理念之一是使用測試來生成文檔。這確保了生成的文檔始終準確地匹配 API 的實際行為。此外,輸出可以被 Asciidoctor 處理,這是一個圍繞 AsciiDoc 語法構建的發佈工具鏈。 實際上,這與 Spring 框架文檔生成的工具相同。
這些方法減少了其他框架帶來的侷限性。 Spring REST Docs 生成的文檔準確、簡潔且結構良好。 這使得 Web 服務消費者能夠以最少的麻煩獲取所需的信息。
該工具還有其他優點,例如:
- 生成 curl 和 http 請求片段
- 易於將文檔打包到項目 jar 文件中
- 易於向片段添加額外信息
- 支持 JSON 和 XML
生成片段的測試可以使用 Spring MVC Test 支持、Spring Webflux 的 WebTestClient 或 REST-Assured。
在我們的示例中,我們將使用 Spring MVC 測試,但使用其他框架也非常相似。
3. 依賴項
使用 Spring REST Docs 的理想方式是在項目中利用依賴管理系統。這裏我們使用 Maven 作為構建工具,因此可以將以下依賴項複製並粘貼到您的 POM 文件中:
<dependency>
    <groupId>org.springframework.restdocs</groupId>
    <artifactId>spring-restdocs-mockmvc</artifactId>
    <version>3.0.0</version>
</dependency>
您還可以查閲 Maven Central 以獲取依賴項的最新版本:此處。
在我們的示例中,我們需要 spring-restdocs-mockmvc 依賴項,因為我們正在使用 Spring MVC 測試支持來創建測試。
如果我們想使用 WebTestClient 或 REST Assured 編寫測試,則需要 spring-restdocs-webtestclient 和 spring-restdocs-restassured 依賴項。
4. 配置
如前所述,我們將使用 Spring MVC Test 框架來向 REST 服務發送請求,這些服務將被記錄。運行測試將生成請求和結果響應的文檔片段。
我們可以使用該庫與 JUnit 4 和 JUnit 5 測試一起使用。下面是每種測試配置的詳細説明。
4.1 JUnit 4 配置
在生成 JUnit 4 測試的文檔片段的第一步是聲明一個公共的 <em>JUnitRestDocumentation</em> 字段,並將其標記為 JUnit 的 <em>@Rule</em> 註解。
<em>JUnitRestDocumentation</em> 規則配置為指定生成的片段應保存的輸出目錄。例如,該目錄可以是 Maven 的構建輸出目錄:
@Rule
public JUnitRestDocumentation restDocumentation = new JUnitRestDocumentation("target/generated-snippets");
接下來,我們設置了 MockMvc 上下文,以便將其配置為生成文檔:
@Autowired
private WebApplicationContext context;

private MockMvc mockMvc;

@Before
public void setUp(){
    this.mockMvc = MockMvcBuilders.webAppContextSetup(this.context)
      .apply(documentationConfiguration(this.restDocumentation))
      .build();
}
MockMvc 對象使用 MockMvcRestDocumentationConfigurer 進行配置。 可以從 org.springframework.restdocs.mockmvc.MockMvcRestDocumentation 靜態的 documentationConfiguration() 方法中獲取該類的實例。
4.2. JUnit 5 配置
要處理 JUnit 5 測試,我們需要使用 RestDocumentationExtension 類來擴展測試:
@ExtendWith({RestDocumentationExtension.class, SpringExtension.class})
@SpringBootTest
public class ApiDocumentationJUnit5IntegrationTest { //... }
此類在使用 Maven 時,會自動配置一個 /target/generated-snippets 輸出目錄,對於 Gradle 則是 /build/generate-snippets。
接下來,我們需要在 @BeforeEach 方法中設置 MockMvc 實例:
@BeforeEach
public void setUp(WebApplicationContext webApplicationContext,
  RestDocumentationContextProvider restDocumentation) {
    this.mockMvc = MockMvcBuilders.webAppContextSetup(webApplicationContext)
      .apply(documentationConfiguration(restDocumentation)).build();
}
如果我們在測試中使用 JUnit,那麼我們必須使用 ManualRestDocumentation 類。
5. RESTful 服務
讓我們創建一個 CRUD RESTful 服務,以便進行文檔記錄:
@RestController
@RequestMapping("/crud")
public class CRUDController {

    @GetMapping
    public List<CrudInput> read(@RequestBody CrudInput crudInput) {
        List<CrudInput> returnList = new ArrayList<CrudInput>();
        returnList.add(crudInput);
        return returnList;
    }

    @ResponseStatus(HttpStatus.CREATED)
    @PostMapping
    public HttpHeaders save(@RequestBody CrudInput crudInput) {
        HttpHeaders httpHeaders = new HttpHeaders();
        httpHeaders.setLocation(
          linkTo(CRUDController.class).slash(crudInput.getTitle()).toUri());
        return httpHeaders;
    }

    @DeleteMapping("/{id}")
    public void delete(@PathVariable("id") long id) {
        // delete
    }
}
然後,我們還需要添加一個 IndexController,它返回一個包含指向 CRUDController 基本端點的鏈接的頁面:
@RestController
@RequestMapping("/")
public class IndexController {

    static class CustomRepresentationModel extends RepresentationModel<CustomRepresentationModel> {
        public CustomRepresentationModel(Link initialLink) {
            super(initialLink);
        }
    }

    @GetMapping
    public CustomRepresentationModel index() {
        return new CustomRepresentationModel(linkTo(CRUDController.class).withRel("crud"));
    }
}
6. JUnit 測試
回到測試部分,我們可以使用 MockMvc 實例來調用我們的服務,並記錄請求和響應。
首先,為了確保每一個 MockMvc 調用都能自動記錄,而無需進行任何額外的配置,我們可以使用 alwaysDo() 方法:。
this.mockMvc = MockMvcBuilders
  //...
  .alwaysDo(document("{method-name}",
    preprocessRequest(prettyPrint()), preprocessResponse(prettyPrint())))
  .build();
本次設置確保了對於每一個 MockMvc 調用,默認片段都會在一個與測試方法名稱相同的文件夾中創建。同時,使用 prettyPrint() 預處理程序可以以更易讀的方式顯示這些片段。
接下來,讓我們繼續自定義一些調用。
為了文檔我們的首頁,其中包含一個鏈接,我們可以使用靜態的 links() 方法:
@Test
public void indexExample() throws Exception {
    this.mockMvc.perform(get("/")).andExpect(status().isOk())
      .andDo(document("index",
        links(linkWithRel("crud").description("The CRUD resource")),
        responseFields(subsectionWithPath("_links")
          .description("Links to other resources"))
        responseHeaders(headerWithName("Content-Type")
          .description("The Content-Type of the payload"))));
}
在這裏,我們使用 linkWithRel() 方法來記錄指向 /crud 的鏈接。
為了將 Content-Type 標頭添加到響應中,我們使用 headerWithName() 方法並將其添加到 responseHeaders() 方法中。
我們還使用 responseFields() 方法記錄響應數據包。 這可用於記錄更復雜的響應子部分或使用 subsectionWithPath() 或 fieldWithPath() 方法記錄單個字段。
與響應數據包類似,我們還可以使用 requestPayload() 方法記錄請求數據包。
@Test
public void crudCreateExample() throws Exception {
    Map<String, Object> crud = new HashMap<>();
    crud.put("title", "Sample Model");
    crud.put("body", "http://www.baeldung.com/");

    this.mockMvc.perform(post("/crud").contentType(MediaTypes.HAL_JSON)
      .content(this.objectMapper.writeValueAsString(crud)))
      .andExpect(status().isCreated())
      .andDo(document("create-crud-example",
        requestFields(fieldWithPath("id").description("The id of the input"),
          fieldWithPath("title").description("The title of the input"),
          fieldWithPath("body").description("The body of the input"),
        ))));
}
在本示例中,我們記錄了接收一個包含 CrudInput 模型的 POST 請求,該模型具有 title 和 body 字段,併發送 CREATED 狀態。 每個字段都使用 fieldWithPath() 方法進行文檔記錄。
要記錄請求和路徑參數,可以使用 requestParameters() 和 pathParameters() 方法。 兩個方法都使用 parameterWithName() 方法來描述每個參數:
@Test
public void crudDeleteExample() throws Exception {
    this.mockMvc.perform(delete("/crud/{id}", 10)).andExpect(status().isOk())
      .andDo(document("crud-delete-example",
      pathParameters(
        parameterWithName("id").description("The id of the input to delete")
      )));
}
這裏,我們記錄了我們的刪除端點,該端點接收一個 id 路徑參數。
Spring REST Docs 項目包含更多強大的文檔功能,例如字段約束和請求部分,這些內容可以在 文檔中找到。
7. 輸出
一旦構建成功運行,REST 文檔片段將被生成並保存到 target/generated-snippets 文件夾中:
生成的輸出將包含有關服務的詳細信息,包括如何調用 REST 服務(如“curl”調用)、REST 服務中的 HTTP 請求和響應,以及指向服務的鏈接/端點:
CURL 命令
----
$ curl 'http://localhost:8080/' -i
----
<strong>HTTP – REST 響應</strong>
[source,http,options="nowrap"]
----
HTTP/1.1 200 OK
Content-Type: application/hal+json;charset=UTF-8
Content-Length: 93

{
  "_links" : {
    "crud" : {
      "href" : "http://localhost:8080/crud"
    }
  }
}
----
8. 使用片段創建文檔
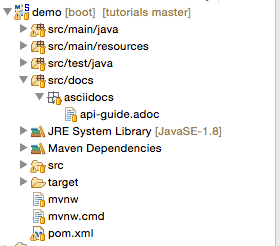
要將片段用於較大的文檔中,可以使用 Asciidoc 的 includes 功能進行引用。 在我們的例子中,我們創建了一個名為 api-guide.adoc 的文檔,位於 src/docs 目錄中:
在該文檔中,如果我們想要引用“鏈接”片段,可以使用佔位符 {snippets},Maven 在處理文檔時會將其替換為實際片段:
==== Links

include::{snippets}/index-example/links.adoc[]
9. Asciidoctor Maven 插件
為了將 API 指南從 Asciidoc 轉換為可讀格式,我們可以將 Maven 插件添加到構建生命週期中。以下是啓用此過程的步驟:
- 將 Asciidoctor 插件應用於 pom.xml
- 在 testCompile 配置中添加對 spring-restdocs-mockmvc 的依賴,如依賴部分所述
- 配置一個屬性以定義生成的片段的輸出位置
- 配置 test 任務以將片段目錄添加為輸出
- 配置 asciidoctor 任務
- 定義一個名為 snippets 的屬性,可用於在文檔中包含生成的片段
- 使任務依賴於 test 任務,以便在創建文檔之前運行測試
- 配置 snippets 目錄作為輸入。所有生成的片段都將創建在其中
將片段目錄作為 pom.xml 中的屬性,以便 Asciidoctor 插件可以使用此路徑在其中生成片段:
<properties>
    <snippetsDirectory>${project.build.directory}/generated-snippets</snippetsDirectory>
</properties>
Maven 插件配置,位於 <em pom.xml</em>> 中,用於從構建過程中生成 Asciidoc 片段,如下所示:
<plugin>
    <groupId>org.asciidoctor</groupId>
    <artifactId>asciidoctor-maven-plugin</artifactId>
    <version>1.5.6</version>
    <executions>
        <execution>
            <id>generate-docs</id>
            <phase>package</phase>
            <goals>
                <goal>process-asciidoc</goal>
            </goals>
            <configuration>
                <backend>html</backend>
                <doctype>book</doctype>
                <attributes>
                    <snippets>${snippetsDirectory}</snippets>
                </attributes>
                <sourceDirectory>src/docs/asciidocs</sourceDirectory>
                <outputDirectory>target/generated-docs</outputDirectory>
             </configuration>
	 </execution>
    </executions>
</plugin>
API 文檔生成流程
當 Maven 構建運行並執行測試時,所有片段將被生成在配置的 target/generated-snippets 目錄下 snippets 文件夾中的。 一旦片段生成,構建過程會生成 HTML 輸出。

生成的 HTML 文件格式良好且易於閲讀,因此 REST 文檔已準備好使用。 每次 Maven 構建運行時,文檔也會與最新更新一起生成。

11. 結論
缺少文檔優於錯誤的文檔,但 Spring REST docs 將幫助生成 RESTful 服務準確的文檔。
作為官方 Spring 項目,它通過使用三個測試庫來實現其目標:Spring MVC Test、WebTestClient 和 REST Assured。這種生成文檔的方法可以幫助支持基於測試的 RESTful API 開發和文檔編寫方法。
