1. 概述
該依賴項已停止維護。我們有一篇關於 SAML 與 Spring Security 的新文章。
在本教程中,我們將探索 Spring Security SAML 與 Okta 作為身份提供者 (IdP)。
2. 什麼是 SAML?
安全斷言標記語言 (SAML) 是一種開放標準,允許身份提供商 (IdP) 安全地將用户的身份驗證和授權詳細信息發送給服務提供商 (SP)。它使用基於 XML 的消息進行 IdP 和 SP 之間的通信。
換句話説,當用户嘗試訪問服務時,他需要使用 IdP 進行身份驗證。一旦身份驗證完成,IdP 將以 XML 格式向 SP 發送 SAML 屬性,其中包含身份驗證和授權詳細信息。
除了提供安全身份驗證傳輸機制外,SAML 還促進了單點登錄 (SSO),允許用户一次登錄並使用相同的憑據登錄到其他服務提供商。
3. Okta SAML 設置
首先,作為前提條件,我們需要設置一個 Okta 開發者賬户。
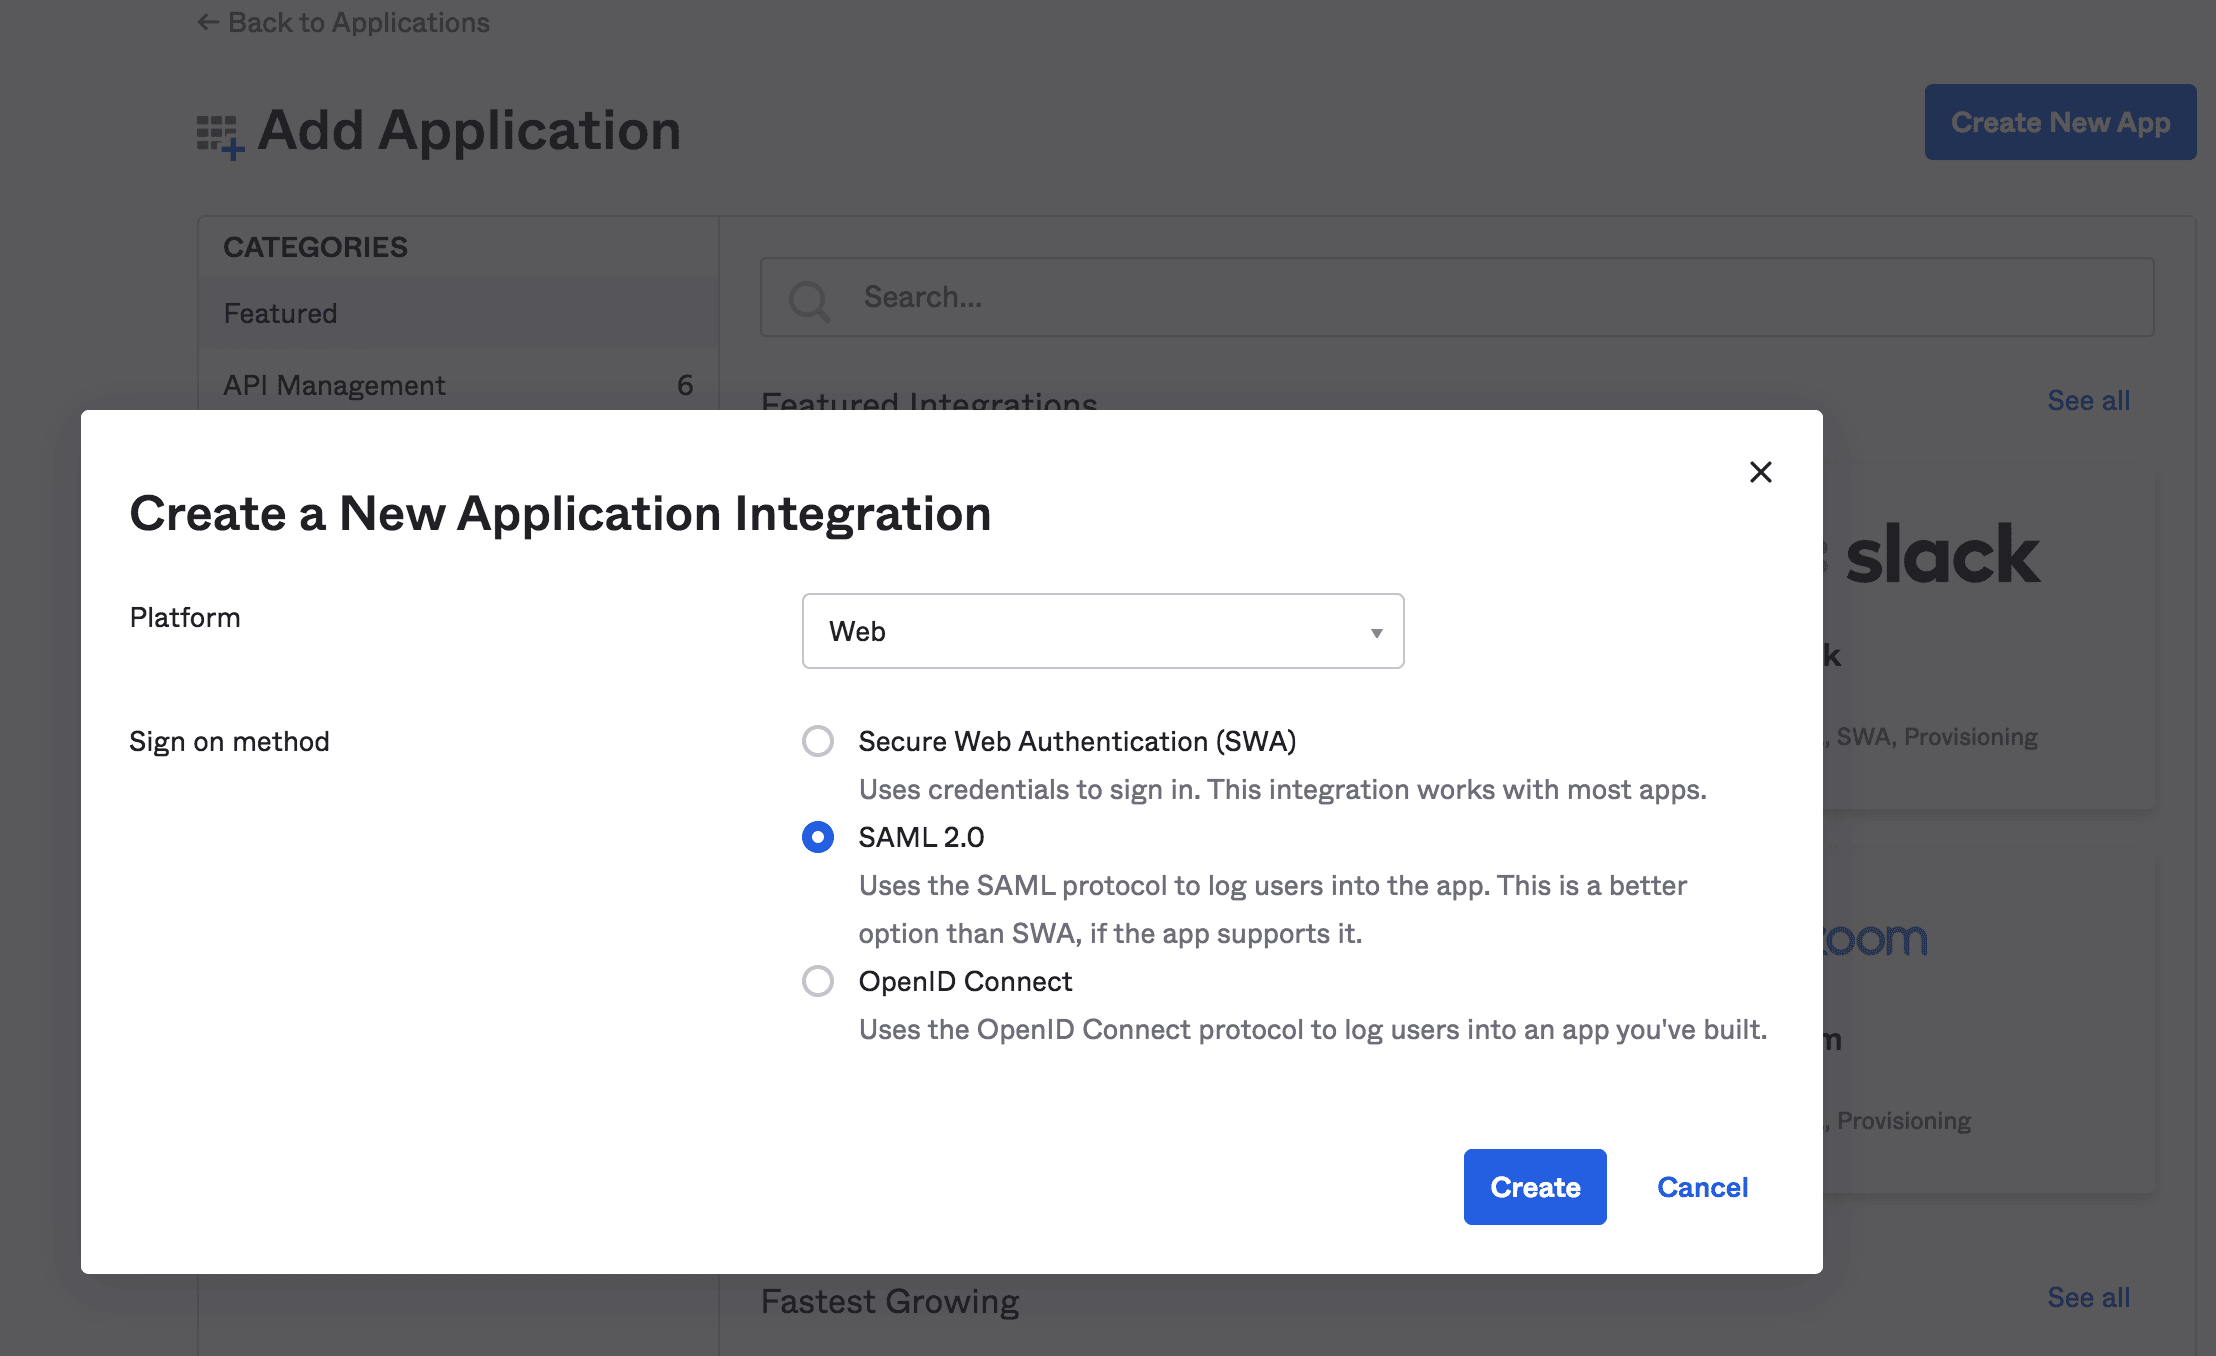
3.1. 創建新應用程序
然後,我們將創建一個具有 SAML 2.0 支持的 Web 應用程序集成:
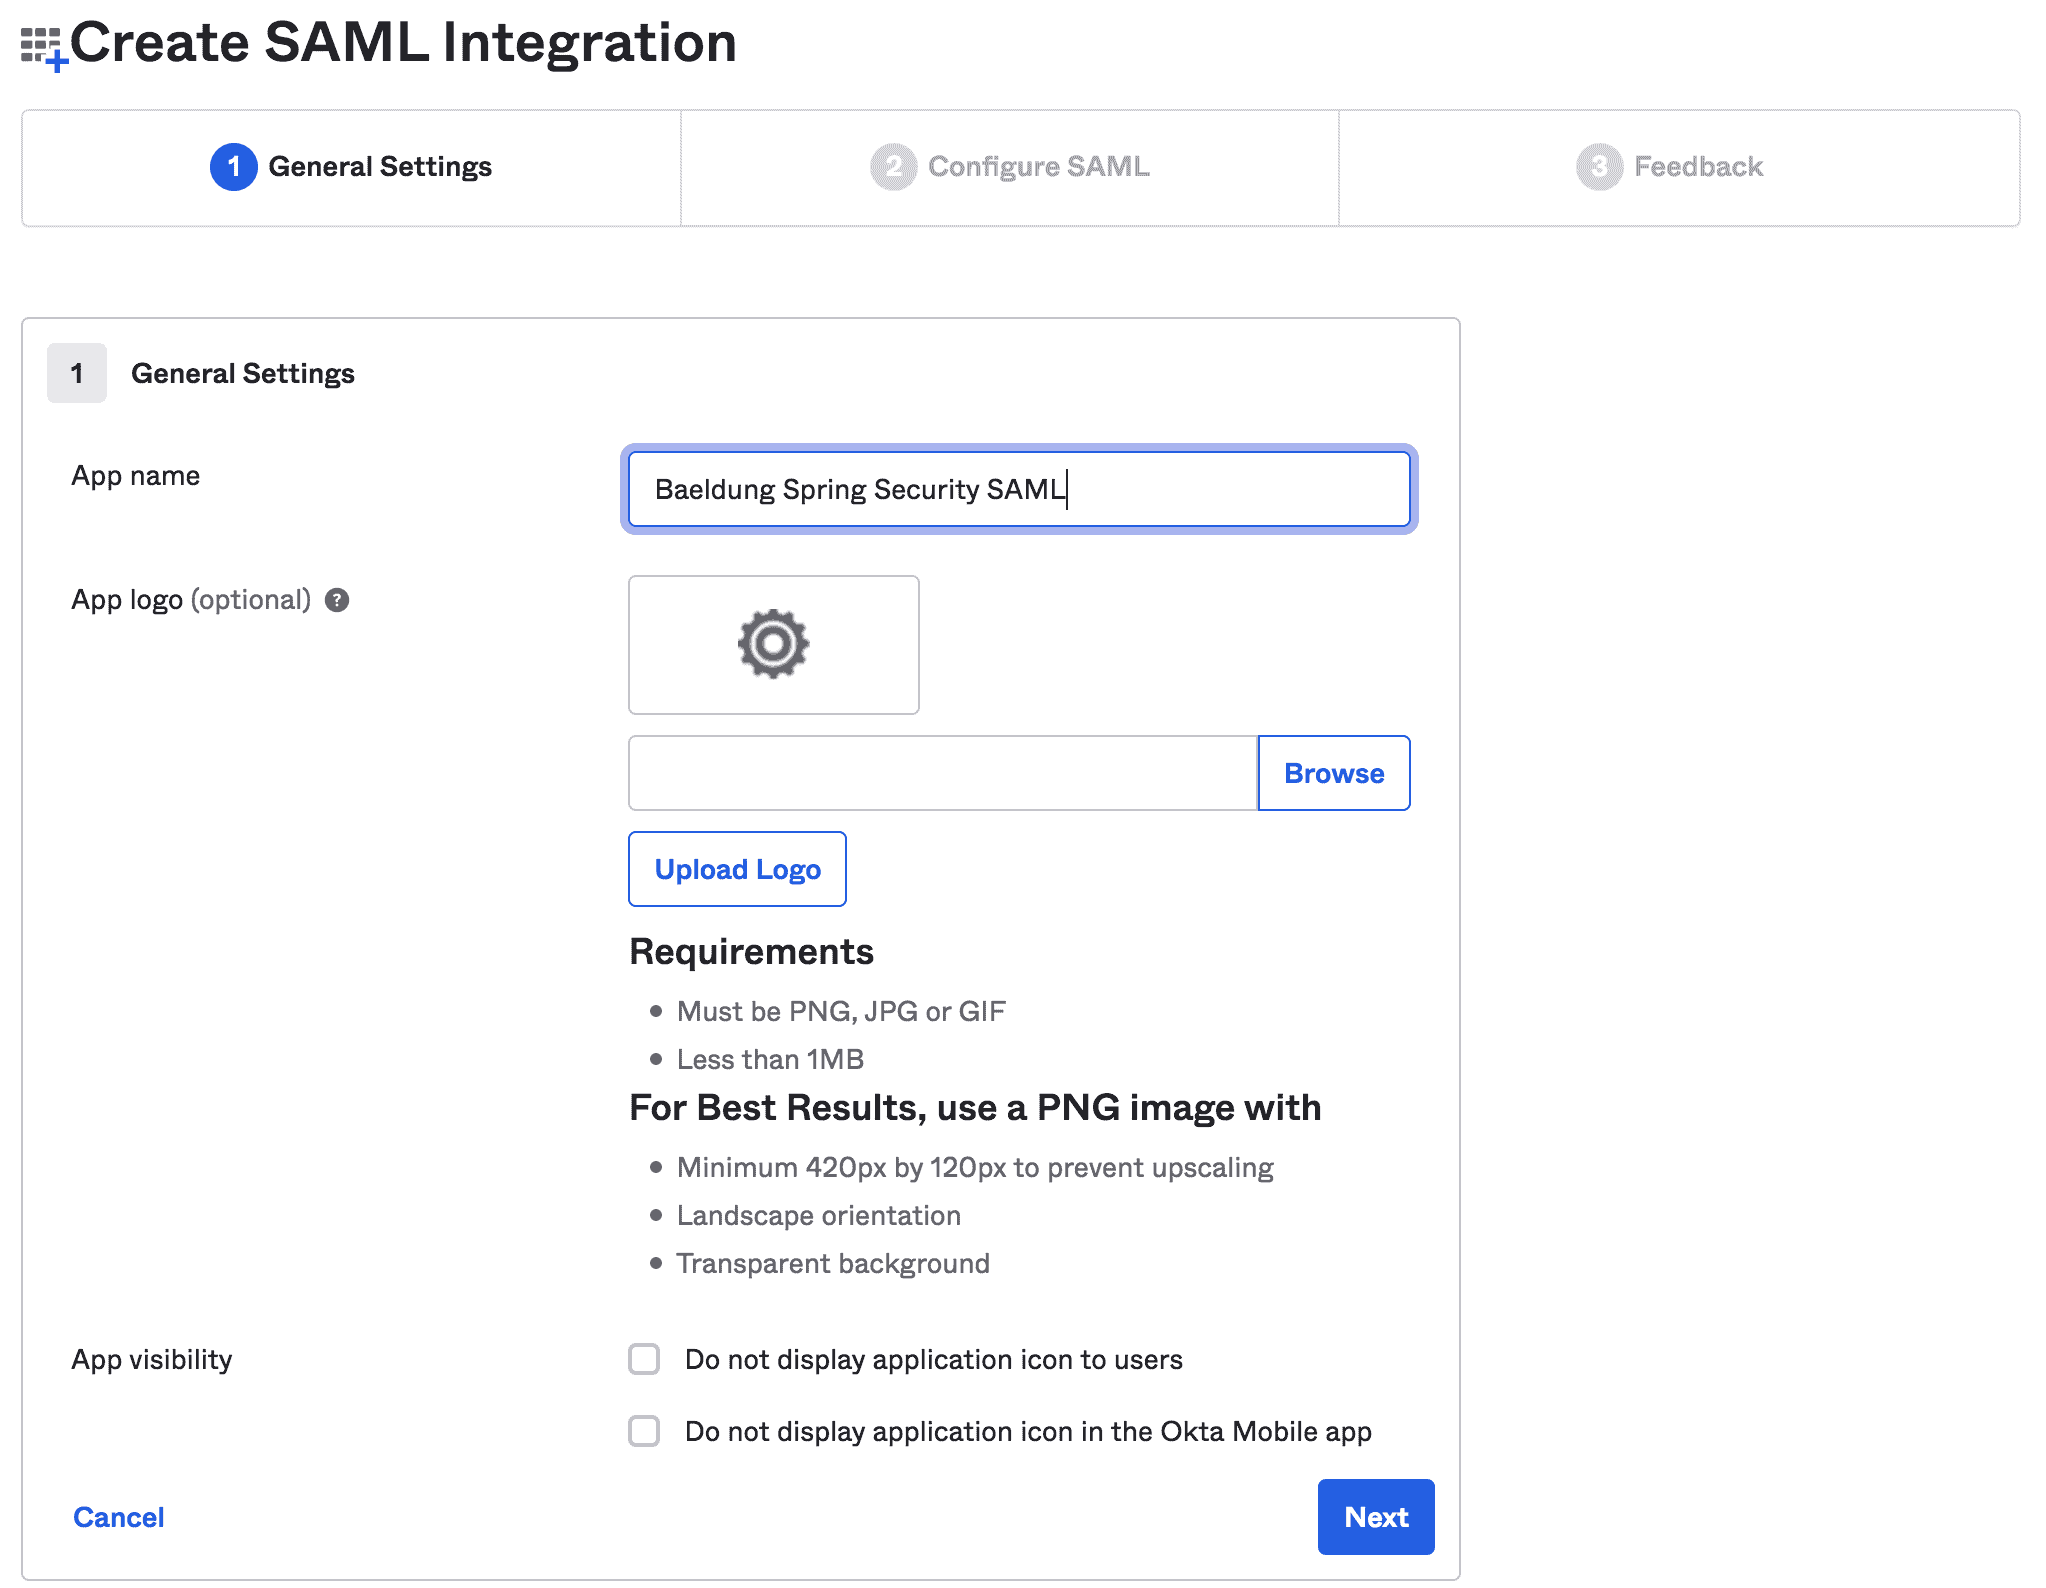
接下來,我們將填寫諸如應用程序名稱和應用程序徽標之類的通用信息:
3.2. 編輯 SAML 集成
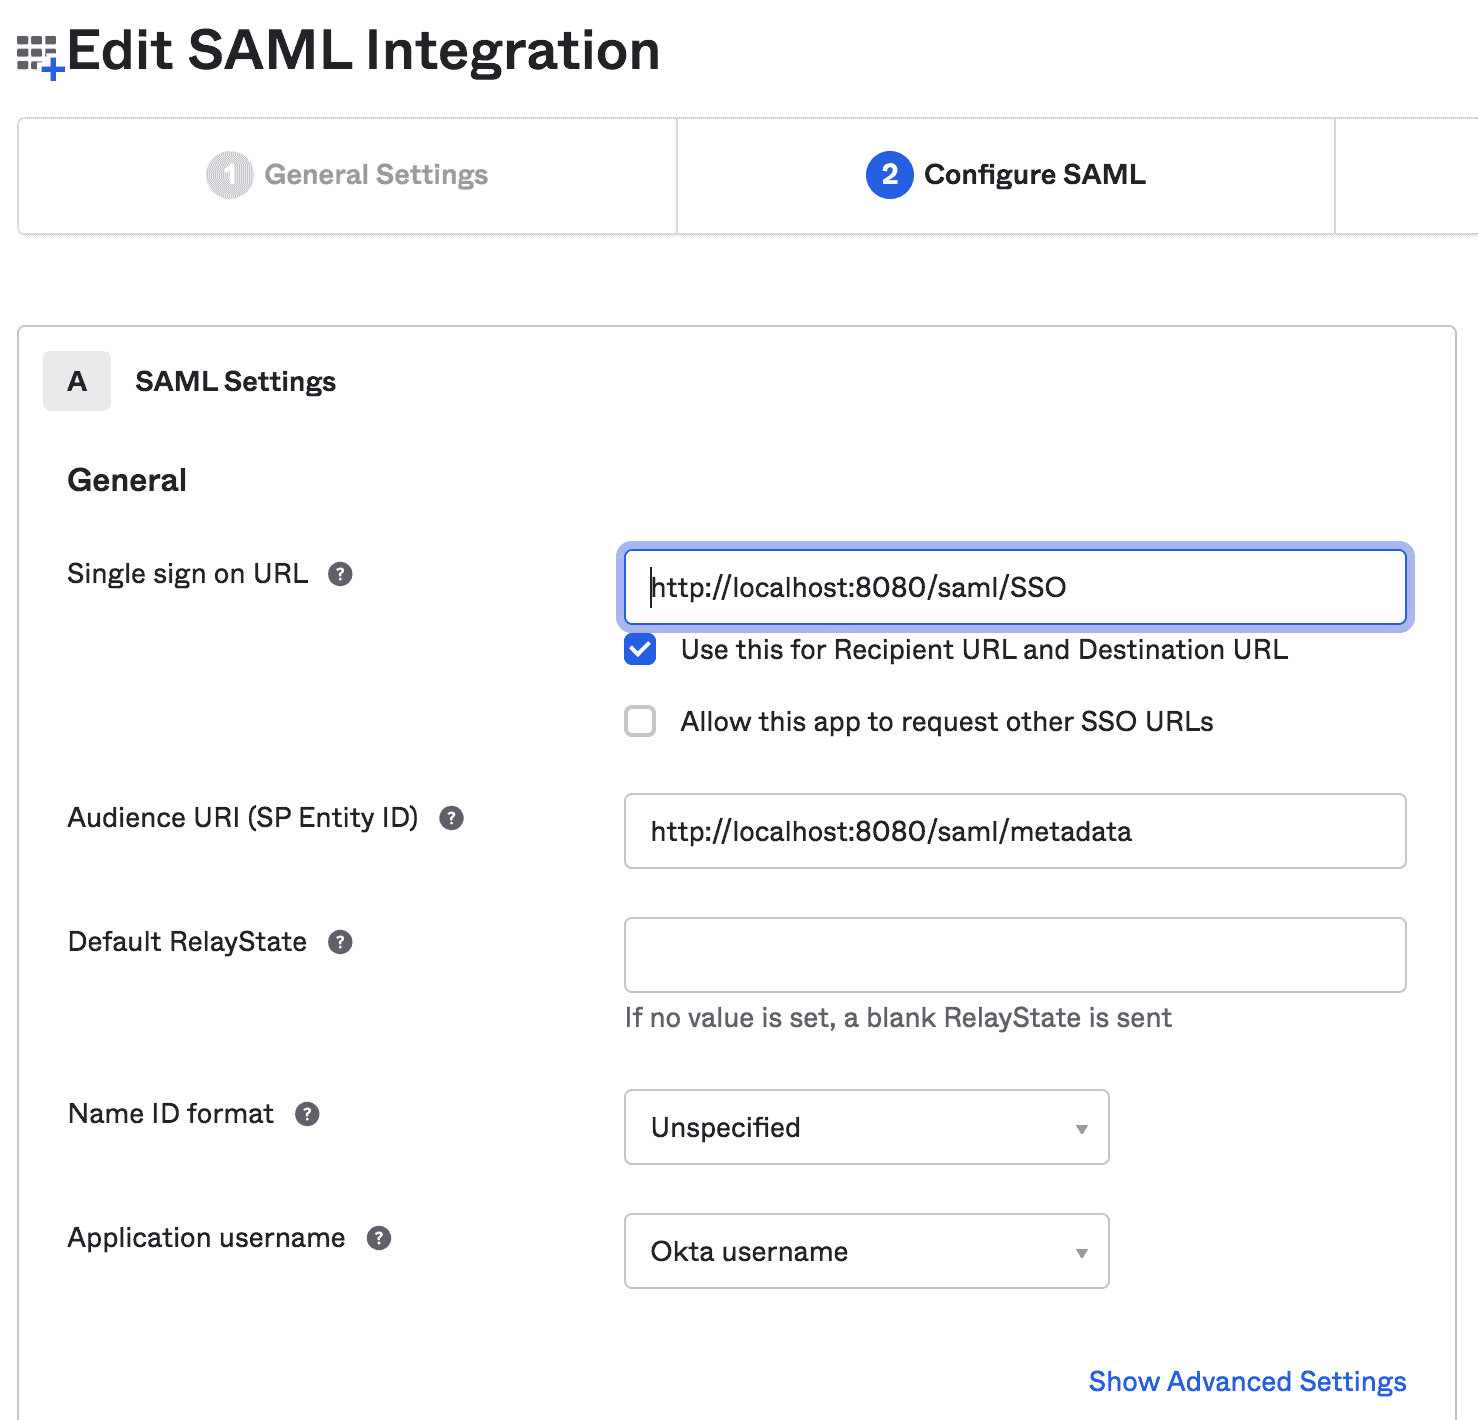
在此步驟中,我們將提供 SAML 設置,例如 SSO URL 和 Audience URI:
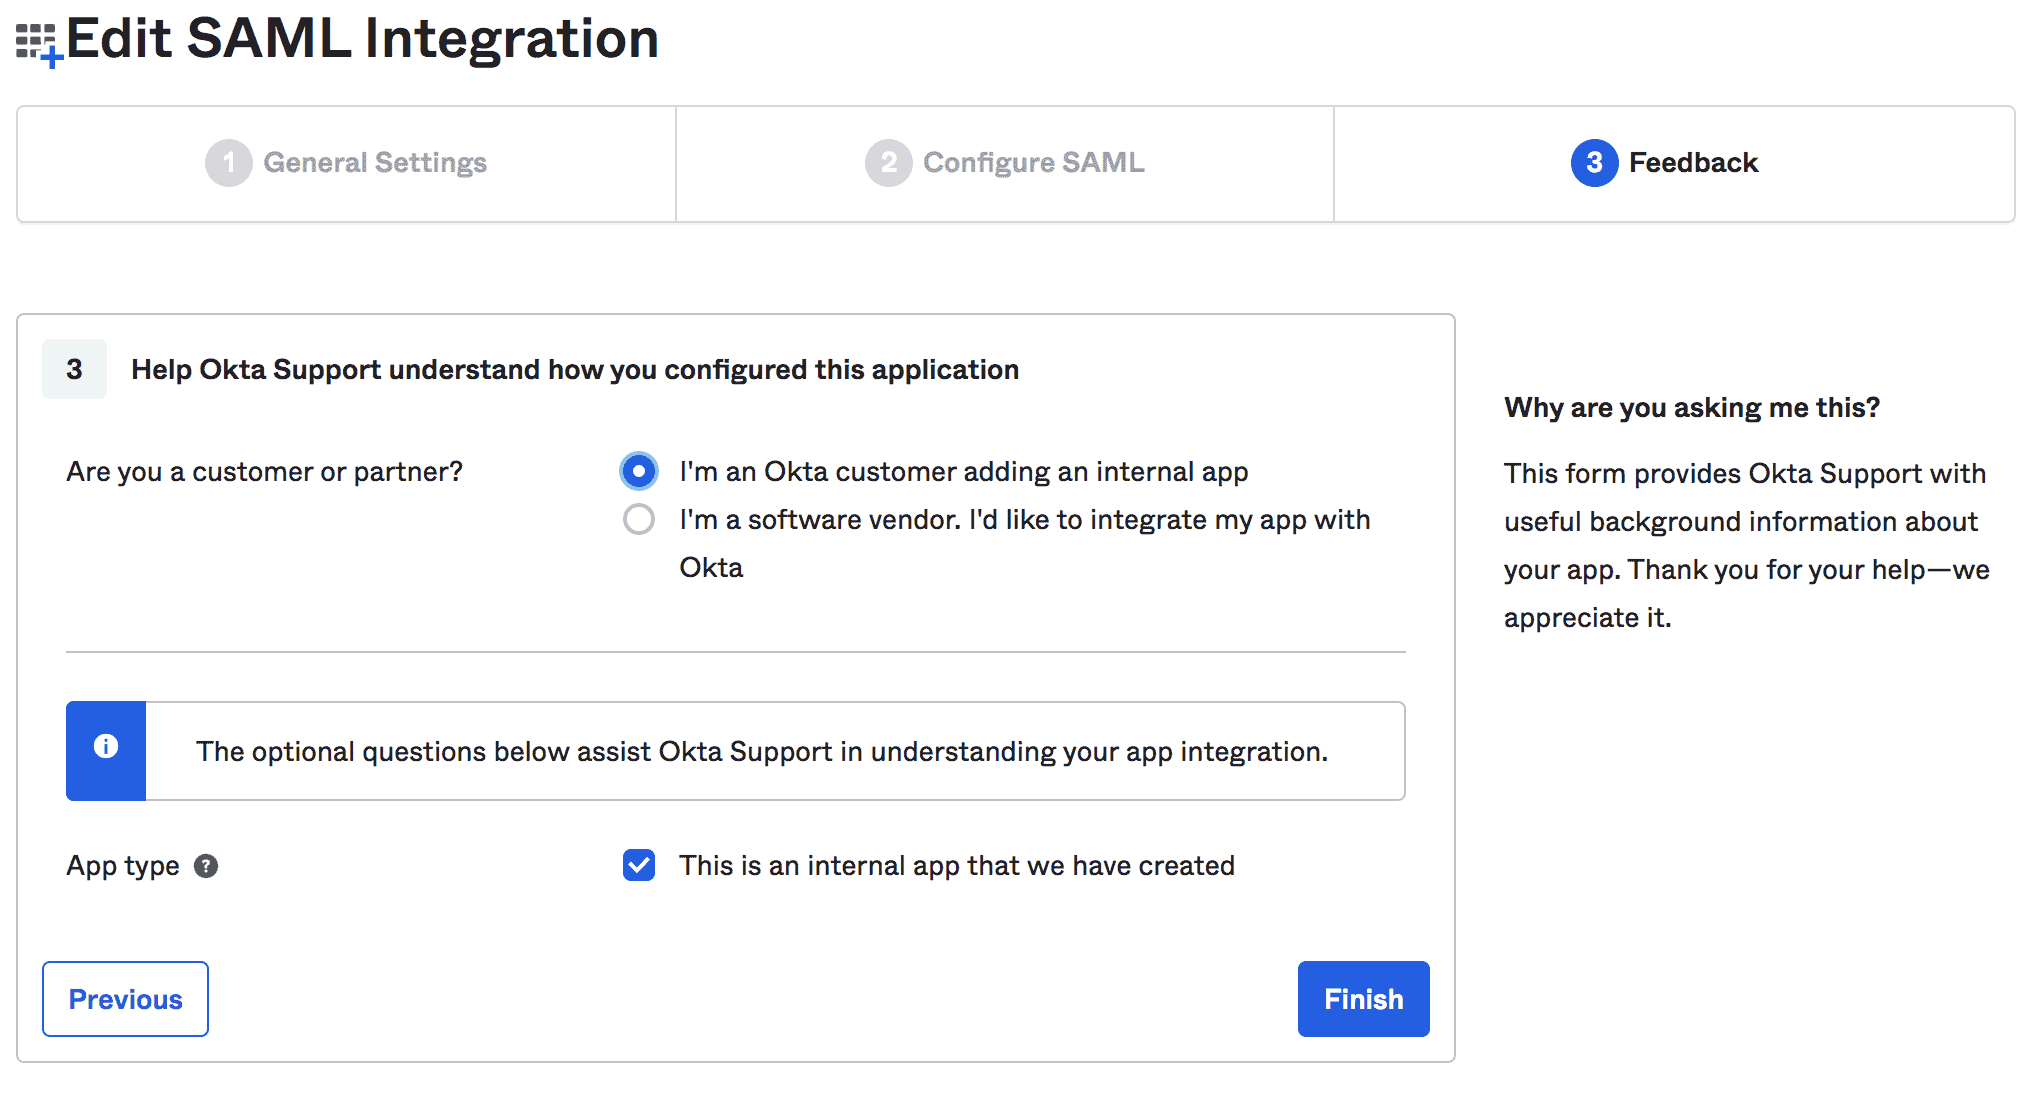
最後,我們可以就我們的集成提供反饋:
3.3. 查看設置説明
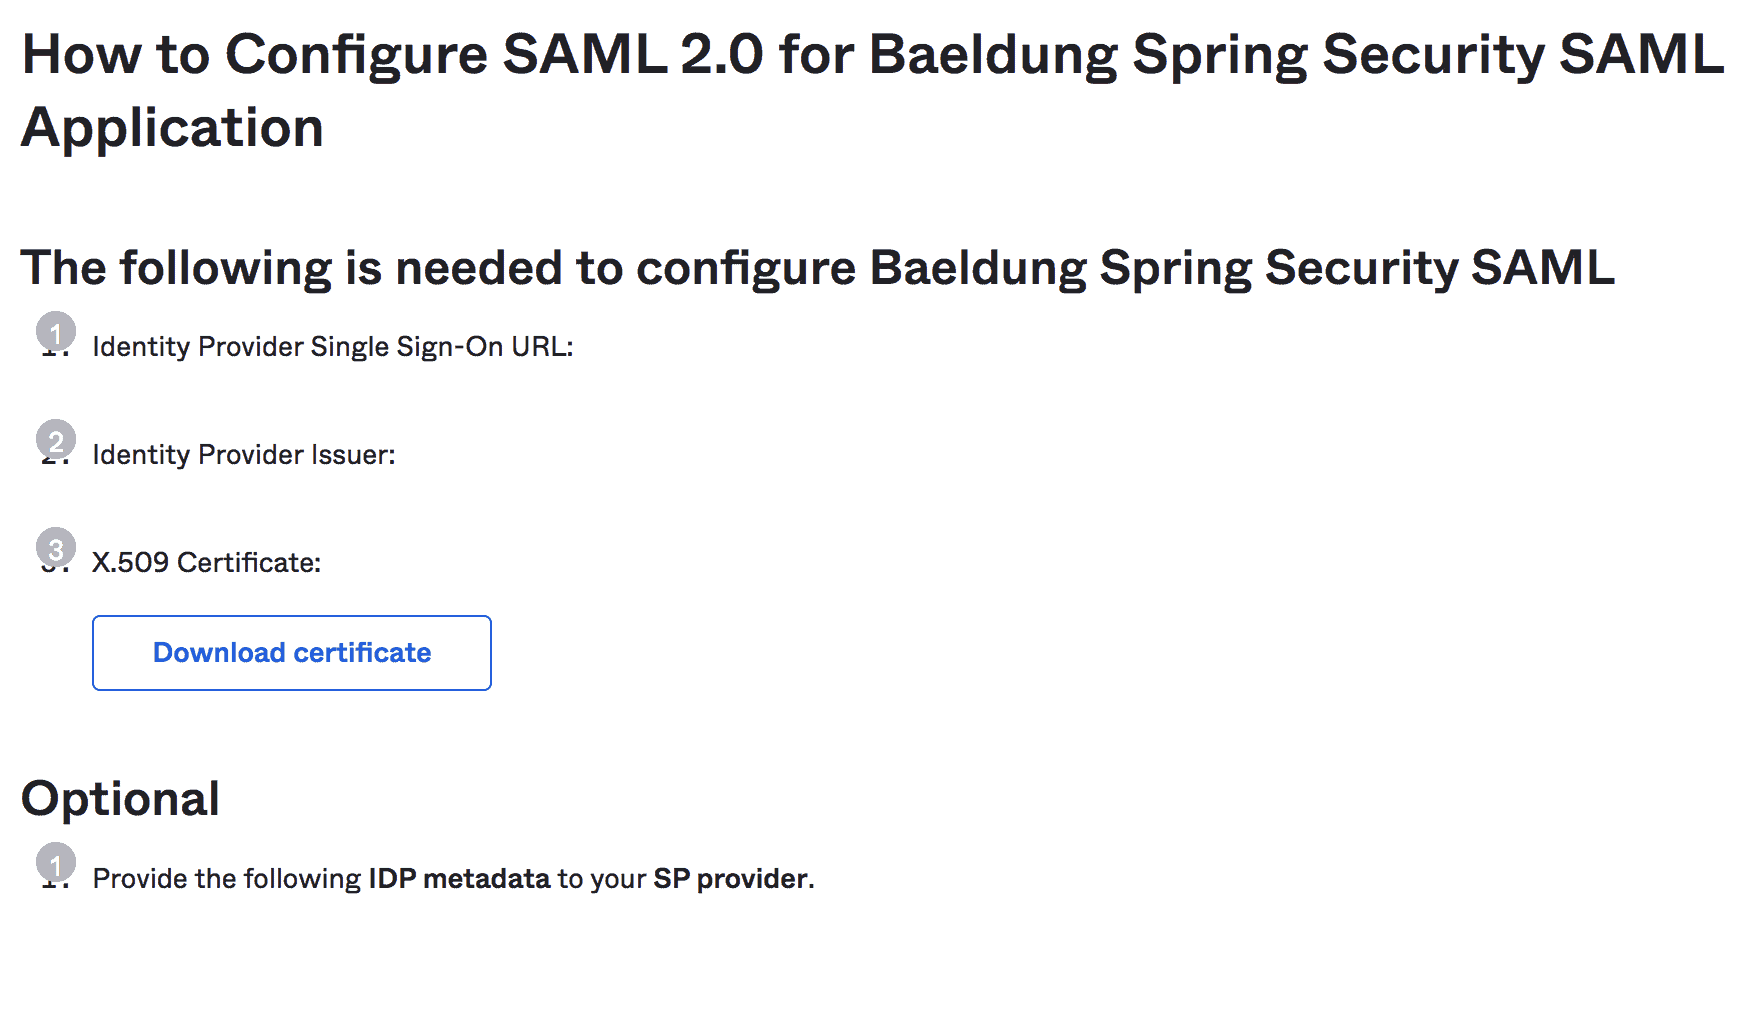
完成之後,我們可以查看 Spring Boot 應用程序的設置説明:
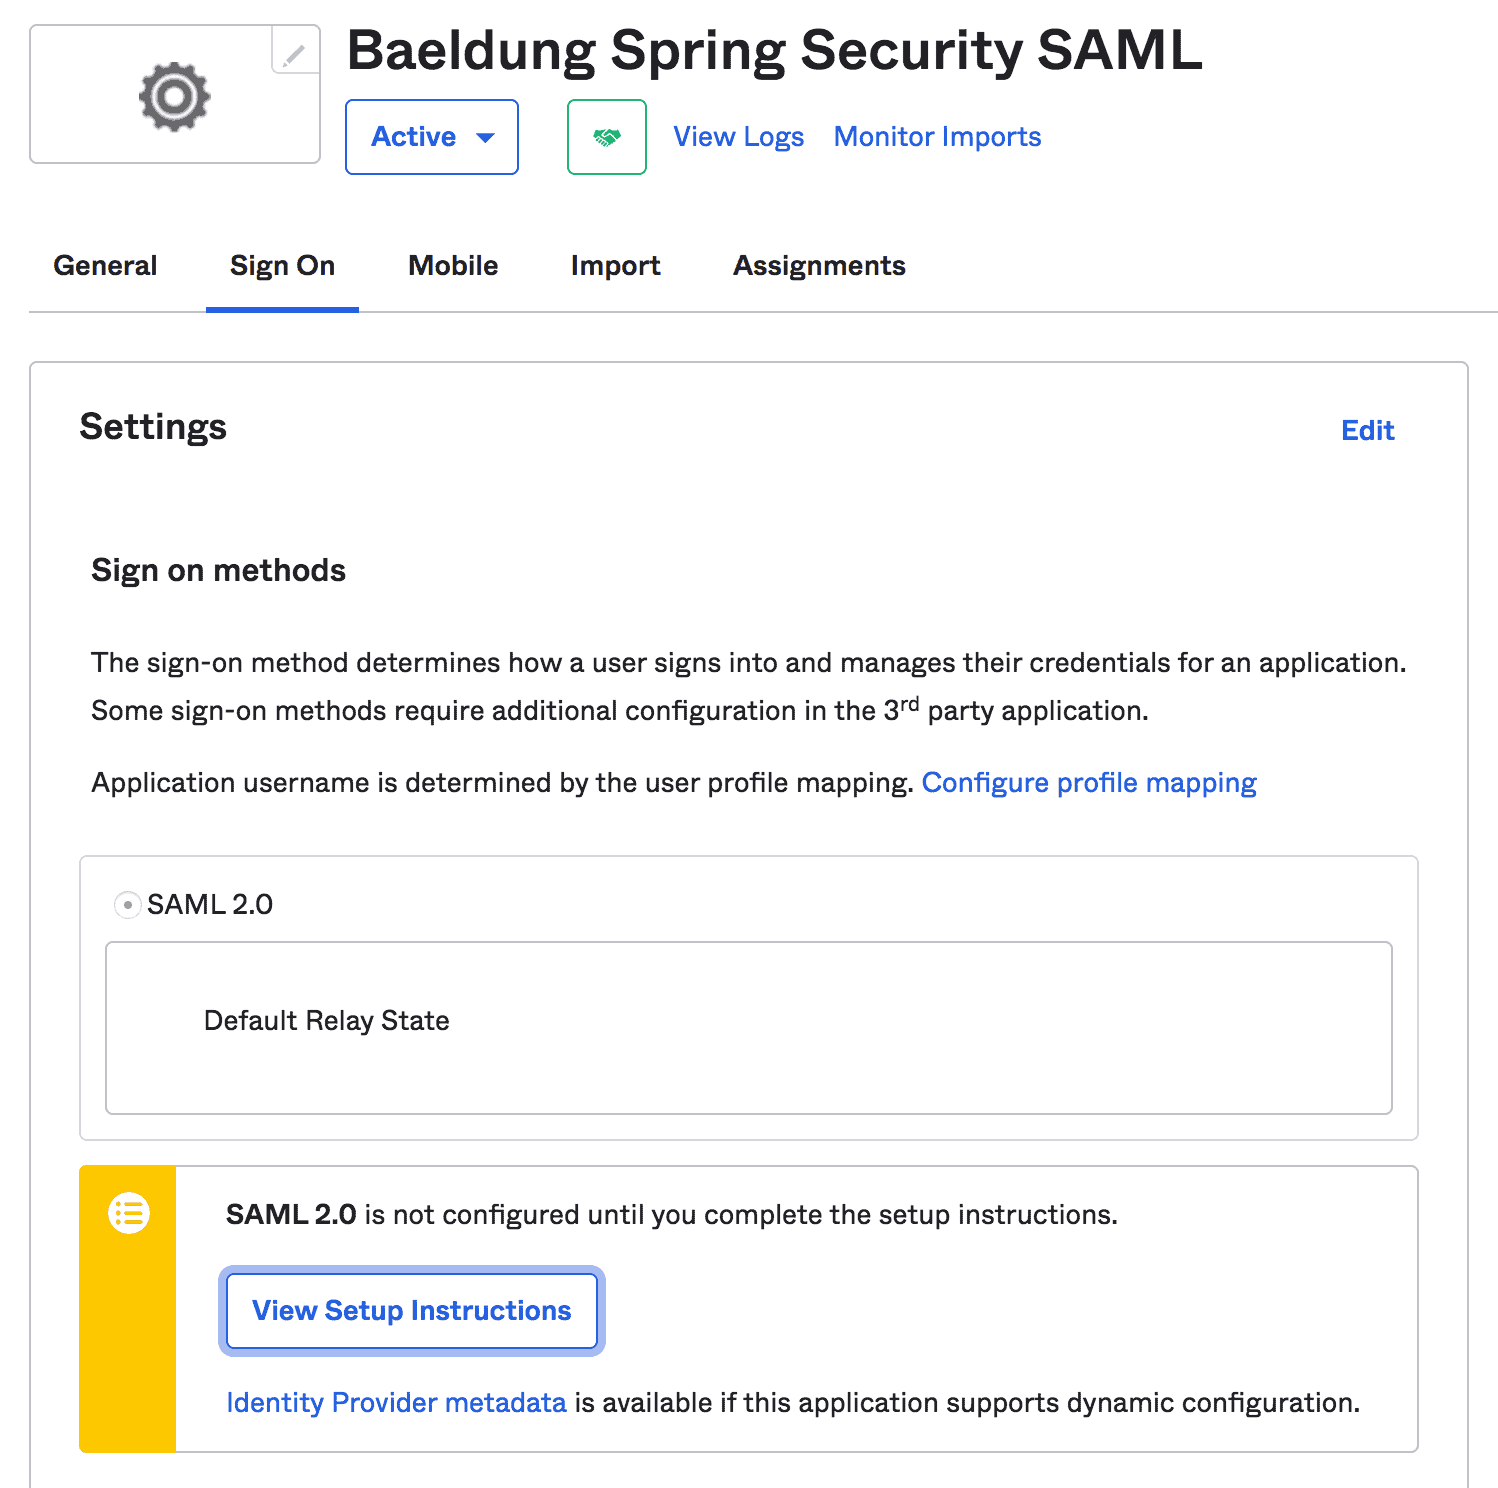
注意:我們應該複製諸如 IdP Issuer URL 和 IdP metadata XML 這樣的説明,這些説明將在 Spring Security 配置中進一步使用:
4. Spring Boot 設置
除了常見的 Maven 依賴,如 spring-boot-starter-web 和 spring-boot-starter-security, 我們還需要 spring-security-saml2-core 依賴:
<dependency>
    <groupId>org.springframework.boot</groupId>
    <artifactId>spring-boot-starter-web</artifactId>
    <version>2.7.2</version>
</dependency>
<dependency>
    <groupId>org.springframework.boot</groupId>
    <artifactId>spring-boot-starter-security</artifactId>
    <version>2.7.2</version>
</dependency>
<dependency>
    <groupId>org.springframework.security.extensions</groupId>
    <artifactId>spring-security-saml2-core</artifactId>
    <version>1.0.10.RELEASE</version>
</dependency>
另外,請確保添加 Shibboleth 倉庫,以便下載 opensaml jar 文件,該文件由 spring-security-saml2-core 依賴項所需:
<repository>
    <id>Shibboleth</id>
    <name>Shibboleth</name>
    <url>https://build.shibboleth.net/nexus/content/repositories/releases/</url>
</repository>
或者,可以在 Gradle 項目中設置依賴項:
compile group: 'org.springframework.boot', name: 'spring-boot-starter-web', version: "2.7.2"
compile group: 'org.springframework.boot', name: 'spring-boot-starter-security', version: "2.7.2"
compile group: 'org.springframework.security.extensions', name: 'spring-security-saml2-core', version: "1.0.10.RELEASE"
5. Spring Security Configuration
Now that we have Okta SAML Setup and Spring Boot project ready, let’s start with the Spring Security configurations required for SAML 2.0 integration with Okta.
5.1. SAML Entry Point
First, we’ll create a bean of the class that will work as an entry point for SAML authentication:
@Bean
public WebSSOProfileOptions defaultWebSSOProfileOptions() {
    WebSSOProfileOptions webSSOProfileOptions = new WebSSOProfileOptions();
    webSSOProfileOptions.setIncludeScoping(false);
    return webSSOProfileOptions;
}

@Bean
public SAMLEntryPoint samlEntryPoint() {
    SAMLEntryPoint samlEntryPoint = new SAMLEntryPoint();
    samlEntryPoint.setDefaultProfileOptions(defaultWebSSOProfileOptions());
    return samlEntryPoint;
}
Here, the > bean allows us to set up parameters of the request sent from SP to IdP asking for user authentication.
5.2. Login and Logout
Next, let’s create a few filters for our SAML URIs like //, //, and />:
@Bean
public FilterChainProxy samlFilter(SAMLProcessingFilter samlProcessingFilter) throws Exception {
    List<SecurityFilterChain> chains = new ArrayList<>();
    chains.add(new DefaultSecurityFilterChain(new AntPathRequestMatcher("/saml/SSO/**"),
        samlProcessingFilter));
    chains.add(new DefaultSecurityFilterChain(new AntPathRequestMatcher("/saml/discovery/**"),
        samlDiscovery()));
    chains.add(new DefaultSecurityFilterChain(new AntPathRequestMatcher("/saml/login/**"),
        samlEntryPoint));
    chains.add(new DefaultSecurityFilterChain(new AntPathRequestMatcher("/saml/logout/**"),
        samlLogoutFilter));
    chains.add(new DefaultSecurityFilterChain(new AntPathRequestMatcher("/saml/SingleLogout/**"),
        samlLogoutProcessingFilter));
    return new FilterChainProxy(chains);
}
Then, we’ll add a few corresponding filters and handlers:
@Bean
public SAMLProcessingFilter samlWebSSOProcessingFilter(AuthenticationManager authenticationManager) {
    SAMLProcessingFilter samlWebSSOProcessingFilter = new SAMLProcessingFilter();
    samlWebSSOProcessingFilter.setAuthenticationManager(authenticationManager);
    samlWebSSOProcessingFilter.setAuthenticationSuccessHandler(samlAuthSuccessHandler);
    samlWebSSOProcessingFilter.setAuthenticationFailureHandler(samlAuthFailureHandler);
    return samlWebSSOProcessingFilter;
}

@Bean
public SAMLDiscovery samlDiscovery() {
    return new SAMLDiscovery();
}

@Bean
public SavedRequestAwareAuthenticationSuccessHandler successRedirectHandler() {
    SavedRequestAwareAuthenticationSuccessHandler successRedirectHandler = new SavedRequestAwareAuthenticationSuccessHandler();
    successRedirectHandler.setDefaultTargetUrl("/home");
    return successRedirectHandler;
}

@Bean
public SimpleUrlAuthenticationFailureHandler authenticationFailureHandler() {
    SimpleUrlAuthenticationFailureHandler failureHandler = new SimpleUrlAuthenticationFailureHandler();
    failureHandler.setUseForward(true);
    failureHandler.setDefaultFailureUrl("/error");
    return failureHandler;
}
So far, we’ve configured the entry point for the authentication (>) and a few filter chains. So, let’s take a deep dive into their details.
When the user tries to log in for the first time, the > will handle the entry request. Then, the > bean (if enabled) will discover the IdP to contact for authentication.
Next, when the user logs in, the IdP redirects the SAML response to the // /, and corresponding > will authenticate the associated auth token.
When successful, the > will redirect the user to the default target URL (>). Otherwise, the > will redirect the user to the > URL.
Last, let’s add the logout handlers for single and global logouts:
@Bean
public SimpleUrlLogoutSuccessHandler successLogoutHandler() {
    SimpleUrlLogoutSuccessHandler successLogoutHandler = new SimpleUrlLogoutSuccessHandler();
    successLogoutHandler.setDefaultTargetUrl("/");
    return successLogoutHandler;
}

@Bean
public SecurityContextLogoutHandler logoutHandler() {
    SecurityContextLogoutHandler logoutHandler = new SecurityContextLogoutHandler();
    logoutHandler.setInvalidateHttpSession(true);
    logoutHandler.setClearAuthentication(true);
    return logoutHandler;
}

@Bean
public SAMLLogoutProcessingFilter samlLogoutProcessingFilter() {
    return new SAMLLogoutProcessingFilter(successLogoutHandler(), logoutHandler());
}

@Bean
public SAMLLogoutFilter samlLogoutFilter() {
    return new SAMLLogoutFilter(successLogoutHandler(),
        new LogoutHandler[] { logoutHandler() },
        new LogoutHandler[] { logoutHandler() });
}
5.3. Metadata Handling
Now, we’ll provide IdP metadata XML to the SP. It’ll help to let our IdP know which SP endpoint it should redirect to once the user is logged in.
So, we’ll configure the bean to enable Spring SAML to handle the metadata:
public MetadataGenerator metadataGenerator() {
    MetadataGenerator metadataGenerator = new MetadataGenerator();
    metadataGenerator.setEntityId(samlAudience);
    metadataGenerator.setExtendedMetadata(extendedMetadata());
    metadataGenerator.setIncludeDiscoveryExtension(false);
    metadataGenerator.setKeyManager(keyManager());
    return metadataGenerator;
}

@Bean
public MetadataGeneratorFilter metadataGeneratorFilter() {
    return new MetadataGeneratorFilter(metadataGenerator());
}

@Bean
public ExtendedMetadata extendedMetadata() {
    ExtendedMetadata extendedMetadata = new ExtendedMetadata();
    extendedMetadata.setIdpDiscoveryEnabled(false);
    return extendedMetadata;
}
The > bean requires an instance of the to encrypt the exchange between SP and IdP:
@Bean
public KeyManager keyManager() {
    DefaultResourceLoader loader = new DefaultResourceLoader();
    Resource storeFile = loader.getResource(samlKeystoreLocation);
    Map<String, String> passwords = new HashMap<>();
    passwords.put(samlKeystoreAlias, samlKeystorePassword);
    return new JKSKeyManager(storeFile, samlKeystorePassword, passwords, samlKeystoreAlias);
}
Here, we have to create and provide a Keystore to the > bean. We can create a self-signed key and Keystore with the JRE command:
keytool -genkeypair -alias baeldungspringsaml -keypass baeldungsamlokta -keystore saml-keystore.jks -keyalg RSA5.4. Implementation
Last, we require a custom implementation of the class to check the instance of the class and set the obtained authorities:
public class CustomSAMLAuthenticationProvider extends SAMLAuthenticationProvider {
    @Override
    public Collection<? extends GrantedAuthority> getEntitlements(SAMLCredential credential, Object userDetail) {
        if (userDetail instanceof ExpiringUsernameAuthenticationToken) {
            List<GrantedAuthority> authorities = new ArrayList<>();
            authorities.addAll(((ExpiringUsernameAuthenticationToken) userDetail).getAuthorities());
            return authorities;
        } else {
            return Collections.emptyList();
        }
    }
}
Also, we should configure the > as a bean in the > class:
@Bean
public SAMLAuthenticationProvider samlAuthenticationProvider() {
    return new CustomSAMLAuthenticationProvider();
}
5.8.
Finally, we’ll configure a basic HTTP security using the already discussed > and :
Bean
public SecurityFilterChain filterChain(HttpSecurity http, SAMLProcessingFilter samlProcessingFilter) throws Exception {
    http.csrf().disable();

    http.httpBasic().authenticationEntryPoint(samlEntryPoint);

    http
      .addFilterBefore(metadataGeneratorFilter(), ChannelProcessingFilter.class)
      .addFilterAfter(samlProcessingFilter, BasicAuthenticationFilter.class)
      .addFilterBefore(samlProcessingFilter, CsrfFilter.class);

    http
      .authorizeRequests()
      .antMatchers("/").permitAll()
      .anyRequest().authenticated();

    http
      .logout()
      .addLogoutHandler((request, response, authentication) -> {
          response.sendRedirect("/saml/logout");
      });

   http.authenticationProvider(samlAuthenticationProvider);
   return http.build();
}
Voila! We finished our Spring Security SAML configuration that allows the user to log in to the IdP and then receive the user’s authentication details in XML format from the IdP. Last, it authenticates the user token to allow access to our web app.
6. HomeController
現在,我們的 Spring Security SAML 配置已就緒,以及 Okta 開發者帳户設置完成,我們可以設置一個簡單的控制器來提供一個登陸頁面和主頁。
6.1. Index and Auth Mapping
首先,讓我們為默認目標 URI</em translate="true">(/)和 /auth URI 添加映射:
@RequestMapping("/")
public String index() {
    return "index";
}

@GetMapping(value = "/auth")
public String handleSamlAuth() {
    Authentication auth = SecurityContextHolder.getContext().getAuthentication();
    if (auth != null) {
        return "redirect:/home";
    } else {
        return "/";
    }
}
然後,我們將添加一個簡單的 index.html,允許用户使用 login鏈接使用 Okta SAML 身份驗證進行重定向:
<!doctype html>
<html>
<head>
<title>Baeldung Spring Security SAML</title>
</head>
<body>
<h3><Strong>歡迎使用 Baeldung Spring Security SAML</strong></h3>
<a th:href="@{/auth}">Login</a>
</body>
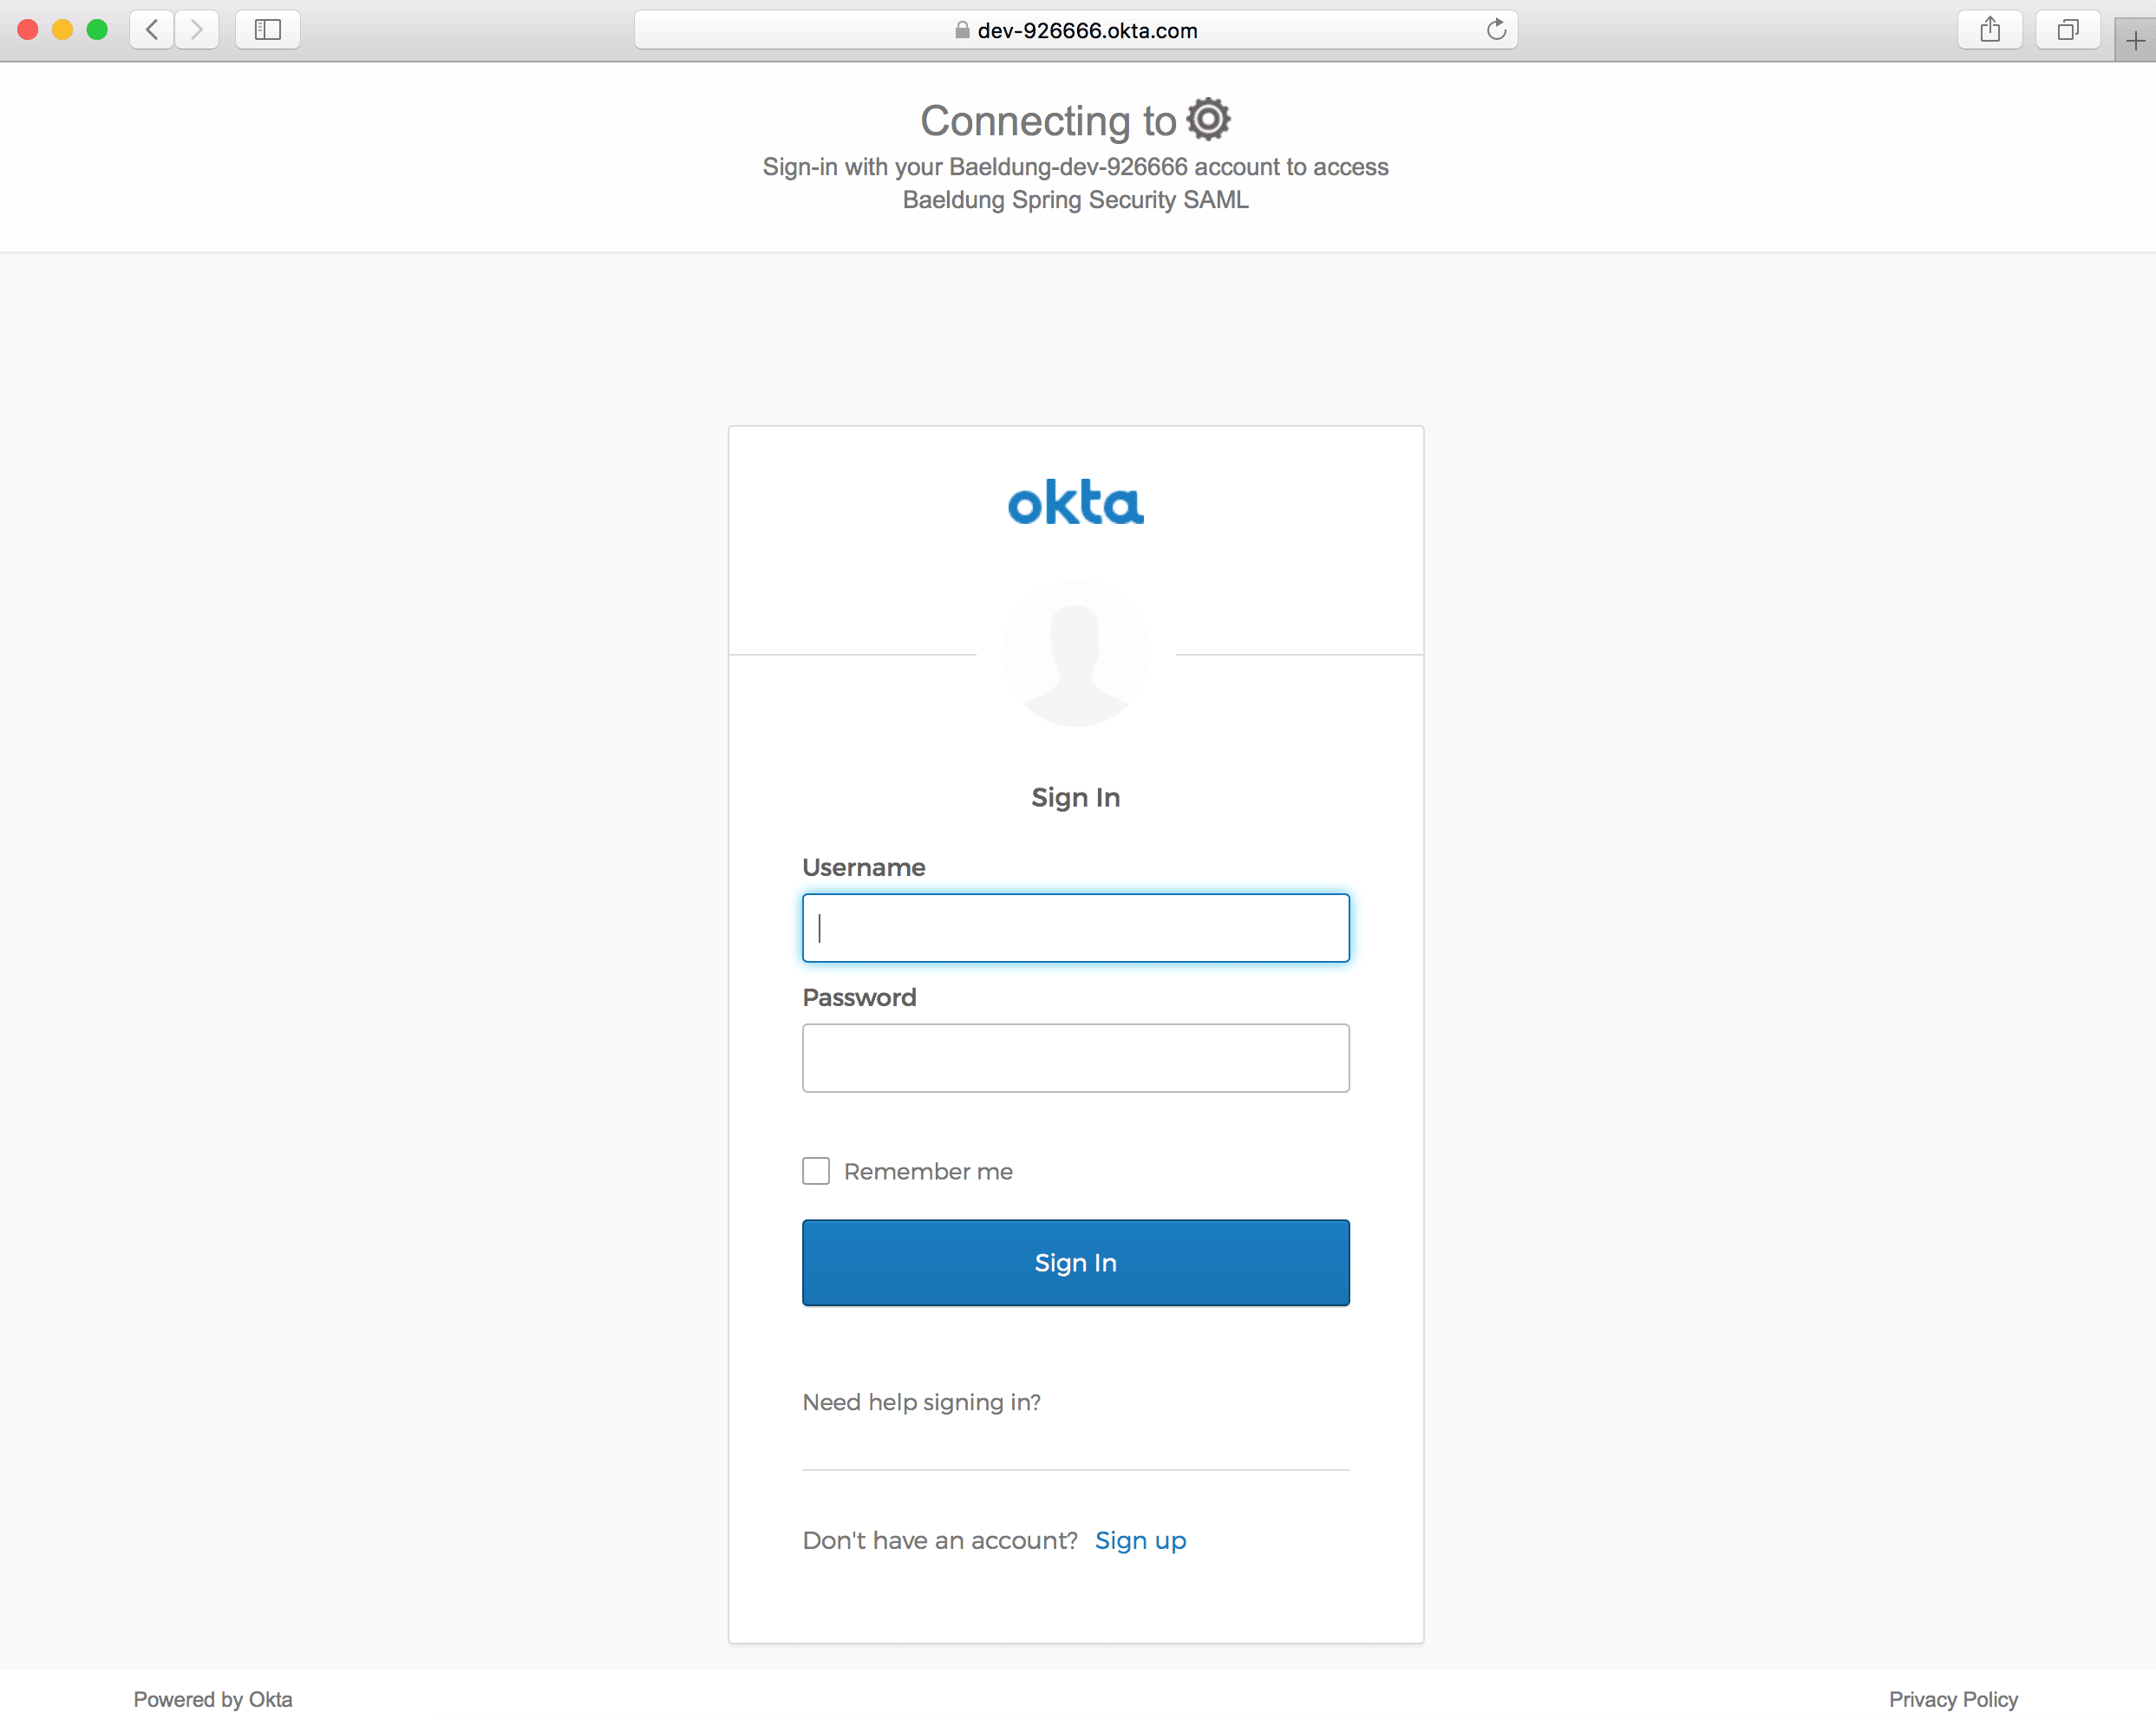
</html>現在,我們已準備好運行我們的 Spring Boot App 並通過 http://localhost:8080/ 訪問它:

Okta 登錄頁面應在單擊 Login鏈接時打開:
6.2. Home Page
接下來,讓我們為 /home URI 添加映射,以在成功身份驗證時重定向用户:
@RequestMapping("/home")
public String home(Model model) {
    Authentication authentication = SecurityContextHolder.getContext().getAuthentication();
    model.addAttribute("username", authentication.getPrincipal());
    return "home";
}
此外,我們將添加 home.html,以顯示已登錄的用户和註銷鏈接:
<!doctype html>
<html>
<head>
<title>Baeldung Spring Security SAML: Home</title>
</head>
<body>
    <h3><Strong>歡迎!</strong><br/>您已成功登錄!</h3>
    <p>您已登錄為 <span th:text="${username}">null</span>.</p>
    <small>
        <a th:href="@{/logout}">Logout</a>
    </small>
</body>
</html>
成功登錄後,我們應該看到主頁:

7. 結論
在本教程中,我們討論了 Spring Security 與 Okta 的 SAML 集成。
首先,我們設置了一個 Okta 開發者帳户,並啓用了 SAML 2.0 Web 集成。然後,我們創建了一個 Spring Boot 項目,並添加了所需的 Maven 依賴項。
接下來,我們完成了 Spring Security SAML 的所有 所需設置,包括 samlEntryPoint、samlFilter、元數據處理和 SAML 處理器。
最後,我們創建了一個控制器和一些頁面,如 index 和 home,以測試我們與 Okta 的 SAML 集成。
